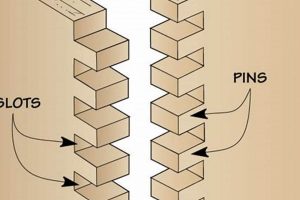
This method of joining wood utilizes a series of interlocking, precisely cut “fingers” that mesh together, creating a strong and visually appealing bond. Often employed to extend the length of lumber or create wide panels, this technique maximizes surface area for adhesive application, resulting in a robust connection. For example, a short piece of hardwood can be connected to another to create a longer furniture component.
The advantages of this particular joint include its enhanced strength compared to butt joints, efficient use of material, and increased glue surface, contributing to a durable and long-lasting bond. Historically, the technique has been favored in various woodworking applications due to its reliability and ability to utilize shorter, potentially waste material, reducing overall lumber costs. It ensures structural integrity in projects ranging from furniture construction to architectural millwork.
The following sections will delve into the specific processes involved in creating this connection, explore the tools and machinery required, and examine the common applications where it is optimally utilized. The discussion will also cover factors influencing joint strength and considerations for achieving precise and aesthetically pleasing results.
Essential Tips for Robust Finger Joints
Achieving optimal results in finger jointing requires attention to detail and adherence to established best practices. Consistent execution ensures both the structural integrity and aesthetic quality of the finished product.
Tip 1: Wood Selection Matters: Choose compatible wood species with similar densities and moisture content. This minimizes differential expansion and contraction, preventing joint failure over time. For example, avoid joining a very soft wood to a dense hardwood.
Tip 2: Precision is Paramount: Accurate machining of the finger profiles is crucial. Utilize sharp cutting tools and calibrated machinery to ensure tight-fitting joints. An imprecise cut compromises glue surface and weakens the bond.
Tip 3: Maximize Glue Surface: Even glue distribution is vital for a strong joint. Apply a thin, consistent layer of high-quality wood glue to all mating surfaces. Clamping pressure ensures intimate contact and optimal adhesion.
Tip 4: Clamping Strategy is Key: Employ adequate clamping pressure to close the joint fully during the glue drying process. Use multiple clamps strategically positioned to distribute pressure evenly along the joint’s length. Avoid over-clamping, which can starve the joint of adhesive.
Tip 5: Grain Orientation Considerations: When joining multiple boards, carefully consider the grain orientation. Alternating grain patterns minimizes warping and cupping in the finished panel. This is particularly important for wider panels.
Tip 6: Dry Fit Before Gluing: Always perform a dry fit to verify the accuracy of the joint and ensure proper alignment. This allows for corrections before the irreversible step of applying adhesive.
Tip 7: Allow Adequate Curing Time: Adhere to the glue manufacturer’s recommended curing time before removing clamps and subjecting the joint to stress. Premature removal can compromise the bond’s integrity.
Implementing these techniques promotes strong, durable, and visually appealing finger joints. Consistent application of these principles will significantly enhance the quality and longevity of woodworking projects.
The subsequent sections will explore potential issues and troubleshooting techniques for mitigating common challenges encountered during this process.
1. Joint Strength
Joint strength is a primary factor in evaluating the efficacy of any wood joining technique. In the context of finger jointing, it represents the capacity of the joint to withstand tensile, compressive, and shear forces without failure. A robust joint ensures the longevity and structural integrity of the assembled component or project.
- Surface Area Maximization
The design of the finger joint inherently maximizes the glue surface area compared to simpler joints like butt joints. This increased surface area allows for a greater bonding potential, as the adhesive can establish a stronger connection between the wood fibers. This is particularly critical in applications where the joint is subject to substantial stress, such as in load-bearing furniture components.
- Interlocking Mechanical Bond
Beyond adhesive bonding, the interlocking “fingers” themselves contribute to joint strength. This mechanical interlock provides resistance to slippage and separation, even before the glue has fully cured. This feature is particularly beneficial in situations where the joint is subjected to impact or vibration, providing an additional layer of security.
- Glue Type and Application
The choice of adhesive significantly impacts joint strength. Polyvinyl acetate (PVA) glues are common, but epoxy or polyurethane adhesives may be preferred for specific applications requiring increased water resistance or higher strength. Furthermore, proper glue application is crucial; a thin, even layer ensures full contact between the wood surfaces, while excessive glue can weaken the joint by preventing complete wood-to-wood contact. Clamping pressure must also be sufficient to create a strong bond.
- Wood Species Compatibility
The species of wood being joined influences the joint’s overall strength. Combining wood species with significantly different densities or expansion/contraction rates can compromise the joint over time, leading to stress fractures and potential failure. Matching wood species or using those with similar properties is crucial for long-term durability. The wood’s porosity will also affect how well the adhesive is absorbed.
The confluence of surface area, mechanical interlock, adhesive properties, and wood compatibility collectively dictates the resultant joint strength. When correctly executed, finger joints provide a robust and reliable method for joining wood, enabling the creation of durable and long-lasting structures. Understanding these factors is paramount for woodworkers seeking to optimize the performance of their creations.
2. Wood Selection
The selection of appropriate wood species is paramount to the successful execution and longevity of finger joint woodworking. The characteristics inherent to various wood types directly influence the strength, stability, and aesthetic qualities of the resultant joint.
- Species Compatibility
Combining dissimilar wood species can induce stress within the joint due to differential expansion and contraction rates. For instance, pairing a dense hardwood like maple with a soft wood such as pine may lead to joint failure over time as environmental conditions fluctuate. Selecting woods with similar densities and moisture content is crucial for minimizing internal stresses.
- Grain Orientation
Proper alignment of grain patterns significantly impacts the joint’s resistance to warping and cupping. In wide panels created through finger jointing, alternating the grain direction of adjacent boards minimizes the cumulative effects of wood movement, preserving the panel’s flatness and structural integrity. This is especially pertinent in applications where dimensional stability is critical, such as tabletops and cabinet doors.
- Wood Density and Porosity
Wood density influences the joint’s overall strength, with denser woods generally providing a more robust connection. However, the porosity of the wood also affects glue absorption and bond strength. Highly porous woods may require more adhesive, while excessively dense woods may limit glue penetration. Careful consideration of both density and porosity is necessary for optimal adhesive bonding.
- Aesthetic Considerations
Wood selection also contributes to the visual appeal of the finished piece. Matching wood colors and grain patterns across multiple boards creates a harmonious and cohesive appearance. Conversely, intentionally contrasting different wood species can be used to create visually striking and unique designs. The final choice depends on the desired aesthetic outcome of the woodworking project.
In summary, informed wood selection is integral to achieving strong, stable, and aesthetically pleasing finger joints. Thoughtful consideration of species compatibility, grain orientation, density, porosity, and aesthetic goals ensures a durable and visually appealing outcome in finger joint woodworking applications.
3. Precision Machining
The creation of a successful finger joint relies fundamentally on precision machining. It is the antecedent cause to the desired effect of a strong and aesthetically pleasing wood joint. Deviations from accurate dimensions and angles directly compromise the integrity of the union. For example, if the “fingers” are not cut with consistent width and spacing, the resulting joint will exhibit gaps and reduced surface area for adhesive application, thereby diminishing its strength.
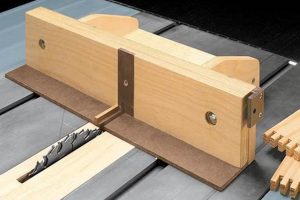
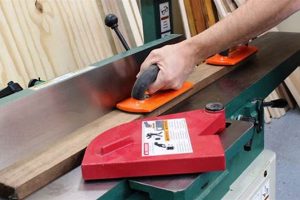
Precision machining’s importance becomes particularly evident when considering large-scale production or projects demanding high levels of uniformity. Whether using a router, a specialized finger jointing machine, or a table saw with a jig, maintaining tight tolerances is non-negotiable. Even minor errors, compounded across multiple joints, can lead to significant discrepancies in the final dimensions of the assembled piece. The practical significance of this understanding lies in the ability to predict and control the quality of the finished product, reducing material waste and labor costs associated with rework. Imagine constructing a series of identical cabinet doors; inconsistent finger joint machining would result in doors of varying sizes, rendering them unusable.
In conclusion, precision machining is not merely a step in the finger jointing process; it is the cornerstone upon which the success of the technique rests. Addressing the challenges associated with achieving and maintaining accuracy, through the use of calibrated equipment and skilled craftsmanship, ensures that finger joints can fulfill their intended purpose: providing strong, reliable, and visually appealing connections in woodworking applications.
4. Adhesive Application
Adhesive application is critical to the integrity and longevity of a finger joint. It serves as the primary bonding agent between the interlocking fingers, distributing stress and preventing joint failure under load. Proper technique and adhesive selection are therefore paramount to the successful utilization of this jointing method.
- Surface Preparation and Compatibility
The wood surface must be clean and free of contaminants, such as dust, oil, or loose fibers, to ensure optimal adhesive adhesion. Furthermore, the selected adhesive must be compatible with the wood species being joined. For instance, oily hardwoods may require surface preparation with a solvent to promote adequate bonding. Failure to address these considerations can result in a weak or unreliable joint.
- Adhesive Type and Viscosity
Various adhesives are suitable for finger jointing, each with distinct properties. Polyvinyl acetate (PVA) glues are commonly used for their ease of application and strong bond strength in interior applications. However, for exterior applications or situations requiring enhanced water resistance, polyurethane or epoxy adhesives may be more appropriate. The viscosity of the adhesive is also important; a glue that is too thin may not provide adequate gap filling, while one that is too thick may be difficult to spread evenly.
- Application Technique and Coverage
Uniform adhesive coverage is essential for maximizing bond strength. A thin, consistent layer of glue should be applied to all mating surfaces of the fingers. Over-application of adhesive can lead to glue starvation when the joint is clamped, as excess glue is squeezed out, leaving insufficient adhesive to form a strong bond. Conversely, insufficient adhesive coverage will result in weak points within the joint. The glue should be applied using a brush, roller, or applicator bottle to ensure consistent coverage.
- Open Time and Curing Process
Adhesive open time, the period during which the glue remains workable before it begins to set, must be considered. The joint should be assembled and clamped within the adhesive’s open time window to ensure proper bonding. Adequate clamping pressure is crucial for forcing the adhesive into the wood fibers and creating intimate contact between the mating surfaces. The joint must then be allowed to cure undisturbed for the recommended duration to achieve full bond strength.
In conclusion, adhesive application is not merely a perfunctory step but a fundamental aspect of finger joint woodworking. The careful consideration of surface preparation, adhesive selection, application technique, and curing process is critical for maximizing joint strength and ensuring the long-term durability of the finished product. Neglecting these details undermines the potential advantages of this joining method.
5. Clamping Pressure
Clamping pressure exerts a direct influence on the integrity of finger joints. Inadequate pressure results in diminished contact between the interlocking fingers, compromising the adhesive bond. Excessive pressure, conversely, may starve the joint of adhesive, leading to a similarly weakened connection. The objective, therefore, is to apply sufficient and uniform pressure to ensure intimate contact without expelling all of the adhesive from the joint. Consider a scenario in furniture construction: insufficient clamping of a finger-jointed table leg may lead to joint failure under load, whereas over-clamping can result in a brittle joint due to a lack of adhesive.
Achieving optimal clamping pressure necessitates careful consideration of several factors, including the type of adhesive used, the wood species, and the joint geometry. Softer woods, for example, require less clamping pressure than denser hardwoods to achieve proper adhesive penetration. Similarly, adhesives with higher viscosities may require more clamping force to ensure even distribution within the joint. Strategically placed clamps, applying force evenly along the entire length of the joint, are essential for preventing localized areas of insufficient or excessive pressure. For instance, when joining two boards to create a wider panel, clamps should be spaced at regular intervals to ensure consistent pressure across the entire surface.
In summary, proper clamping pressure represents a critical component of successful finger joint woodworking. Striking a balance between adequate contact and adhesive retention is paramount to achieving a strong and durable joint. Understanding the interplay between clamping force, adhesive properties, and wood characteristics enables woodworkers to optimize the performance of finger joints in a variety of applications. Failure to properly control clamping pressure can negate the benefits of precise machining and quality adhesive, leading to premature joint failure and compromised structural integrity.
Frequently Asked Questions About Finger Joint Woodworking
The following addresses common inquiries regarding the process, applications, and limitations of finger joint woodworking. The aim is to provide clear and concise answers to pertinent questions frequently encountered in woodworking practice.
Question 1: What is the primary advantage of finger jointing compared to other wood joining methods?
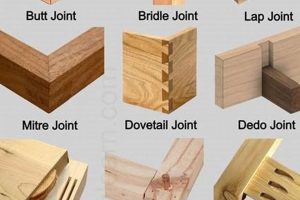
The primary advantage lies in the maximized glue surface area, resulting in superior joint strength compared to simpler joinery techniques such as butt joints. This increased surface area allows for a stronger adhesive bond, enhancing the overall structural integrity of the assembled component.
Question 2: Are there specific wood species that are unsuitable for finger jointing?
While most wood species can be finger jointed, combining woods with significantly different densities and expansion/contraction rates is generally discouraged. This disparity can induce stress within the joint over time, potentially leading to failure. Selecting compatible species with similar properties is recommended.
Question 3: How crucial is precision in cutting the finger profiles?
Precision is paramount. Inaccurate finger profiles result in gaps, reduced glue surface, and diminished joint strength. Utilizing sharp, well-maintained cutting tools and calibrated machinery is essential for achieving tight-fitting and robust joints.
Question 4: Is specialized machinery required for creating finger joints?
While specialized finger jointing machines exist for high-volume production, finger joints can also be created using a table saw with a dedicated jig or a router. The choice of method depends on the scale of the project and the desired level of precision.
Question 5: Can finger joints be used in exterior applications?
Yes, but the choice of adhesive is critical. Polyvinyl acetate (PVA) glues are generally not suitable for exterior use due to their limited water resistance. Polyurethane or epoxy adhesives, which offer enhanced water resistance, are recommended for exterior applications.
Question 6: Does the orientation of the wood grain affect the strength of the finger joint?
Yes, particularly when joining multiple boards to create wide panels. Alternating the grain direction minimizes warping and cupping, enhancing the panel’s stability and longevity. This is especially important in applications where dimensional stability is critical.
Finger joint woodworking’s effectiveness hinges upon meticulous execution, appropriate material selection, and a thorough understanding of the factors influencing joint strength. Adherence to best practices ensures a reliable and aesthetically pleasing outcome.
The following article sections will discuss techniques for troubleshooting common problems and provide guidance on best practices.
Conclusion
This exploration of finger joint woodworking has illuminated the key factors influencing its success: precise machining, appropriate material selection, meticulous adhesive application, and controlled clamping pressure. These elements, when properly managed, converge to create a robust and reliable method for joining wood, enhancing the structural integrity and longevity of woodworking projects.
The continued refinement of finger joint woodworking techniques and the development of advanced adhesives promise further advancements in wood joinery. Its inherent strength and efficient material use position it as a vital technique for both small-scale artisans and large-scale industrial applications. Understanding and mastering this process remains essential for anyone seeking to create durable and aesthetically pleasing wood constructions.


