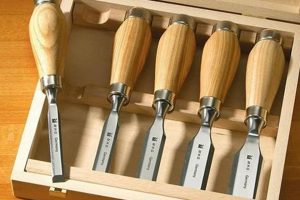
Implements designed to pare thin layers from timber, altering its form and smoothing its surface, represent a core element of woodworking. These tools, manipulated by hand, offer precision and control in refining stock to desired dimensions. A common example includes the hand plane, which features a blade set within a rigid body to consistently peel away material.
The utility of these devices extends beyond mere dimensional accuracy. They allow artisans to create complex profiles, prepare surfaces for finishing, and achieve superior fits in joinery. Their long history reflects a continuous refinement of design, with variations tailored to specific tasks and wood types. The mastery of these tools signifies a high level of craftsmanship.
The following sections will delve into specific types of these instruments, exploring their individual applications and techniques for effective use. We will examine factors affecting performance, such as blade sharpness and tool adjustment, providing insights into achieving optimal results in various woodworking scenarios.
Essential Techniques for Using Wood Shaping Hand Tools
Optimizing performance requires diligent attention to both tool preparation and operational technique. Consistent application of these strategies will improve efficiency and the quality of finished work.
Tip 1: Prioritize Blade Sharpness: A keen cutting edge is paramount. Dull blades require excessive force, leading to uneven surfaces and potential tear-out. Regularly hone and strop blades to maintain optimal sharpness.
Tip 2: Accurate Tool Adjustment: Proper blade projection and lateral adjustment are critical for consistent shaving thickness and uniform cuts. Adjust the tool until the desired shaving is achieved, testing on scrap material.
Tip 3: Grain Direction Awareness: Understanding wood grain is essential to prevent tear-out. Work with the grain whenever possible, particularly when finishing surfaces.
Tip 4: Secure Workpiece Fixturing: A stable workpiece is crucial for controlled cutting. Utilize appropriate clamping or work-holding devices to prevent movement during tool use.
Tip 5: Controlled Tool Movement: Apply even pressure and maintain a consistent angle throughout the stroke. Avoid jerky or abrupt movements that can result in gouges or uneven surfaces.
Tip 6: Regular Tool Maintenance: Clean tools after each use to prevent corrosion and damage. Periodically check for loose parts and lubricate moving components to ensure smooth operation.
These techniques emphasize the importance of careful preparation and deliberate action. Mastering these principles enhances control, precision, and ultimately, the quality of woodworking projects.
The following sections will explore specific woodworking project examples.
1. Blade Sharpness
Blade sharpness is a primary determinant of performance in woodworking hand tools designed to shape wood by removing shavings. The keenness of the cutting edge directly affects the efficiency and quality of the shaping process. A dull blade compromises precision and necessitates increased force, leading to suboptimal results.
- Cutting Efficiency
A sharp blade severs wood fibers cleanly with minimal effort. This efficiency reduces user fatigue and allows for consistent shaving thickness. In contrast, a dull blade tears or crushes the wood fibers, demanding greater force and resulting in uneven surfaces. The difference is analogous to using a surgical scalpel versus a butter knife.
- Surface Quality
The sharpness of the blade directly influences the final surface finish. A razor-sharp edge produces a smooth, polished surface, minimizing the need for subsequent sanding or refining. A dull blade leaves a rough, uneven surface characterized by tear-out, requiring extensive remediation to achieve a desirable finish.
- Tool Control
A sharp blade enhances control over the tool, enabling precise and predictable cuts. The user can guide the tool with confidence, knowing that it will respond predictably to applied pressure and direction. A dull blade introduces uncertainty, making it difficult to maintain a consistent cutting path and increasing the risk of errors.
- Safety Considerations
Paradoxically, a sharp blade is often safer than a dull one. A sharp blade requires less force, reducing the likelihood of slippage or uncontrolled movements. A dull blade necessitates excessive force, increasing the risk of losing control and potentially causing injury. Maintaining a sharp cutting edge is thus essential for safe and effective woodworking.
In summary, blade sharpness is not merely a desirable attribute but a fundamental requirement for effective use of hand tools in shaping wood. It affects cutting efficiency, surface quality, tool control, and user safety. Maintaining a keen cutting edge is therefore paramount for achieving optimal results in woodworking.
2. Tool Adjustment
The proper adjustment of a hand tool designed to shape wood by removing shavings directly influences its performance and the quality of the resulting surface. Adjustment refers to the precise calibration of the tool’s components, primarily the blade’s projection and alignment relative to the tool’s body or sole. Incorrect adjustment leads to inefficient cutting, uneven surfaces, and potential damage to the workpiece.
For instance, in a hand plane, blade projection determines the thickness of the shaving removed. Too much projection results in aggressive cutting, requiring excessive force and potentially causing tear-out. Insufficient projection leads to minimal material removal, making the process tedious and ineffective. Lateral adjustment ensures the blade’s cutting edge is parallel to the sole, preventing uneven cuts where one side removes more material than the other. A skewed blade can create ridges and an inconsistent surface. Similarly, in a spokeshave, adjusting the blade depth controls the amount of material removed when shaping curved surfaces. Accurate settings are vital for achieving the desired profile without creating facets or irregularities.
Understanding the connection between adjustment and performance is crucial for effective use of these tools. Mastery of adjustment techniques enables woodworkers to achieve predictable and consistent results. Furthermore, the ability to fine-tune tool settings allows for adaptation to different wood types and specific project requirements, contributing to the overall precision and control inherent in hand woodworking.
3. Grain direction
The orientation of wood fibers, known as grain direction, significantly impacts the behavior of woodworking hand tools designed to shape wood by removing shavings. Understanding this relationship is essential for achieving clean cuts and preventing defects.
- Cutting with the Grain
Cutting with the grain, also referred to as cutting along the grain, involves orienting the tool’s cutting edge parallel to the direction of the wood fibers. This approach typically results in a smooth, clean cut as the blade severs the fibers without tearing or lifting them. For example, planing a board along the grain typically yields a smooth surface, suitable for finishing.
- Cutting Against the Grain
Cutting against the grain involves orienting the tool’s cutting edge perpendicular or at an angle to the wood fibers. This approach often leads to tear-out, where fibers are lifted and fractured, resulting in a rough or uneven surface. Attempting to plane against the grain often produces a series of small chips rather than a continuous shaving.
- Recognizing Grain Direction
The direction of wood grain is visually apparent through the arrangement of pores and growth rings. In most cases, following the angle of these visual cues indicates the direction of the grain. However, irregularities such as knots or changes in the wood’s growth pattern can complicate the determination of grain direction. Experience and careful observation are often necessary to accurately assess grain direction in complex situations.
- Mitigating Tear-Out
Techniques exist to minimize tear-out when cutting against the grain is unavoidable. One strategy involves using a very sharp blade and taking light cuts. Another is to dampen the wood surface slightly to soften the fibers. Back beveling the blade on hand planes can also reduce tear-out by altering the cutting angle.
The interaction between grain direction and the application of woodworking hand tools directly affects the outcome of any shaping operation. By understanding and accounting for grain direction, woodworkers can optimize tool performance and minimize defects in their finished pieces.
4. Surface smoothness
The achievement of surface smoothness constitutes a critical objective in woodworking, frequently attained through the use of hand tools designed to shape wood by removing shavings. The efficacy of these tools in producing a refined surface directly influences the aesthetic quality, functionality, and longevity of the finished product. A smooth surface allows for uniform adhesion of finishes like paint or varnish, prevents the accumulation of dirt and moisture, and enhances the tactile experience. For instance, a meticulously planed tabletop exhibits a lustrous sheen when finished, in contrast to a rough-sanded surface that may appear dull and uneven. This underscores surface smoothness’s contribution to quality.
The process of achieving surface smoothness involves a systematic reduction of irregularities through controlled material removal. Tools such as hand planes, scrapers, and smoothing planes are employed to eliminate imperfections, such as plane tracks, tear-out, or mill marks. The skill of the woodworker, combined with the precision of the tool, determines the level of surface refinement achieved. An example of this is the use of a smoothing plane after coarser planes to remove any remaining imperfections left behind by the previous tools. This step is essential in preparing the wood for staining or varnishing, which would otherwise accentuate the imperfections. The careful use of these tools minimizes the need for abrasive methods, preserving the wood’s natural character.
In conclusion, the pursuit of surface smoothness through the application of hand tools represents a fundamental aspect of fine woodworking. The resulting tactile and visual refinement enhances the value and utility of wooden objects. The attainment of surface smoothness demands precision, skill, and a thorough understanding of both the tools and the wood itself, embodying the essence of the craft. Challenges in achieving surface smoothness might include dealing with figured grain or difficult wood species, requiring specialized techniques. The understanding of this relation is part of a broader theme about quality control in woodworking.
5. Material control
Material control, in the context of hand tool woodworking utilizing shaving removal, refers to the precision and predictability with which a craftsman can manipulate the dimensions and form of wood. It is a critical aspect of achieving desired outcomes in woodworking projects, directly influencing the accuracy of joinery, the quality of surface finishes, and the overall aesthetic appeal of the finished piece.
- Depth of Cut Regulation
The capacity to regulate the depth of cut is fundamental to material control. Tools such as hand planes and spokeshaves allow for incremental adjustments to blade projection, enabling the removal of precise amounts of material. Insufficient control leads to inefficient shaping or, conversely, the removal of excessive material, compromising dimensional accuracy. A properly adjusted hand plane, for instance, permits the removal of shavings as thin as a few thousandths of an inch, enabling fine-tuning of a surface to exacting specifications.
- Lateral Dimension Management
Material control extends to managing lateral dimensions, ensuring consistent width and thickness across a workpiece. Tools like marking gauges and precision squares establish reference lines, while hand planes and chisels are used to remove material up to those lines. Deviations from intended dimensions can result in joinery failures or aesthetically unpleasing asymmetry. Careful adherence to established dimensions, guided by accurate layout tools, is crucial for achieving intended forms.
- Surface Angle Precision
Achieving accurate surface angles is another key component. Bevel gauges and protractors are used to establish desired angles, which are then transferred to the workpiece. Hand planes and chisels are used to shape the wood to these angles. Inaccurate angles can compromise the structural integrity of joinery or create visual distortions. Precise angle control is particularly important in complex joinery, such as dovetails or mortise-and-tenon joints.
- Form Replication Accuracy
Material control is essential for replicating specific forms or profiles. Templates and patterns are often used to guide the shaping process, with hand tools employed to remove material up to the template’s edge. The ability to consistently reproduce a complex curve or profile is a testament to the craftsman’s skill and their command of the tools. This is exemplified in the creation of curved furniture components, where templates are used to guide the shaping of legs, arms, or backrests.
These facets highlight the intimate relationship between material control and the effectiveness of hand tools that remove wood by shaving. The capacity to manage depth of cut, lateral dimensions, surface angles, and form replication directly impacts the quality and precision of woodworking endeavors. A woodworker’s skill in material control ultimately determines their ability to translate a design concept into a tangible, well-executed object.
6. Ergonomic design
Ergonomic design, when applied to woodworking hand tools that shape wood by removing shavings, directly influences the efficiency, safety, and long-term physical well-being of the user. The repetitive motions and sustained force often required in woodworking can lead to musculoskeletal disorders if tools are not designed to minimize strain. Therefore, the shape, weight, and balance of these tools are critical design considerations. A poorly designed tool necessitates increased force to achieve the same result, leading to fatigue and a higher risk of injury. For example, a hand plane with an awkwardly shaped handle requires the user to maintain an unnatural wrist position, increasing the likelihood of carpal tunnel syndrome.
Ergonomic principles applied to these tools often manifest in several ways. Handle shapes are contoured to fit comfortably in the hand, distributing pressure evenly and reducing stress points. Weight is carefully balanced to minimize wrist strain. Materials are selected for their shock-absorbing properties, dampening vibrations that can contribute to fatigue. Furthermore, the tool’s overall form should facilitate a natural and efficient workflow. A spokeshave with adjustable handles, for example, allows users to tailor the grip to their hand size and the specific task, promoting comfort and control during prolonged use. The evolution of tool design often reflects a growing awareness of these ergonomic factors, with older designs being modified to address common complaints of discomfort or inefficiency.
In conclusion, the integration of ergonomic design principles into hand tools that remove wood by shaving is not merely a matter of comfort but a crucial factor in preventing injuries and enhancing productivity. Prioritizing ergonomic considerations reduces physical strain, promotes efficient work habits, and contributes to the long-term health and well-being of woodworkers. Challenges exist in balancing ergonomic requirements with traditional tool aesthetics and functionality, necessitating careful research and iterative design processes. The benefits of ergonomically designed tools underscore the broader theme of occupational health and safety in woodworking, emphasizing the importance of creating a sustainable and injury-preventive working environment.
Frequently Asked Questions
This section addresses common inquiries regarding hand tools specifically designed for shaping wood through the removal of shavings.
Question 1: What distinguishes a hand plane from other woodworking tools?
The hand plane is characterized by its blade secured within a rigid body, allowing for controlled and consistent removal of shavings. This distinguishes it from tools like chisels, which rely on direct impact, or rasps, which abrade material rather than slice it away.
Question 2: How does one maintain the sharpness of a hand plane blade?
Maintaining sharpness involves honing the blade on progressively finer abrasive stones, followed by stropping on a leather surface. Regular honing, even during use, is critical to optimal performance. The frequency depends on the wood species and the tool’s usage.
Question 3: What are the common causes of tear-out when using a hand plane?
Tear-out typically results from cutting against the grain, using a dull blade, or setting the blade projection too aggressively. Mitigating tear-out often involves changing the cutting direction, sharpening the blade, or reducing the depth of cut.
Question 4: Is specialized knowledge required to adjust a hand plane effectively?
Effective adjustment necessitates understanding the relationship between blade projection, lateral alignment, and the desired shaving thickness. While experience aids in this process, resources such as instructional videos and woodworking guides can provide valuable insight.
Question 5: What are the safety precautions when utilizing hand tools for shaving removal?
Safety precautions include securing the workpiece firmly, maintaining sharp blades, and using appropriate hand protection. Dull tools require more force and increase the risk of slippage, emphasizing the importance of sharpness for safety.
Question 6: What is the appropriate method for storing these tools when not in use?
Proper storage involves cleaning the tools after each use, applying a protective oil to prevent corrosion, and storing them in a dry environment. Blades should be retracted or covered to prevent accidental damage or injury.
The effective application of hand tools for shaving removal hinges on understanding the tool’s design, maintaining its condition, and employing appropriate techniques.
The subsequent section will provide information about specific applications of these tools in woodworking projects.
Conclusion
This exploration has detailed the functionality, maintenance, and optimal usage of a woodworking hand tool used to shape wood by removing shavings. The critical aspects of blade sharpness, precise adjustment, grain direction awareness, surface smoothness, material control, and ergonomic design have been discussed, emphasizing their individual and collective contributions to the shaping process. The interplay of these elements determines the tool’s efficiency and the quality of the final product.
Mastery of these tools represents a commitment to precision and quality in woodworking. Further investigation into specific applications and advanced techniques will enable woodworkers to refine their craft and achieve increasingly complex designs. The ongoing pursuit of knowledge and skill in this area will ensure the continued relevance and appreciation of this essential woodworking practice.


