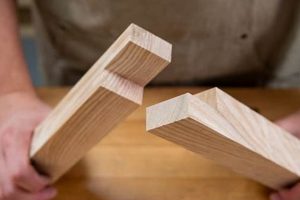
A technique employed in woodworking creates a robust and visually appealing connection between two pieces of material. This method involves shaping one component to conform precisely to the curved or contoured surface of the other. The result is a joint that distributes stress effectively and offers significant mechanical strength, often utilized where aesthetics are also a consideration. An example would be the connection of a curved chair seat to the supporting legs.
The advantages of this approach include its enhanced stability and resistance to racking forces. It allows for the creation of joints capable of withstanding significant loads. Historically, this type of joinery has been favored in applications requiring both durability and visual integration, such as in crafting furniture, boat building, and timber framing. Its enduring popularity stems from its blend of functional performance and aesthetic appeal.
The following sections will delve into the specific methods for creating this joint, exploring the tools and techniques used, as well as examining its various applications and considerations for successful execution. Attention will be given to variations in the joint’s design and how these alterations impact its strength and visual characteristics.
Essential Considerations for Executing Precise Joints
Achieving a strong and aesthetically pleasing result requires careful planning and execution. The following recommendations are intended to guide the practitioner through the key stages of creating this type of joint effectively.
Tip 1: Stock Preparation is Paramount: Ensure both pieces of stock are accurately dimensioned and planed to the desired thickness. Inconsistent stock will compromise the fit and strength of the completed joint.
Tip 2: Precise Layout is Critical: Utilize accurate marking tools, such as a sharp knife or marking gauge, to transfer the contours and dimensions of the mating piece onto the saddle. Avoid using pencils, as their line width introduces potential errors.
Tip 3: Employ Gradual Removal Techniques: Remove material incrementally to prevent over-cutting. This is particularly important when shaping the saddle, as subtle adjustments are often required to achieve a perfect fit.
Tip 4: Leverage Mock-Ups for Complex Geometries: When dealing with complex curves or angles, construct a full-scale mock-up using inexpensive material. This allows for iterative refinement of the joint design before committing to the final workpiece.
Tip 5: Prioritize a Tight Fit: Aim for a friction fit between the two components. A loose joint will compromise its structural integrity and aesthetic appeal.
Tip 6: Reinforce with Appropriate Adhesives: Select an adhesive appropriate for the wood species and anticipated load. Ensure proper surface preparation for optimal bonding.
Tip 7: Consider Mechanical Fasteners: In applications demanding exceptional strength, consider supplementing the adhesive bond with mechanical fasteners, such as screws or dowels. Ensure fasteners are appropriately sized and placed to avoid weakening the joint.
The careful application of these principles contributes to a superior result. Attention to detail during each stage of the process is essential to produce a strong, durable, and visually pleasing connection.
The subsequent article sections will address common pitfalls, troubleshooting techniques, and advanced applications of this joint, providing a comprehensive resource for woodworkers seeking to master this challenging but rewarding technique.
1. Precise Contouring
Precise contouring is fundamental to the success of any woodworking joint, particularly within the context of saddle joint woodworking. The accuracy with which the mating surfaces are shaped directly influences the strength, stability, and aesthetic integration of the connected components.
- Surface Area Maximization
Accurate contouring aims to maximize the contact surface area between the two pieces. A larger surface area facilitates a more effective transfer of load, minimizing stress concentrations and reducing the likelihood of joint failure. Imperfect conformity reduces the effective bonding area, weakening the overall assembly.
- Stress Distribution
A precisely contoured joint ensures uniform stress distribution across the entire joint. This prevents localized areas of high stress that can lead to premature failure under load. Conversely, poorly fitted joints concentrate stress on specific points, increasing the risk of cracking or separation.
- Dimensional Accuracy
Precise contouring depends on accurate dimensional transfer from one component to another. Any deviation from the intended dimensions results in a compromised fit, reducing the joint’s ability to withstand applied forces. This necessitates careful measurement and marking techniques throughout the shaping process.
- Aesthetic Integration
Beyond its structural implications, precise contouring contributes to the aesthetic quality of the finished piece. A seamlessly integrated joint enhances the visual appeal of the woodworking project, creating a refined and professional appearance. Visible gaps or misalignments detract from the overall aesthetic, regardless of the joint’s inherent strength.
The emphasis on precise contouring within saddle joint woodworking directly reflects its role in achieving both structural integrity and visual harmony. The connection between form and function is paramount, highlighting the need for meticulous craftsmanship throughout the entire process.
2. Accurate Joint Layout
In the construction of any woodworking joint, the layout process constitutes a foundational step. This is particularly true for intricate joints, where even minor inaccuracies can propagate, resulting in compromised structural integrity and aesthetic imperfections. Accurate joint layout defines the dimensions, angles, and overall geometry of the joint, directly influencing its ultimate performance.
- Dimensional Transfer
Dimensional transfer involves accurately conveying measurements and contours from one workpiece to its mating piece. Inaccurate transfer leads to misaligned surfaces, reducing the contact area and, consequently, the joint’s strength. For example, if the curve of a chair leg support is not precisely transferred to the seat, the resulting joint will exhibit gaps and instability.
- Reference Point Establishment
Reference points serve as anchors for subsequent layout and cutting operations. Establishing reliable reference points is crucial for maintaining dimensional consistency throughout the joint construction process. If a reference point is misaligned or imprecisely marked, all subsequent layout lines will be skewed, leading to a flawed joint. This often entails using precision instruments and verifying measurements multiple times.
- Tool Path Planning
Accurate joint layout dictates the tool paths required to shape the mating surfaces. This includes determining the optimal angle and depth of cuts to achieve the desired geometry. Incorrectly planned tool paths can result in over-cutting or under-cutting, leading to a loose or ill-fitting joint. For instance, in creating the curved recess for a seat support, careful planning ensures the correct amount of material is removed.
- Visualization of Assembled Form
A well-executed layout allows for a clear visualization of the assembled joint before any material is removed. This predictive capability enables adjustments to the design or layout before irreversible cuts are made. By understanding how the components will interact, potential issues such as interference or aesthetic imbalances can be identified and corrected early in the process.
The combined effect of precise dimensional transfer, reliable reference points, carefully planned tool paths, and clear visualization during the layout stage directly determines the quality and performance of saddle joints. Neglecting these aspects undermines the inherent strength and aesthetic potential. The precision and patience invested in accurate layout yield tangible rewards in the final outcome, resulting in durable and visually harmonious woodworking projects.
3. Material Compatibility
Material compatibility significantly influences the longevity and structural integrity of woodworking joints. When constructing joints using this method, selecting materials that exhibit similar properties is of paramount importance. Disparate expansion and contraction rates, varying strengths, and differing densities can compromise the joint’s integrity over time.
- Wood Species Pairing
Pairing wood species with substantially different expansion coefficients can lead to joint failure. Seasonal fluctuations in humidity cause wood to expand and contract. If two joined species expand and contract at different rates, the resulting stresses can weaken or even fracture the joint. Pairing species with similar density and grain patterns is generally recommended.
- Adhesive Interaction
The selected adhesive must be chemically compatible with the chosen wood species. Certain adhesives bond more effectively with specific wood types. For instance, some adhesives are formulated for hardwoods, while others are better suited for softwoods. Using an incompatible adhesive will result in a weak bond and potential joint failure. Consideration of wood’s acidity or oil content is crucial for proper adhesive selection.
- Hardness Differential
Significant differences in hardness between joined materials can cause uneven wear and stress distribution. The softer material may compress or deform under pressure, leading to gaps and instability in the joint. Ideally, the two pieces should possess similar hardness characteristics to ensure uniform load bearing across the joint’s surface. This can be addressed through careful species selection or by reinforcing the joint.
- Grain Orientation and Stability
Matching grain orientation between the mating pieces contributes to the joint’s overall stability. Consistent grain direction helps to minimize warping or twisting, particularly in applications where the joint is subjected to significant stress. Understanding wood’s anisotropic properties is crucial in planning the joint layout and material selection.
The careful consideration of these material compatibility factors is indispensable for creating strong and durable saddle joints. Failing to account for these variables can result in premature joint failure, compromising the functionality and aesthetic appeal of the finished woodworking project. Proper planning mitigates these risks and enhances the overall quality of the workmanship.
4. Load Distribution
Load distribution is a critical consideration in any structural application, and its importance is amplified in woodworking joints, particularly those employing curved or contoured surfaces. The effectiveness with which a joint transfers and distributes forces directly dictates its longevity and resistance to failure. Careful design and execution are essential to ensure optimal load distribution within a saddle joint assembly.
- Surface Contact Area
A larger contact area between the joined surfaces facilitates more effective load transfer. The contoured shape inherent in saddle joint woodworking allows for maximizing the surface area, spreading the load over a greater region and reducing stress concentrations. An example is the distribution of weight from a chair seat onto its legs, where a properly shaped saddle joint ensures even dispersal of the load.
- Stress Mitigation
Concentrated stresses can lead to premature joint failure. The gradual transition provided by a contoured surface minimizes sharp angles and abrupt changes in geometry, thereby reducing stress concentrations. This is particularly important in areas subjected to high bending moments or shear forces, where localized stress can quickly exceed the material’s yield strength. A smoothly transitioned saddle can, for example, prevent cracking in a table leg where it joins the tabletop.
- Material Properties Influence
The ability of a joint to effectively distribute loads is influenced by the material properties of the wood itself. Species with high compressive strength are better suited for applications where significant loads are transferred through the joint. Consideration of grain orientation is also critical, as wood is generally stronger along the grain than across it. For instance, aligning the grain direction with the direction of the primary load path enhances the joint’s overall strength.
- Fastener Considerations
While the contoured surface of a saddle joint provides inherent load distribution benefits, the use of fasteners, such as screws or dowels, can further enhance its capacity. These fasteners should be strategically placed to supplement the adhesive bond and provide additional resistance to shear and tensile forces. However, improper fastener placement can create stress concentrations, negating the benefits of the contoured joint. A well-placed dowel, used judiciously, can greatly increase a joints resistance to twisting.
These elements demonstrate how the integration of the saddle joint woodworking method enhances the dispersion of load. By maximizing surface contact, mitigating stress concentrations, considering material properties, and strategically employing fasteners, the resulting structures can withstand significant forces while preserving a seamless aesthetic. A thorough understanding of these factors is essential for crafting durable and visually appealing pieces.
5. Adhesive Selection
Adhesive selection represents a pivotal stage in the successful execution of saddle joint woodworking. The chosen adhesive directly influences the joint’s strength, durability, and long-term stability. The complex geometry and often substantial surface area of this joint type necessitate careful consideration of adhesive properties and application techniques.
- Wood Species Compatibility
Different wood species exhibit varying levels of acidity, oil content, and porosity, all of which affect adhesive bonding. For instance, oily woods such as teak and rosewood require specific adhesives formulated to overcome their natural resistance to bonding. Using an inappropriate adhesive can lead to a weak bond or even complete failure of the joint. A thorough understanding of the wood’s characteristics is essential for selecting a compatible adhesive.
- Joint Geometry Considerations
The curved and contoured surfaces inherent in saddle joints present unique challenges for adhesive application. Achieving consistent coverage and adequate clamping pressure can be difficult. Adhesives with longer open times or gap-filling properties may be necessary to compensate for these challenges. The complexity of the joint dictates the need for adhesives that can maintain their strength under potentially uneven stress distribution. Additionally, the amount of exposed surface area in complex joints requires an adhesive with high moisture resistance.
- Load Bearing Requirements
The anticipated load-bearing demands of the finished piece should inform adhesive selection. High-stress applications, such as load-bearing furniture components, require adhesives with exceptional strength and durability. Conversely, purely decorative applications may allow for the use of less robust adhesives. A structural engineer’s assessment can greatly inform selection in high-stress applications.
- Environmental Factors
Environmental factors such as temperature, humidity, and exposure to UV radiation can significantly affect adhesive performance. For outdoor applications, water-resistant or waterproof adhesives are essential to prevent bond degradation and joint failure. Indoor applications may require adhesives with low VOC emissions to minimize potential health hazards. Understanding the environmental conditions the joint will be exposed to is crucial for ensuring long-term stability.
The interplay between adhesive properties, joint geometry, and environmental conditions underscores the importance of informed adhesive selection within saddle joint woodworking. Choosing the correct adhesive, applying it properly, and accounting for external factors guarantees a structurally sound and aesthetically pleasing joint that withstands the test of time. The long term performance of the piece rests heavily on the correct adhesive choice.
Frequently Asked Questions About Saddle Joint Woodworking
The following addresses common queries and concerns regarding saddle joint woodworking, offering clarity and guidance for practitioners.
Question 1: What constitutes a saddle joint in woodworking?
A saddle joint, within woodworking, refers to a type of connection where one component is shaped to conform precisely to a curved or contoured surface on the mating piece. This results in a joint that distributes stress and offers significant mechanical strength.
Question 2: What distinguishes saddle joint woodworking from other jointing methods?
This technique stands apart due to its reliance on curved or contoured surfaces to achieve a strong and aesthetically integrated connection. Unlike mortise and tenon or dovetail joints, this approach emphasizes surface contact and flowing lines.
Question 3: What are the primary advantages of employing this jointing technique?
The benefits include enhanced stability, increased resistance to racking forces, and the ability to create visually appealing joints capable of withstanding significant loads. Its unique design balances functional performance with aesthetic integration.
Question 4: Are specific wood species better suited for saddle joint woodworking?
Dense hardwoods with tight grain patterns generally perform well, providing strength and stability. However, careful consideration of wood species compatibility is crucial to minimize expansion and contraction issues that can compromise the joint’s integrity.
Question 5: Is specialized equipment required for crafting this type of joint?
While hand tools can be used, power tools such as routers, spindle sanders, and band saws can significantly enhance efficiency and precision, particularly when shaping complex curves and contours. Precision measuring and marking tools are also essential.
Question 6: What are the common mistakes to avoid during saddle joint woodworking?
Common pitfalls include inaccurate layout, over-cutting during shaping, failing to ensure proper surface contact, and selecting an inappropriate adhesive. Careful planning, gradual material removal, and precise execution are essential to avoid these issues.
Successful implementation relies on careful attention to detail and adherence to established best practices. Addressing these questions enables practitioners to approach the process with greater confidence and skill.
The subsequent sections will delve into advanced techniques and alternative applications, further expanding upon the concepts introduced.
Conclusion
This exploration of saddle joint woodworking has illuminated the critical aspects of this complex and rewarding technique. From material selection to precise contouring and adhesive application, each element contributes to the strength, durability, and aesthetic appeal of the final product. The inherent challenges require a commitment to accuracy and a thorough understanding of woodworking principles.
Continued mastery of this skill necessitates a dedication to refining technique and expanding knowledge of material properties. Further investigation into advanced applications and variations on the core principles will undoubtedly enhance both the functional and artistic possibilities within woodworking. The value lies not only in the creation of strong and lasting structures but also in the preservation and advancement of a time-honored craft.


