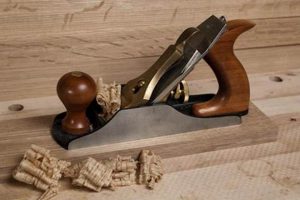
The practice involves using a manual tool with a blade to shave thin layers of wood from a surface. This technique is employed to achieve a smooth, flat, or dimensionally accurate workpiece. One might use this method to refine joinery, correct imperfections, or prepare stock for finishing.
This skill offers the craftsman enhanced control over material removal compared to power tools. It minimizes tear-out, particularly on figured woods, and allows for subtle adjustments impossible to achieve with automated processes. Furthermore, it represents a connection to traditional methods, preserving techniques passed down through generations, fostering a deeper understanding of wood properties and grain direction. This method reduces reliance on electricity and the associated noise and dust production.
The following discussion will address the different types of tools used, proper sharpening techniques, methods for achieving optimal performance, and considerations for selecting the appropriate tool for specific applications.
Tips for Effective Wood Surface Refinement
The following guidelines offer insights into optimizing the effectiveness and precision of manual wood surface preparation.
Tip 1: Blade Sharpness is Paramount: A keen cutting edge is crucial for achieving clean, effortless shavings. Dull blades necessitate increased force, leading to tear-out and uneven surfaces. Hone blades regularly using progressively finer grits of sharpening stones.
Tip 2: Adjust Depth of Cut Incrementally: Begin with a shallow setting to avoid excessive material removal and potential errors. Gradually increase depth as needed to achieve the desired results. Frequent adjustments yield smoother, more predictable outcomes.
Tip 3: Maintain Proper Body Positioning and Stance: A stable stance with balanced weight distribution promotes consistent pressure and control. Utilize the bodys momentum to guide the tool, minimizing strain and maximizing efficiency. Consider the workbench height to enhance ergonomic comfort.
Tip 4: Observe Grain Direction: Cutting with the grain minimizes tear-out and produces a smoother surface. Identify the grain’s orientation before initiating each pass. Altering the cutting direction may be necessary to address areas with opposing grain patterns.
Tip 5: Ensure Proper Tool Setup: Verify that the sole is flat and free from imperfections. Check the alignment of the blade to the sole. A well-tuned tool delivers superior performance and reduces the likelihood of errors.
Tip 6: Utilize a Backing Board for End Grain: When refining the end grain of wood, a backing board minimizes tear-out and splintering. Clamp the backing board securely to the workpiece and shave towards it.
Tip 7: Strive for Consistent Overlap: Overlap each pass by approximately 50% to eliminate ridges and ensure a uniform surface. Maintain a steady hand and consistent pressure throughout each stroke.
These techniques enable superior precision and control in woodworking endeavors. The application of these principles will result in improved surface quality and enhanced project outcomes.
Subsequent sections will explore advanced techniques and troubleshooting common challenges encountered during wood surface preparation.
1. Blade Sharpness
The condition of the blade’s cutting edge dictates the efficiency and quality of work achieved in manual woodworking practices. A dull or improperly sharpened blade compromises the ability to smoothly remove material, resulting in increased effort and diminished results.
- Effort Reduction and Ergonomics
A keen edge minimizes the force required to propel the tool through the wood. Reduced resistance translates to less physical strain on the user, enabling prolonged use without fatigue. Conversely, a dull blade demands excessive pressure, leading to discomfort, potential injury, and decreased control over the cut.
- Surface Finish Quality
Sharpness directly impacts the final surface texture. A honed edge severs wood fibers cleanly, producing a smooth, polished surface. A dull edge, however, tears and crushes the fibers, resulting in a rough, uneven finish characterized by tear-out and fuzziness, necessitating additional sanding and refinement.
- Precision and Accuracy
The ability to execute fine, controlled shavings hinges on blade condition. Sharpness facilitates the precise removal of small amounts of material, crucial for achieving tight-fitting joinery and accurate dimensions. An imprecise edge hinders controlled material removal, compromising dimensional accuracy.
- Wood Species Variability
Different wood species require varying degrees of sharpness. Denser, harder woods necessitate an exceptionally keen edge to avoid resistance and ensure clean cuts. Softer woods are more forgiving, but optimal results still depend on maintaining a sharp blade. Neglecting appropriate sharpness levels for specific wood types leads to suboptimal outcomes.
The interplay between blade sharpness, wood properties, and user technique underscores the critical role of edge maintenance in manual woodworking. Consistent attention to sharpening and honing promotes efficient, precise, and ergonomically sound woodworking practices.
2. Wood grain direction
Understanding the grain direction in wood is paramount when employing a hand planer. The orientation of wood fibers directly impacts the ease and quality of cut achievable with a manual instrument.
- Preventing Tear-Out
Tear-out occurs when the blade lifts wood fibers instead of cleanly severing them. Planing against the grain’s natural direction greatly increases the likelihood of tear-out, resulting in a rough, uneven surface. Observing and working with the grain is essential to producing a smooth finish. For example, if a board exhibits grain sloping upwards, planing in that direction minimizes tearing.
- Identifying Grain Direction
Grain direction is often visually apparent, manifesting as lines, patterns, or the subtle tilt of pores. However, it can also be less obvious, requiring tactile assessment. Running a hand along the surface may reveal a smoother feel when moving with the grain versus a slightly rougher texture against it. Correct identification prevents improper planing direction.
- Dealing with Reversing Grain
Reversing grain, where the direction changes within a single piece of wood, presents a significant challenge. In such instances, planing in one direction will inevitably lead to tear-out in sections with opposing grain. Solutions include alternating planing directions, using a higher blade angle, or employing a specialized tool designed to minimize tear-out.
- Impact on Tool Selection
The choice of tool can be influenced by grain direction. Low-angle tools, for instance, are often preferred for working with difficult or figured grain. The shallower cutting angle reduces the force exerted on the wood fibers, lessening the chance of tear-out. Conversely, steeper angles may be more suitable for consistent, straight-grained wood.
Mastery of grain direction is integral to successful manual wood surface refinement. By carefully observing grain patterns, selecting appropriate techniques, and employing suitable tools, operators can mitigate tear-out and achieve superior results when using a hand planer. Ignoring this fundamental principle invariably leads to compromised surface quality and increased material wastage.
3. Tool adjustment
Proper adjustment of the hand planer is fundamental to achieving accurate and controlled material removal in woodworking. Precise manipulation of its components directly influences the quality of the resulting surface and the efficiency of the process. Without careful adjustment, the tool’s inherent capabilities are diminished, leading to suboptimal results.
- Blade Projection and Cutting Depth
The amount the blade extends beyond the sole determines the thickness of each shaving. Precise control over this projection allows for fine adjustments in the rate of material removal. For rough stock, a greater projection is acceptable, while finishing requires a minimal setting to achieve a smooth surface. Uneven projection can result in gouging or uneven surfaces, especially with harder woods.
- Lateral Blade Alignment
Ensuring the blade is parallel to the sole is critical for creating a flat, consistent surface. Misalignment results in a cut that is deeper on one side than the other, causing ridges and requiring additional correction. This alignment is typically adjusted with lateral adjustment levers or screws, enabling minute corrections to blade position.
- Chipbreaker (Cap Iron) Positioning
The chipbreaker, or cap iron, is positioned close to the cutting edge to curl and break the shaving as it is formed. Proper positioning minimizes tear-out, particularly when working against the grain or with figured woods. The distance between the chipbreaker and the cutting edge directly impacts the effectiveness of tear-out prevention; closer settings are used for problematic grain, while slightly further settings are acceptable for straight-grained material.
- Mouth Opening Size
The size of the mouth opening influences the efficiency of chip removal and the support provided to the wood fibers ahead of the blade. A smaller mouth opening reduces tear-out but can become clogged with thick shavings. A larger mouth accommodates thicker shavings but offers less support, increasing the risk of tear-out. Adjusting the mouth opening allows for optimization based on wood type and desired surface finish.
These adjustments are interdependent and require careful consideration to optimize the hand planer for a specific task. Proper adjustment transforms the tool from a rudimentary implement into a precise instrument capable of producing exceptional results in the hands of a skilled woodworker. Overlooking these fine tunings compromises the potential of the tool and the quality of the final product. A well-adjusted hand planer enhances both the process and the outcome of surface refinement in woodworking.
4. Body posture
In manual woodworking using a hand planer, the operator’s posture significantly influences efficiency, accuracy, and long-term physical well-being. An incorrect stance can lead to increased fatigue, reduced control over the tool, and potential musculoskeletal strain. Conversely, proper posture promotes a more stable and balanced interaction with the tool and workpiece. The angle of the spine, the positioning of the feet, and the alignment of the arms all contribute to the overall effectiveness of the planing process. A stable base allows for consistent pressure to be applied along the length of the stroke, resulting in a smoother and more uniform surface. For example, a woodworker planing a long tabletop would benefit from positioning one foot slightly ahead of the other, providing a forward momentum that complements the pushing action of the arms.
Furthermore, the height of the workbench relative to the woodworker’s stature directly impacts posture. A bench that is too low necessitates excessive bending at the waist, leading to back strain. A bench that is too high forces the arms to work above a comfortable level, causing shoulder and neck discomfort. An ideal workbench height allows the operator to maintain a relatively straight back and elbows bent at approximately 90 degrees when pushing the plane. In practical scenarios, adjustments to bench height can be achieved using risers or adjustable legs to accommodate individual preferences and the specific task being performed. The ability to adopt a comfortable and sustainable posture reduces the risk of repetitive strain injuries and allows for longer periods of focused work.
In summary, appropriate body posture is not merely a matter of comfort but a critical component of effective and safe manual woodworking. Maintaining a stable stance, optimizing workbench height, and aligning the body to complement the planing motion contribute to improved control, reduced fatigue, and long-term physical well-being. These ergonomic considerations are essential for any woodworker seeking to master the craft and avoid preventable injuries. This interplay demonstrates how a seemingly passive factor like body posture has a big result and impact with manual woodworking activities.
5. Depth of cut
The depth of cut, a critical parameter in manual woodworking involving hand planes, dictates the amount of material removed with each pass. Its precise adjustment allows for controlled shaping and surface refinement, influencing the efficiency and quality of the final product. Inappropriate settings can lead to either inefficient material removal or undesirable surface characteristics.
- Influence on Surface Smoothness
A shallow depth of cut, often employed during finishing, yields smoother surfaces by removing minute imperfections. This approach minimizes the risk of tear-out, especially with figured woods or when working against the grain. Conversely, a deeper setting can leave pronounced ridges and require subsequent passes for refinement. Examples include using a very fine setting for preparing a surface for varnish and a slightly deeper setting for removing plane tracks.
- Impact on Planing Effort
Increasing the depth of cut correlates with a corresponding increase in the force required to propel the tool. Excessive depths necessitate significant exertion, leading to fatigue and potentially compromising control. Optimal efficiency is achieved by balancing material removal with manageable effort. For example, a seasoned woodworker might opt for several shallow passes over a single deep cut to maintain control and reduce physical strain.
- Role in Correcting Imperfections
A deeper cut can be strategically employed to address significant irregularities in the wood surface, such as cupping or twisting. By focusing material removal on the high points, the overall form can be gradually corrected. However, this approach demands careful execution to avoid creating new imperfections or uneven surfaces. For instance, strategically deepening the cut on one side of a cupped board can bring it back to a flat plane, ready for more delicate work.
- Considerations for Wood Species
The optimal depth of cut is influenced by the characteristics of the wood species being worked. Hardwoods typically require shallower settings to prevent tear-out and excessive force, while softer woods can tolerate slightly deeper cuts. Adjusting the depth based on wood density ensures efficient material removal without compromising surface quality. The proper cut for hardwood is less than softwood for best performance.
The manipulation of cutting depth is an essential skill in manual woodworking. Mastering this aspect allows the operator to adapt the tool’s performance to the specific needs of the project, optimizing both efficiency and final surface quality. The choice of blade projection is based on desired outcome and wood properties.
6. Sole flatness
The flatness of a hand planer’s sole is a critical factor governing the precision and quality of its operation. The sole, being the surface that contacts the wood, acts as a reference plane during the cutting process. Any deviation from absolute flatness introduces inconsistencies in the depth of cut and ultimately affects the planed surface. A convex sole, for example, will result in the tool preferentially removing material from the center of the board, while a concave sole will remove more material from the edges. This phenomenon is demonstrable when attempting to flatten a wide board with a planer possessing an imperfect sole, resulting in either a crowned or hollow surface, respectively. The presence of localized bumps or dips further exacerbates this effect, leading to unevenness and the potential for gouging.
The material and construction of the sole significantly influence its flatness and stability over time. Traditional hand planes typically feature soles made from cast iron, which offers a good balance of durability and machinability. However, cast iron is susceptible to rust and can warp if subjected to excessive stress or temperature fluctuations. Modern hand planes may utilize ductile iron or even synthetic materials for their soles, offering improved resistance to corrosion and deformation. Regardless of the material, meticulous machining and lapping are essential to achieve and maintain the required degree of flatness. Skilled artisans often use precision surface plates and abrasive compounds to refine the sole to within tolerances of a few thousandths of an inch. The method’s significance is apparent in the performance of older tools that have been neglected or improperly stored, often requiring significant restoration to regain their original flatness.
Maintaining sole flatness is an ongoing requirement for effective hand planing. Regular inspection and occasional re-lapping are necessary to address any wear or distortion that may occur over time. Failure to do so can compromise the accuracy and efficiency of the tool, leading to frustration and suboptimal results. Recognizing and addressing deviations from flatness is, therefore, a fundamental aspect of proficient hand planer use. The inherent relationship between sole geometry and planing outcome underscores the importance of understanding and caring for this critical tool component.
7. Wood species
The selection of wood species is a primary determinant in the execution and outcome of hand planer woodworking. The inherent properties of different woods significantly influence the effort required, the achievable surface finish, and the overall suitability for specific projects. Recognizing these properties is crucial for efficient and effective use of hand planes.
- Hardness and Density
The hardness and density of a wood directly impact the force required to remove material with a hand plane. Dense hardwoods like maple and oak necessitate sharper blades and greater physical exertion compared to softer woods like pine or cedar. Furthermore, denser woods are more prone to tear-out if the blade is not impeccably sharp or the grain direction is disregarded. The effort of planing can be greatly increased or decreased based on wood hardness.
- Grain Pattern and Figure
The grain pattern and figure (e.g., curly, quilted, or burl) present unique challenges when hand planing. Figured woods are often prone to tear-out due to the irregular orientation of the wood fibers. Lower cutting angles and meticulously sharp blades are essential for achieving a smooth surface on these materials. The plane is more effective on straight grain rather than complex figure. A steep angle will lead to more tear-out in figured woods.
- Oil Content and Resin
The presence of oils or resins within certain wood species can affect the planing process. Oily woods like teak can lubricate the sole of the plane, reducing friction and making planing easier. However, the oil can also clog the blade and require more frequent cleaning. Resinous woods, such as pine, can similarly gum up the blade and hinder smooth cutting. The correct blade geometry must be considered to alleviate clogging.
- Dimensional Stability
The dimensional stability of a woodits tendency to expand or contract with changes in moisture contentis a consideration in hand planer woodworking, particularly when aiming for precise joinery. Woods with high dimensional stability, such as mahogany, are less prone to warping or cupping after planing, ensuring that the finished surface remains flat and true. The moisture content is the primary source of instability.
Ultimately, a thorough understanding of the characteristics of different wood species is essential for successful hand planer woodworking. Selecting the appropriate wood for a given project, and adjusting planing techniques accordingly, enables optimal results in terms of surface finish, dimensional accuracy, and overall aesthetic appeal. Wood selection is the starting point for a successful project.
Frequently Asked Questions About Hand Planer Woodworking
The following section addresses common inquiries and concerns related to the practice. These answers aim to provide clarity and promote a deeper understanding of the techniques involved.
Question 1: What is the primary advantage of using a hand planer versus a power planer?
A primary advantage lies in the enhanced control afforded to the operator. A manual tool enables subtle adjustments and nuanced material removal impossible to achieve with automated equipment, minimizing tear-out and preserving delicate wood fibers.
Question 2: How frequently should a hand planer blade be sharpened?
Sharpening frequency is contingent upon wood hardness and usage intensity. An indication for sharpening is increased resistance during operation or a decline in surface quality. Regular honing can extend the time between full sharpenings.
Question 3: What constitutes a “tuned” hand planer, and why is it important?
A tuned tool possesses a flattened sole, a properly aligned blade, and a precisely adjusted chipbreaker. These adjustments optimize cutting performance and minimize potential errors, leading to improved results and reduced user fatigue.
Question 4: How does grain direction influence the planing process, and what can be done to mitigate tear-out?
Planing against the grain increases the likelihood of tear-out. Mitigating strategies include working with the grain, employing a low-angle tool, utilizing a chipbreaker, or moistening the wood surface.
Question 5: What are the essential safety precautions to observe when using a hand planer?
Safe practices include securing the workpiece, maintaining a firm grip on the tool, keeping hands clear of the blade, and wearing appropriate eye protection. Sharp blades are safer than dull blades, as they require less force and reduce the risk of slippage.
Question 6: Is hand planer woodworking suitable for all wood types?
While adaptable, the method is better suited for certain wood types. Extremely dense or resinous woods may present challenges, requiring specialized techniques and tools. Softer, straight-grained woods generally yield more favorable results.
The insights shared offer a foundation for mastering manual woodworking. Continuous learning and practice refine the user’s skills to make surface preperation efficient and precise.
The next section will present detailed case studies and specific project examples.
Conclusion
This examination has explored the nuances of manual woodworking. Key aspects include blade sharpness, grain direction, tool adjustment, posture, and wood species. Mastery of these elements is critical for precision and efficient material removal. The importance of tool maintenance and a careful approach to material selection are emphasized.
The continued relevance of manual techniques in a modern era of automation reflects the value placed on craftsmanship and control. Continued exploration and refinement of these skills ensures preservation and enhancement of quality in woodworking practices. These techniques enable unique project results.


