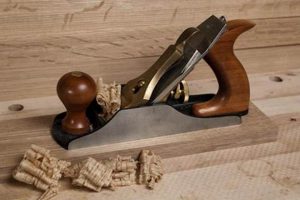
The practice encompasses the use of compact, manually operated tools for shaping and smoothing wood. These implements, designed to be held and guided by hand, are employed to remove thin shavings of material from timber surfaces. Examples include block planes for end-grain work, smoothing planes for creating refined finishes, and shoulder planes for fitting joinery.
Employing these tools offers a high degree of control and precision, making them valuable for intricate tasks and achieving superior surface quality. Historically, they were essential instruments for carpenters and cabinetmakers, and their continued use reflects a commitment to craftsmanship and a nuanced understanding of wood behavior. Their portability and independence from power sources also make them suitable for on-site work or in environments with limited access to electricity.
The following sections will delve into specific types of these tools, examining their applications, maintenance requirements, and the techniques employed to maximize their effectiveness in various woodworking projects. Further discussion will address selecting appropriate models, sharpening methods, and best practices for achieving optimal results.
Essential Techniques
Mastering the use of compact, manually operated wood-shaping tools requires adherence to specific techniques that optimize performance and ensure accuracy. The following tips outline fundamental practices for achieving superior results.
Tip 1: Preparation is paramount. Prior to commencing any planing operation, ensure the blade is meticulously sharpened and properly honed. A dull blade will tear fibers instead of slicing them cleanly, leading to a substandard finish and increased effort.
Tip 2: Adjust blade projection incrementally. Avoid extending the blade too far, which can cause aggressive cutting, chatter, and potential damage to the workpiece. Small, controlled adjustments are crucial for achieving a consistent shaving thickness and a smooth surface.
Tip 3: Maintain a consistent angle of attack. The tool should be held firmly and advanced at a shallow, uniform angle relative to the wood surface. Variations in angle can lead to uneven planing and inconsistent results.
Tip 4: Plane with the grain whenever possible. Planing against the grain can cause tear-out, resulting in a rough and uneven surface. Observing the grain direction and adjusting the planing direction accordingly is essential for achieving a clean, smooth finish.
Tip 5: Utilize proper body mechanics. Employ the entire body, not just the arms and wrists, to propel the tool. This will promote smoother, more controlled movements and reduce fatigue, especially during extended planing sessions.
Tip 6: Practice on scrap material. Before working on a final project, hone your skills on scrap wood of similar species and density. This allows for experimentation with blade adjustments, planing angles, and grain direction without risking damage to the intended piece.
Tip 7: Clean and lubricate frequently. Periodically clean the sole of the tool to remove debris and apply a thin layer of lubricant, such as wax or oil. This reduces friction, promotes smoother gliding, and prevents rust.
Adherence to these techniques will significantly enhance the effectiveness of small hand planes, resulting in improved surface quality, reduced effort, and greater control over the woodworking process.
The subsequent section will explore common challenges encountered when using these tools and strategies for effectively resolving them.
1. Blade Sharpness Maintenance
The consistent performance and effectiveness of compact, manually operated wood-shaping tools are inextricably linked to the condition of their blades. Blade sharpness maintenance is not merely a procedural task but a fundamental prerequisite for achieving precise cuts, smooth surfaces, and minimizing the effort required during woodworking processes.
- Reduced Cutting Resistance
A meticulously sharpened blade encounters significantly less resistance when slicing through wood fibers. This translates to a smoother, more controlled cutting action, minimizing the risk of tear-out and ensuring a cleaner, more refined surface. The force required to propel the tool is also reduced, leading to less user fatigue during extended operations. Example: A dull blade on a block plane will crush rather than cut end grain, leading to splintering and a rough finish.
- Enhanced Precision and Control
A sharp blade allows for greater precision in shaping and smoothing wood. The user can execute finer cuts and achieve more intricate details with enhanced control over the tool. This precision is particularly critical when fitting joinery or creating delicate profiles. Example: When using a shoulder plane to fine-tune a tenon, a keen edge allows for removing microscopic amounts of material to achieve a perfect fit.
- Minimized Tear-Out and Grain Damage
A sharp blade cleanly severs wood fibers, minimizing the likelihood of tear-out, a common problem encountered when working with figured or interlocked grain. This results in a smoother surface that requires less sanding and finishing, preserving the natural beauty and integrity of the wood. Example: Planing highly figured maple with a dull blade will invariably lead to tear-out, resulting in a jagged, uneven surface.
- Increased Tool Longevity and Efficiency
Maintaining a sharp blade not only improves the quality of the work but also extends the lifespan of the tool itself. A sharp blade requires less force to operate, reducing stress on the tool’s components and minimizing wear and tear. Furthermore, a sharp blade is more efficient, allowing for more work to be accomplished in less time. Example: A properly maintained blade will require less frequent sharpening, saving time and preserving the blade’s original geometry for a longer period.
These facets collectively highlight that maintaining a sharp blade is crucial. Without consistently keen edges, the potential of compact hand-operated wood-shaping tools cannot be fully realized, limiting the precision, efficiency, and overall quality of the woodworking process.
2. Grain direction awareness
A critical aspect of effective manual wood shaping involves understanding the directional alignment of wood fibers, commonly termed grain direction. Proficiency in this area directly influences the outcome when employing compact, manually operated wood-shaping tools. Failure to account for grain direction can lead to substandard results, regardless of tool quality or user skill.
- Tear-Out Prevention
Planing against the grain, often termed “climbing cut,” frequently results in tear-out, where wood fibers are lifted and fractured rather than cleanly severed. Recognizing grain direction allows the operator to plane with the grain, minimizing this issue and producing a smoother surface. The visual cue of angled rays on flatsawn lumber reveals grain direction changes.
- Optimized Cutting Angle
Adjusting the cutting angle relative to the grain can further enhance surface quality. A steeper angle may be necessary when working with reversing grain or hardwoods, while a shallower angle might suffice for softwoods. Observation of shaving formation can indicate whether the cutting angle is optimized for the specific wood species and grain pattern.
- Joint Preparation Enhancement
For joinery preparation, grain direction becomes paramount in ensuring strong and aesthetically pleasing connections. Mismatched grain directions in adjacent pieces can lead to differential shrinkage and expansion, compromising joint integrity. Paying attention to grain alignment during glue-up minimizes stress and enhances long-term stability.
- Surface Finish Refinement
The ultimate goal of achieving a refined surface finish hinges on understanding grain direction. Planing with the grain minimizes the appearance of scratches and imperfections, contributing to a visually appealing and tactilely smooth surface. Applying finishes parallel to the grain further enhances the wood’s natural beauty and protective qualities.
These factors highlight how critical grain direction understanding is when utilizing manual wood shaping tools. It is not an optional consideration but rather a fundamental prerequisite for achieving high-quality results and maximizing the potential of these instruments in woodworking endeavors. Successfully managing grain orientation optimizes tool performance, minimizes material waste, and enhances the overall aesthetic and structural integrity of the finished piece.
3. Tool setup precision
The accuracy and consistency of results from compact, manually operated wood-shaping tools are directly contingent upon the meticulousness of their setup. Proper tool setup precision dictates the efficiency of material removal, the quality of the resulting surface, and the overall control the craftsman maintains during operation. Achieving optimal results necessitates attention to several crucial elements.
- Blade Projection Adjustment
The extent to which the blade protrudes from the sole of the plane governs the depth of cut. Precise adjustment ensures the removal of shavings at the desired thickness, preventing excessive material removal or insufficient cutting action. For instance, a smoothing plane requires a minimal blade projection to achieve a fine, polished surface, while a scrub plane necessitates a greater projection for rapid stock removal. Deviation from precise blade projection can result in uneven surfaces, chatter, and increased effort.
- Lateral Blade Alignment
Ensuring the blade is perfectly parallel to the sole is crucial for achieving uniform cuts across the width of the workpiece. Lateral misalignment leads to uneven shaving thickness and the creation of skewed surfaces. Fine adjustments, often achieved through lateral adjustment levers or screws, are essential for correcting any deviation. A simple visual check, observing the blade’s alignment relative to the sole when sighting along the plane’s length, confirms accurate lateral alignment.
- Chipbreaker Positioning (where applicable)
The position of the chipbreaker, or cap iron, relative to the cutting edge significantly affects the shaving formation and reduces tear-out, particularly in figured or interlocked grain. Precise positioning of the chipbreaker, typically within a few millimeters of the cutting edge, curls the shaving and prevents it from lifting and fracturing the wood fibers ahead of the blade. Inadequate chipbreaker positioning compromises the blade’s ability to produce clean, smooth surfaces.
- Sole Flatness Verification
The flatness of the plane’s sole is paramount for ensuring consistent contact with the workpiece and preventing localized gouging or uneven planing. A warped or uneven sole will result in inconsistent surface quality and difficulty in achieving a flat, true surface. Regular inspection and lapping of the sole on a known flat surface are necessary to maintain its integrity. Precision in sole flatness directly translates to accuracy in the final surface finish.
These facets of tool setup precision are not isolated adjustments but rather interconnected elements that contribute to the overall performance. When neglected, even a perfectly sharpened blade becomes ineffective. Therefore, meticulous attention to these details is an investment in both the quality of the work and the longevity of the tools, reinforcing the essential connection between proper preparation and successful woodworking outcomes.
4. Shaving thickness consistency
Achieving uniform shaving thickness is a cornerstone of effective woodworking employing compact, manually operated tools. Deviations in shaving thickness directly impact surface quality, dimensional accuracy, and overall efficiency, highlighting the necessity of mastering this aspect.
- Surface Finish Quality
Consistent shaving thickness directly correlates to the smoothness and evenness of the resulting surface. Irregular shavings leave behind an undulating surface, necessitating additional sanding or corrective measures. A uniform shaving thickness, however, produces a surface requiring minimal further refinement. For example, final passes with a smoothing plane aim to remove exceedingly thin, uniform shavings to achieve a glass-like surface.
- Dimensional Accuracy
Maintaining consistent shaving thickness is crucial when aiming for specific dimensions in a project. Uneven shavings lead to inaccurate material removal, potentially compromising the integrity of joinery or affecting the overall proportions of the finished piece. When fitting a tenon, for instance, consistently thin shavings allow for minute adjustments to achieve a precise fit within the mortise.
- Blade Control and Feedback
The ability to produce uniform shavings provides direct feedback to the user regarding blade sharpness, angle of attack, and the consistency of downward pressure. A sudden increase or decrease in shaving thickness often indicates a dull spot on the blade or a change in the angle at which the tool is being held. Skilled operators use this feedback to make subtle adjustments in real-time, maintaining optimal performance.
- Efficiency and Material Conservation
Consistent shaving thickness maximizes the efficiency of material removal while minimizing waste. Removing the correct amount of material with each pass reduces the need for repeated passes, saving both time and effort. Furthermore, consistent shaving thickness reduces the risk of over-cutting, conserving valuable material and reducing the likelihood of errors that require corrective action.
The factors underscore the importance of mastering shaving thickness consistency in the context of manually operated wood-shaping tools. Precise control over this parameter elevates the quality of work, improves efficiency, and enhances the user’s overall command of the tool, resulting in superior woodworking outcomes.
5. Body mechanics effectiveness
Effective body mechanics significantly influence the outcome of woodworking tasks involving manually operated wood-shaping tools. The posture, stance, and movement patterns employed directly affect control, precision, and fatigue levels. Optimal body mechanics transfer power efficiently to the tool, ensuring consistent force application across the cutting surface. Improper techniques lead to instability, uneven cuts, and increased risk of musculoskeletal strain. For example, a hunched posture while planing promotes back pain and limits the range of motion, compromising the quality of the surface finish.
The ability to maintain a stable stance, distribute weight evenly, and engage core muscles is crucial for controlling the tool’s trajectory and preventing unwanted movements. Using the entire body, rather than solely relying on arm strength, distributes the workload and reduces fatigue during extended operations. A smooth, fluid motion, originating from the legs and torso, translates into consistent shaving thickness and a refined surface. The utilization of a workbench at the correct height allows the operator to maintain a neutral spine position, further minimizing strain. Conversely, straining to reach the workpiece or maintaining an awkward angle increases the likelihood of errors and discomfort.
In summary, integrating sound body mechanics into woodworking practices involving compact hand-operated tools is not merely a matter of comfort but a determinant of performance and longevity. By prioritizing proper posture, weight distribution, and movement patterns, woodworkers can enhance their control, minimize fatigue, and achieve superior results. Ignoring these principles compromises both the quality of the work and the physical well-being of the craftsman, highlighting the intrinsic link between technique and outcome.
Frequently Asked Questions
This section addresses common inquiries regarding the selection, usage, and maintenance of compact, manually operated wood-shaping tools. These tools offer unique capabilities and challenges, and understanding their nuances is essential for achieving optimal results.
Question 1: What distinguishes small hand planes from larger models?
Smaller versions are characterized by their reduced size and weight, enhancing maneuverability and control, particularly in confined spaces or when working on intricate details. Larger models provide greater stability and are more suitable for removing significant amounts of material on larger surfaces.
Question 2: What are the primary applications of block planes?
Block planes excel at end-grain planing, chamfering, and smoothing small surfaces. Their low cutting angle minimizes tear-out when working across the grain, making them indispensable for trimming joinery and creating crisp edges.
Question 3: How frequently should plane blades be sharpened?
Sharpening frequency depends on wood hardness and usage intensity. However, blades should be honed regularly to maintain a keen edge. Signs of dullness, such as increased resistance or tear-out, indicate the need for immediate sharpening.
Question 4: What is the significance of sole flatness?
Sole flatness is paramount for ensuring consistent contact with the workpiece. An uneven sole results in inconsistent cuts and difficulty achieving a flat surface. Regular inspection and lapping are necessary to maintain sole flatness.
Question 5: What techniques mitigate tear-out?
Tear-out can be minimized by planing with the grain, using a sharp blade, adjusting the chipbreaker (if applicable), and taking light cuts. Skewing the plane slightly can also reduce tear-out on difficult grain patterns.
Question 6: Are these tools suitable for beginners?
While requiring practice and patience, these tools are accessible to beginners. Starting with a simple block plane and focusing on proper sharpening and technique is recommended. Supervised instruction or online resources can significantly accelerate the learning process.
Mastering compact, manually operated wood-shaping tools requires dedication and attention to detail. However, the precision, control, and satisfaction derived from using these tools make them a valuable addition to any woodworker’s repertoire.
The following section will provide a guide to choosing appropriate models for various woodworking tasks.
Conclusion
The preceding discussion detailed various facets of small hand planes woodworking, encompassing techniques, maintenance, and application-specific considerations. Emphasis was placed on the interdependent relationship between blade sharpness, grain direction awareness, precise tool setup, and consistent execution, ultimately contributing to the refinement of woodworking outcomes.
Proficiency in small hand planes woodworking necessitates dedication to continuous learning and a commitment to mastering fundamental skills. The application of these principles promotes not only the creation of superior-quality woodwork but also fosters a deeper appreciation for the time-honored traditions of the craft. Ongoing exploration and diligent practice remain essential for realizing the full potential of these versatile tools.


