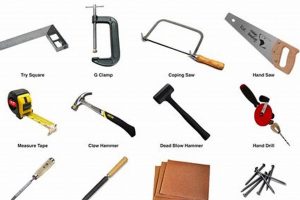
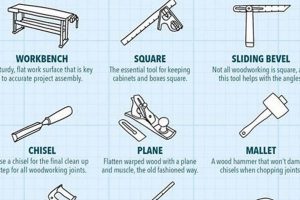
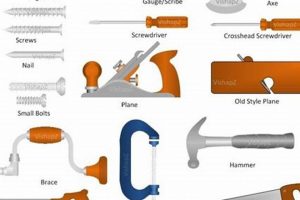
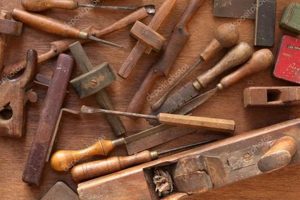
Essential implements manipulated directly by hand, without the aid of electricity or other power sources, are fundamental to the craft of shaping wood. These implements enable precise cutting, shaping, joining, and finishing of wood materials. A saw used to create initial cuts in a board and a chisel employed to refine a joint represent such implements.
Proficiency with these implements provides a direct connection to the material, fostering a deeper understanding of wood grain and its properties. This mastery cultivates precision, control, and an appreciation for traditional techniques, resulting in durable and aesthetically pleasing outcomes. Historically, these implements were the only means of creating wooden objects, and their skillful use remains a valuable and rewarding skill.
The following discussion will outline key categories of these implements, including cutting tools, shaping tools, measuring and marking tools, and fastening tools, highlighting the function and application of each within the broader woodworking context.
Guidance on Implements Used in Wood Crafting
Effective utilization of manually operated implements in wood crafting requires careful consideration and practice. The following advice provides a foundation for successful woodworking endeavors.
Tip 1: Prioritize Sharpness: Ensure all cutting edges are meticulously honed. A dull tool requires excessive force, leading to inaccurate cuts and potential injury. Regular sharpening is essential for safe and precise work.
Tip 2: Master the Grain: Understand the direction of the wood grain. Cutting with the grain minimizes tear-out and produces smoother surfaces. Observe the wood carefully before each cut.
Tip 3: Practice Layout Techniques: Accurate marking and measuring are paramount. Utilize precise marking tools and techniques to ensure proper alignment and dimensions before commencing any cutting or shaping operation.
Tip 4: Secure Workpieces: Employ appropriate clamping mechanisms to firmly secure the wood being worked. A stable workpiece enhances control and reduces the risk of movement during cutting or shaping.
Tip 5: Employ Proper Stance and Grip: Maintain a balanced stance and a secure grip on the implement. This promotes control, reduces fatigue, and minimizes the potential for accidents.
Tip 6: Practice Techniques on Scrap Wood: Before working on a final project, refine techniques and test settings on scrap material. This allows for adjustments and minimizes the risk of errors on valuable wood.
Tip 7: Select Quality Implements: Invest in durable, well-made hand tools. While initial cost may be higher, quality implements retain their value and provide superior performance over time.
Tip 8: Maintain Implements Regularly: Clean and oil implements after each use to prevent rust and maintain functionality. Proper maintenance extends the lifespan of the tools and ensures consistent performance.
By adhering to these guidelines, practitioners can enhance their woodworking skills, improve the quality of their work, and foster a deeper appreciation for the craft.
The subsequent section will delve into specific applications of these implements in various woodworking projects.
1. Cutting
The process of severing or removing material is a foundational element of woodworking, inextricably linked to the capabilities and limitations of manually operated implements. Understanding the nuances of cutting is paramount to successful woodworking projects, influencing precision, efficiency, and the final quality of the piece.
- Saws: Kerf and Tooth Geometry
The saw, in its various forms, represents a primary cutting implement. The kerf, or width of the cut produced by the saw, and the geometry of the saw’s teeth significantly impact the cutting process. Fine-toothed saws create narrower kerfs and smoother cuts, suitable for precision work like joinery. Larger-toothed saws remove material more aggressively, suitable for rough shaping and stock preparation. Understanding the relationship between tooth geometry, set, and the type of wood being cut is essential for selecting the appropriate saw and achieving optimal results.
- Chisels: Controlled Material Removal
Chisels serve as both cutting and shaping tools, enabling precise removal of small amounts of material. Their effectiveness lies in the controlled application of force, allowing for intricate work like creating mortises or refining dovetails. The angle of the chisel’s bevel and the sharpness of its edge dictate its ability to cut cleanly and accurately. Different chisel types, such as mortise chisels and paring chisels, are designed for specific cutting tasks, reflecting the nuanced requirements of woodworking.
- Grain Direction and Cutting Strategies
Wood grain plays a crucial role in the cutting process. Cutting with the grain generally produces cleaner cuts, while cutting against the grain can lead to tear-out and splintering. Recognizing grain direction and adapting cutting strategies accordingly is vital. Employing techniques like scoring the wood before making a final cut or using a backer board to support the wood can minimize tear-out and ensure a clean edge.
- Sharpening and Tool Maintenance
The effectiveness of any cutting tool hinges on its sharpness. Regular sharpening is essential for maintaining optimal performance. A dull cutting edge requires excessive force, leading to inaccurate cuts and potential injury. Mastering sharpening techniques, whether using sharpening stones, honing guides, or powered sharpening systems, is a fundamental skill for any woodworker. Proper tool maintenance, including cleaning and oiling, further extends the life and ensures the reliability of these essential implements.
The success of woodworking hinges significantly on the practitioner’s knowledge of materials, the implement’s characteristics, and the ability to maintain these implements, and these elements are intertwined. From selecting the appropriate implement to employing suitable cutting techniques, the mastery of cutting is a crucial skill that directly translates to the quality and precision of the final woodworking product.
2. Shaping
The process of shaping transforms raw stock into refined forms, a critical aspect of woodworking that relies heavily on the skillful application of manually operated implements. These implements, through precise and controlled material removal, allow the woodworker to achieve desired contours, profiles, and surfaces. Proficiency in shaping is essential for creating functional and aesthetically pleasing pieces.
- Planes: Achieving Flat and Consistent Surfaces
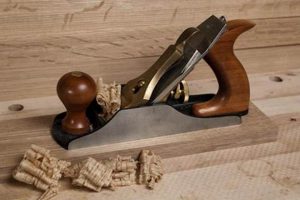
Hand planes, available in various types such as smoothing planes, jack planes, and block planes, are instrumental in creating flat, smooth, and consistent surfaces. The blade of the plane, carefully adjusted to a precise cutting depth, shaves thin layers of wood, gradually removing imperfections and irregularities. The plane’s sole provides a reference surface, ensuring that the resulting surface is flat and true. Applications range from preparing stock for joinery to refining finished surfaces.
- Spokeshaves: Contouring Curved Forms
Spokeshaves are specialized implements designed for shaping curved surfaces, such as those found on chair legs, Windsor chair spindles, and boat hulls. The spokeshave’s blade, held between two handles, allows the woodworker to control the depth and angle of the cut, enabling the creation of complex curves and contours. The skill lies in reading the grain of the wood and applying consistent pressure to achieve a smooth, flowing shape.
- Rasps and Files: Aggressive Material Removal and Refinement
Rasps and files are used to remove material more aggressively than planes, particularly when shaping irregular forms or working with hardwoods. Rasps, with their coarse teeth, rapidly remove wood, while files, with their finer teeth, are used for refining shapes and smoothing surfaces. These implements are particularly useful for shaping intricate details and creating organic forms. Examples include shaping cabriole legs, carving decorative elements, and refining joinery.
- Drawknives: Initial Shaping and Stock Removal
Drawknives facilitate the efficient removal of wood from a workpiece, often employed in the early stages of shaping projects. The implement is drawn across the wood surface, slicing away material and quickly forming a workpiece to a desired rough shape. This approach is particularly helpful in creating rounded elements or tapers. The utilization of a drawknife needs control to maintain precision, often requiring additional shaping tools to refine the component.
The implements employed in shaping represent a direct link between the woodworker’s intention and the material’s transformation. Skillful manipulation of these manually operated implements enables the creation of precise forms, intricate details, and aesthetically pleasing surfaces, underscoring the importance of shaping in the broader context of crafting with these instruments.
3. Measuring
Accurate measurement forms the bedrock of successful woodworking, providing the necessary framework for precise joinery, consistent dimensions, and overall structural integrity. The effectiveness of any woodworking endeavor is fundamentally linked to the precision with which measurements are taken and applied, particularly when relying on manually operated implements.
- Rules and Tapes: Establishing Linear Dimensions
Rules and measuring tapes are essential for determining linear dimensions, providing a tangible reference for length, width, and height. The accuracy of these implements directly affects the precision of cuts and the overall dimensions of the finished piece. The ability to read and interpret measurements accurately is crucial, as even slight errors can accumulate and compromise the project’s outcome.
- Squares: Ensuring Orthogonality and Alignment
Squares, including combination squares, try squares, and speed squares, are used to establish right angles and ensure orthogonality. Accurate squares are vital for creating square corners, aligning components, and verifying the accuracy of joinery. Their use extends to marking lines perpendicular to an edge, which facilitates precise cutting and assembly.
- Marking Gauges: Scribing Parallel Lines
Marking gauges are specialized tools for scribing lines parallel to an edge, crucial for creating consistent reveals, marking mortise and tenon joints, and establishing consistent thicknesses. The gauge ensures that the marked line remains parallel, eliminating the potential for cumulative errors that can arise from manual marking. Their utility is particularly evident in situations requiring consistent and repeatable markings.
- Bevel Gauges: Transferring Angles
Bevel gauges facilitate the transfer of angles from one workpiece to another, essential for creating accurate miters, reproducing existing angles, and ensuring that components fit together seamlessly. By accurately transferring angles, bevel gauges enable the creation of complex geometric shapes and intricate joinery. Miter saws and other power tools have their place, but the bevel gauge is very useful when no power exists or is not required.
In summary, accurate measurement constitutes an indispensable aspect of woodworking, establishing the dimensional framework upon which all other operations depend. Skillful application of measuring tools, combined with a meticulous approach to marking and layout, ensures that woodworking projects meet the intended specifications and exhibit a high degree of precision. The mastery of this skill is the cornerstone to fine craftsmanship.
4. Joining
The assembly of wood components to create a cohesive structure or form defines the woodworking process known as joining. The efficacy and longevity of these connections frequently depend upon the correct selection and execution of techniques using manually operated implements. The following details the use of these instruments in creating durable and aesthetically pleasing joints.
- Mortise and Tenon Joinery: Strength Through Interlocking
Mortise and tenon joints represent a fundamental method of joining, relying on a projecting tenon that fits precisely into a mortise, or recess. Manually operated implements, such as mortise chisels, tenon saws, and marking gauges, facilitate the creation of accurate mortises and tenons. The precision achieved through these implements directly impacts the joint’s strength and resistance to stress. Historically, this method has been used in structural applications, from timber framing to furniture construction.
- Dovetail Joinery: Visual Appeal and Mechanical Interlock
Dovetail joints, characterized by their interlocking tails and pins, provide both visual appeal and mechanical strength. Creating dovetails by hand requires skill and precision, employing saws, chisels, and marking gauges to achieve a tight, gap-free fit. This method is often chosen for drawer construction and casework, where the joint’s appearance enhances the overall aesthetic of the piece. The hand-cut variation is particularly prized for the intricacy of the joint’s geometry and the tactile engagement with the material.
- Lap Joints: Surface-to-Surface Connections
Lap joints involve overlapping two pieces of wood and securing them with fasteners or adhesives. Manually operated implements, such as saws and planes, ensure that the mating surfaces are flat and smooth, promoting a strong and reliable bond. This type of joining is particularly useful when working with large panels or creating frame structures, providing a balance between strength and ease of construction. Examples include frame and panel construction and basic furniture assemblies.
- Fasteners: Supplemental Strength and Efficiency
The utilization of mechanical fasteners, such as screws and nails, serves as a supplementary method to augment the integrity of joints crafted using these instruments. Hand drills, screwdrivers, and mallets enable the precise placement of fasteners, augmenting resistance against separation and maintaining alignment during adhesive curing. The strategic deployment of fasteners contributes to the joint’s overall robustness, particularly in scenarios involving substantial loads or recurrent stress.
The preceding examples represent fundamental methods for consolidating wood components using primarily manually operated implements. These approaches provide a pathway for achieving visually attractive structures that highlight the inherent attributes of the material. Skillful implementation of these methods, combined with precise execution, results in long-lasting, durable outcomes.
5. Finishing
The concluding stage of woodworking, known as finishing, serves to protect, enhance, and refine the wood surface. Its successful application significantly impacts the aesthetic appeal and longevity of the piece. While power tools may expedite certain aspects of finishing, the control and precision offered by basic hand tools remain invaluable for achieving superior results.
- Surface Preparation: Smoothing with Hand Planes and Scrapers
Achieving a flawless finish necessitates meticulous surface preparation. Hand planes, such as smoothing planes and block planes, are used to remove imperfections and create a uniformly smooth surface. Hand scrapers further refine the surface, eliminating minute irregularities and burnishing the wood. This meticulous preparation ensures optimal adhesion and a consistent appearance of the finish.
- Application of Finishes: Brushes and Cloths for Controlled Coverage
The application of finishes, whether varnish, lacquer, oil, or wax, requires careful control to achieve even coverage and avoid drips or runs. High-quality brushes, specifically designed for the type of finish being applied, allow for precise application in corners and intricate details. Cloths are used for applying oil or wax finishes, ensuring that the finish is evenly distributed and excess material is removed.
- Rubbing and Polishing: Achieving a Lustrous Sheen
Rubbing and polishing are essential steps in achieving a high-quality finish. Abrasive papers, used in progressively finer grits, smooth the finish and eliminate any imperfections. Rubbing compounds and polishes further enhance the sheen, creating a lustrous and durable surface. These steps are typically performed by hand to ensure that the finish is evenly polished and any swirl marks are minimized.
- Specialized Finishes: Milk Paint and Shellac Application
Certain specialized finishes, such as milk paint and shellac, often benefit from hand application techniques. Milk paint, a traditional finish, can be applied with brushes to create a textured, antique appearance. Shellac, known for its fast drying time, is often applied with a brush or cloth in thin coats to build up a smooth, glossy finish. These finishes require careful attention to detail and a practiced hand to achieve the desired results.
In conclusion, while modern finishing techniques often involve power tools and advanced materials, the fundamental principles of surface preparation, controlled application, and meticulous refinement remain paramount. The use of basic hand tools in finishing allows for a level of control and precision that is often difficult to achieve with power tools alone, contributing to a superior final product.
6. Maintenance
The operational longevity and effectiveness of implements used in wood crafting are directly contingent upon regular maintenance. Neglecting this aspect leads to diminished performance, potential tool failure, and increased risk of injury. A dull cutting edge on a chisel, for example, requires more force, leading to inaccurate cuts and a higher likelihood of the tool slipping. Similarly, a rusted saw blade increases friction, making cutting more difficult and producing a rougher finish. Proper maintenance is not merely about preserving the tools; it is an integral component of safe and efficient woodworking practices.
Specific maintenance procedures vary depending on the implement’s type and material. Cutting implements, such as saws and chisels, require periodic sharpening to maintain their cutting edge. Sharpening stones, honing guides, and stropping compounds are essential for this process. Metal components benefit from regular cleaning and lubrication to prevent rust and corrosion. Wooden handles may require occasional treatment with linseed oil to prevent drying and cracking. These measures, though seemingly simple, significantly extend the tool’s useful life and ensure consistent performance.
Ultimately, the diligent upkeep of manually operated implements represents a worthwhile investment. Tools that are properly maintained perform more effectively, require less effort to use, and last longer. Failure to adhere to these practices not only reduces the quality of woodworking projects but also increases the likelihood of accidents. Therefore, maintenance should be viewed as a fundamental element of woodworking, inseparable from the tools themselves.
7. Safety
The proficient and secure utilization of implements in wood crafting necessitates a thorough awareness of safety protocols. A lack of adherence to such guidelines can result in physical harm, encompassing lacerations, fractures, and other severe injuries. Therefore, safety constitutes a paramount aspect of all woodworking endeavors, demanding unwavering attention and proactive implementation of preventive measures. For instance, the improper use of a chisel, compounded by a lack of protective eyewear, can lead to eye injuries from flying wood chips, or deep cuts from the tool slipping.
Protective equipment, selected judiciously and utilized consistently, serves as a critical safeguard. Safety glasses shield the eyes from debris, while gloves provide enhanced grip and protection against abrasions. Hearing protection minimizes the risk of auditory damage from sustained exposure to loud noises inherent in woodworking environments. Furthermore, maintaining a clean and organized workspace reduces the likelihood of trips and falls, contributing to a safer operational setting. Secure clamping of workpieces is essential. Failure to do so can result in the workpiece moving unexpectedly during cutting or shaping, leading to tool slippage and potential injury.
Proper training in tool handling, combined with a consistent commitment to safe practices, is vital for mitigating risks. Familiarity with each implement’s intended function and inherent limitations enables the woodworker to operate them with precision and control. Adherence to safety regulations minimizes the incidence of accidents and promotes a secure and productive woodworking experience. The integration of safety into all aspects of woodworking is not merely a recommendation but an ethical imperative.
Frequently Asked Questions
The subsequent queries address common misconceptions and concerns regarding manually operated implements used in wood crafting. The provided answers aim to clarify prevalent questions and offer insights into the practical considerations associated with such instruments.
Question 1: What constitutes the minimum set of implements needed to initiate woodworking?
A basic set typically includes a crosscut saw, a rip saw, a block plane, a smoothing plane, a chisel set, a marking gauge, a combination square, and a sharpening stone. This selection facilitates fundamental cutting, shaping, and joining operations.
Question 2: What criteria should be considered when selecting these implements?
Material quality, construction integrity, and ergonomic design are critical factors. Implement selection should reflect the intended scope of woodworking projects and the user’s experience level.
Question 3: How frequently should these implements be sharpened?
Sharpening frequency depends on usage and the type of wood being worked. Implements should be sharpened whenever a decrease in cutting efficiency is observed.
Question 4: What are the recommended storage practices for preserving these implements?
Implements should be stored in a dry environment to prevent rust and corrosion. Cutting edges should be protected with guards or sheaths. Periodic application of protective oil is advisable.
Question 5: What safety equipment is indispensable when employing these implements?
Safety glasses, hearing protection, and appropriate work gloves are essential. A well-ventilated workspace is also recommended to minimize exposure to wood dust.
Question 6: Where can novices acquire proficiency in using these implements?
Woodworking courses, apprenticeship programs, and instructional resources (books and videos) are valuable avenues for acquiring skills and knowledge.
Mastering the application of these implements requires a blend of theoretical understanding and practical experience. Ongoing practice and adherence to established techniques are crucial for achieving proficient woodworking outcomes.
The following section will provide resources for those interested in further exploring wood crafting and the implements used in this area.
Conclusion
This exploration has underscored the critical role of basic hand tools for woodworking in achieving precision, control, and a profound understanding of the material. These implements, encompassing cutting, shaping, measuring, joining, and finishing tools, are foundational to the craft. Proper maintenance and unwavering adherence to safety protocols are paramount for ensuring both tool longevity and user well-being.
The mastery of these implements provides a gateway to timeless craftsmanship. Continued exploration and application of these techniques ensures the preservation of valuable skills, promoting the creation of enduring, high-quality woodworking projects.


