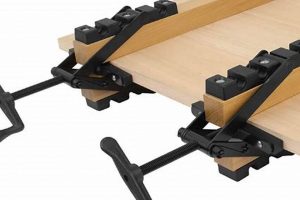
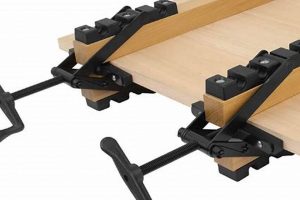
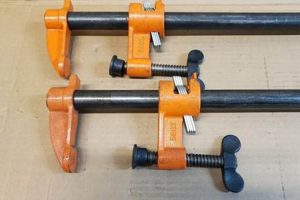
Pipe clamps, essential devices in woodworking, apply controlled pressure to hold components securely during gluing and assembly. These tools consist of a threaded pipe, typically steel, and two clamp heads: one fixed at the end and the other adjustable. The adjustable head slides along the pipe and is tightened with a screw mechanism to exert clamping force. A common application involves bonding multiple boards edge-to-edge to create a wider panel; the clamps maintain alignment and pressure until the adhesive cures.
The value of utilizing pipe clamps stems from their capacity to provide substantial and uniform pressure across larger surface areas, facilitating strong and durable bonds. Their adaptability, allowing for customization through varying pipe lengths, makes them suitable for diverse project sizes. Historically, these tools evolved from simpler clamping mechanisms, gradually incorporating threaded pipes for increased strength and precision, becoming a cornerstone of both amateur and professional woodworking practices.
A detailed explanation of preparing the workpieces, positioning the clamps, applying appropriate pressure, and considerations for preventing damage to the wood surface follows. Furthermore, this discussion explores techniques for achieving optimal results and maintaining the clamps for prolonged use.
Tips for Effective Pipe Clamp Use in Woodworking
Employing pipe clamps effectively necessitates attention to detail and a systematic approach. The following tips enhance the quality of the final product and extend the lifespan of the clamping equipment.
Tip 1: Prepare Surfaces Thoroughly: Ensure mating surfaces are clean, smooth, and free of debris before adhesive application. This promotes optimal glue adhesion and prevents gaps in the final assembly.
Tip 2: Use Cauls to Distribute Pressure: Implement cauls straight, rigid pieces of wood between the clamp jaws and the workpiece. Cauls distribute clamping pressure evenly, mitigating the risk of localized dents or distortions, especially when working with softer woods.
Tip 3: Employ Wax Paper or Tape: Apply wax paper or non-stick tape to the clamp jaws to prevent the workpiece from adhering to the metal. This simplifies clamp removal and protects the wood surface from staining or damage caused by adhesive squeeze-out.
Tip 4: Stagger Clamp Placement: Avoid placing clamps in a straight line. Staggering the clamps distributes pressure more effectively, preventing bowing or uneven compression, particularly in wider assemblies.
Tip 5: Avoid Over-Tightening: Excessive clamping pressure can damage wood fibers and distort the assembly. Tighten the clamps until the adhesive squeeze-out is consistent along the joint line, indicating adequate pressure for a strong bond.
Tip 6: Ensure Squareness: Before the adhesive cures, verify that the assembly is square using a reliable measuring tool, such as a square or framing square. Adjust clamp pressure or position as needed to correct any deviations from squareness.
Tip 7: Clean Clamps After Use: Promptly remove adhesive residue from the pipe clamps after each use. Dried adhesive can impede clamp operation and reduce the tool’s effectiveness. Use a solvent suitable for the adhesive type to clean the pipe and clamp heads.
Consistent application of these techniques results in stronger, more accurate wood assemblies. Proper clamp usage minimizes defects and contributes to overall project success.
The subsequent section addresses potential problems encountered during the clamping process and offers troubleshooting strategies.
1. Surface Preparation
Surface preparation constitutes a foundational element in woodworking projects involving pipe clamps. The quality of the bond achieved and the dimensional accuracy of the final assembly are directly influenced by the meticulousness of surface preparation. Proper surface preparation ensures intimate contact between wood surfaces and the adhesive, maximizing the effectiveness of the clamping pressure.
- Cleanliness of Mating Surfaces
Contaminants such as dust, oil, or loose wood fibers impede adhesive bonding. These substances create a physical barrier that prevents the adhesive from properly wetting the wood surface, resulting in a weaker joint. Sanding, vacuuming, and wiping with a solvent are standard methods for ensuring clean mating surfaces. In applications, for instance, when joining oily woods like teak, degreasing is paramount.
- Flatness and Co-planarity
Uneven surfaces introduce gaps and inconsistencies in clamping pressure. When mating surfaces are not co-planar, pipe clamps are forced to compensate for these irregularities, leading to localized stress concentrations and potential distortion of the assembly. The use of a jointer and planer to achieve flat and co-planar surfaces is crucial. Consider, for example, constructing a tabletop, where achieving a perfectly flat surface is necessary for the overall integrity.
- Texture and Surface Roughness
An excessively smooth surface can hinder adhesive penetration and mechanical interlocking. Conversely, a surface that is too rough may create excessive voids and require a greater volume of adhesive to fill. A moderately rough surface, typically achieved through sanding with appropriate grit sandpaper, provides optimal conditions for adhesion. In scenarios such as edge-gluing boards, a uniform surface texture promotes a consistent bond line.
- Moisture Content Equilibrium
Variations in moisture content between adjoining pieces can lead to differential expansion and contraction after assembly. This movement can compromise the bond and introduce stress within the joint. Acclimatizing the wood to a stable moisture content before gluing minimizes this risk. For example, when constructing furniture for an environment with controlled humidity, the wood must be acclimated to a similar level before assembly.
These facets of surface preparation directly influence the effectiveness of pipe clamps. By ensuring clean, flat, and properly textured surfaces with balanced moisture content, the clamping pressure is distributed evenly, maximizing bond strength and minimizing the risk of distortion or failure. A well-prepared surface is, therefore, an indispensable prerequisite for successful outcomes in woodworking projects.
2. Clamp Placement
Clamp placement is a critical factor influencing the success of any woodworking project involving pipe clamps. The strategic positioning of these clamps directly affects the distribution of pressure, the alignment of components, and the overall structural integrity of the finished piece. Improper clamp placement can lead to uneven joints, warping, or even complete failure of the assembly.
- Proximity to Joint Lines
Positioning clamps too far from the glue line reduces their effectiveness. The further the clamp is from the joint, the greater the potential for bowing or misalignment between the joined pieces. Clamps should be placed close enough to the joint to apply direct pressure, typically within a few inches, ensuring that the adhesive is evenly compressed. For example, in edge-gluing boards to create a tabletop, clamps positioned directly above and below the joint lines are crucial for maintaining flatness.
- Staggered Arrangement
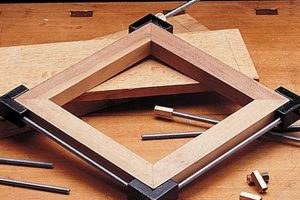
A linear arrangement of clamps can create concentrated pressure points and lead to uneven compression. Staggering the clamps, alternating their position slightly above and below the joint line, distributes pressure more uniformly across the assembly. This technique is particularly important when gluing wide panels or complex shapes, where even pressure distribution is essential to prevent warping. When assembling a frame, staggering ensures pressure at multiple points along the mitered corners, reinforcing the joints.
- Quantity and Spacing
The number of clamps used and their spacing along the joint line directly affect the uniformity of pressure. Insufficient clamps can lead to gaps or weak spots in the glue line, while excessive clamps can be cumbersome and may not necessarily improve the bond. The optimal spacing depends on the material, joint type, and size of the project, but a general rule is to space clamps every six to twelve inches. Consider a long, thin strip of wood being glued to a larger piece; more clamps are needed to prevent bowing compared to gluing two thick boards together.
- Consideration of Wood Grain Direction
Wood exhibits different strengths and properties depending on the direction of the grain. When applying clamping pressure, it is important to consider the grain orientation to avoid crushing or distorting the wood fibers. Applying excessive pressure perpendicular to the grain can cause the wood to buckle. Aligning the clamp jaws parallel to the grain, where possible, helps distribute the force more evenly and minimizes the risk of damage. When clamping a miter joint, the clamp pressure should be applied in a way that supports the mitered face, preventing it from collapsing.
These elements of clamp placement are integral to the successful application of pipe clamps in woodworking. Thoughtful consideration of clamp proximity, arrangement, quantity, and the influence of wood grain contributes to stronger, more accurate assemblies. Attention to these details minimizes the likelihood of defects and ensures the production of high-quality woodworking projects.
3. Pressure Control
Pressure control represents a crucial aspect of woodworking when employing pipe clamps. The degree of force applied directly influences the integrity of the bond and the structural stability of the assembled piece. Insufficient pressure can result in weak joints, while excessive pressure can damage the wood fibers or distort the components. The appropriate pressure level is dictated by factors such as the type of wood, the type of adhesive, and the nature of the joint being formed. As an example, hardwoods like maple require more clamping pressure than softwoods like pine. The use of a pressure gauge to measure compression offers greater precision, particularly in high-volume production environments. In cases of veneering, precise pressure control is paramount to prevent substrate deformation and veneer cracking.
The method of achieving controlled pressure varies depending on the pipe clamp design. Most involve a screw mechanism that allows incremental tightening. It is essential to tighten the clamps uniformly, distributing the force evenly across the joint. Furthermore, supplemental tools, like cauls, assist in distributing pressure over a larger area, preventing localized indentations or compression marks on the wood surface. When clamping curved components, pressure control is complicated by the irregular geometry. Specialized clamping jigs may be required to ensure uniform force distribution along the curved surfaces. A practical application involves edge-gluing a wide tabletop; if pressure is uneven, the table may warp during the curing process.
Proper pressure control ensures optimal adhesive performance and minimizes the risk of structural failure. It requires a combination of experience, careful observation, and appropriate tool selection. While general guidelines exist, experimentation and adjustment are often necessary to achieve the desired results. Consistent pressure control directly contributes to the longevity and aesthetic quality of woodworking projects, thereby reinforcing its significance as a foundational skill. A lack of awareness when it comes to controlled force impacts the overall quality and durability; woodworking operations could face costly repairs.
4. Wood Protection
Wood protection is an integral component of woodworking that directly influences outcomes when pipe clamps are employed. The application of clamping pressure, while necessary for secure adhesion, introduces the potential for surface damage and distortion. Protecting the wood surface during this process is essential for preserving the aesthetic and structural integrity of the finished piece.
- Use of Cauls
Cauls, rigid pieces of wood or metal, distribute clamping pressure evenly across the workpiece. Placing cauls between the clamp jaws and the wood surface prevents localized pressure points that can cause dents or impressions. For example, when edge-gluing boards for a tabletop, cauls running parallel to the joint lines ensure that the pressure is spread across the entire surface, minimizing the risk of bowing or unevenness.
- Application of Protective Layers
Thin layers of material, such as wax paper, cork, or leather, can be applied to the clamp jaws to provide a cushioning effect. These materials act as a barrier between the metal clamp and the wood, preventing direct contact and reducing the likelihood of scratches or staining. Wax paper is particularly useful in preventing adhesive from bonding to the clamps. A practical application is clamping a delicate veneer; protective layers prevent the clamp from marring the veneer surface.
- Consideration of Clamp Jaw Design
The design of the clamp jaws themselves plays a role in wood protection. Some pipe clamps feature swivel pads that conform to the shape of the workpiece, distributing pressure more evenly. Clamps with larger jaw surfaces also tend to be less likely to cause localized damage. The choice of clamp should consider the fragility of the wood being clamped; for example, softwoods require clamps with wider, gentler jaws.
- Appropriate Clamping Pressure
Applying excessive clamping pressure can compress wood fibers and lead to permanent deformation. It is crucial to apply only the amount of pressure necessary to achieve a strong bond. Overtightening clamps does not necessarily result in a stronger joint and can, in fact, weaken the wood. Monitoring adhesive squeeze-out is a useful indicator of adequate pressure; consistent squeeze-out along the joint line suggests that the clamps are sufficiently tightened without overstressing the wood. Applying controlled pressure helps minimize damage.
These facets of wood protection are intrinsically linked to effective “how to use pipe clamps woodworking”. Employing these techniques mitigates the risks associated with clamping pressure and contributes to the creation of high-quality woodworking projects. The appropriate protective measures ensure that the finished product retains its intended appearance and structural integrity, free from blemishes caused by the clamping process.
5. Squareness Verification
Squareness verification is a fundamental process in woodworking, intrinsically linked to the effective application of pipe clamps. Accurate alignment and adherence to right angles are often critical for the structural integrity and aesthetic appeal of woodworking projects. The use of pipe clamps to apply pressure during glue-up necessitates diligent verification to ensure the resulting assembly meets specified squareness tolerances.
- Importance of Accurate Measurement
Achieving and maintaining squareness relies heavily on precise measurement techniques. Tools such as precision squares, framing squares, and measuring tapes must be utilized correctly to identify deviations from true right angles. Inaccuracies during the measurement phase propagate throughout the project, leading to misaligned joints and compromised structural stability. For example, when constructing a cabinet carcass, precise measurements are crucial for ensuring that doors and drawers fit properly and operate smoothly.
- Application of Corrective Techniques
Deviations from square often necessitate corrective adjustments before the adhesive fully cures. This may involve subtle shifting of the clamped components, shimming, or the application of counter-pressure to counteract any warping or twisting. The timely identification and correction of squareness issues minimize the need for more extensive repairs later in the project. For instance, when assembling a picture frame, slight adjustments to the clamp pressure can bring the corners into perfect alignment.
- Utilizing Reference Surfaces
Reference surfaces, such as a flat workbench or a known-square structure, provide a reliable baseline for verifying squareness. By placing the clamped assembly against a reference surface, deviations from square can be readily identified and addressed. The reference surface acts as a standard against which the assembly’s alignment can be assessed. Assembling a drawer box may involve ensuring it sits flush against the edge of a workbench, confirming squareness before the adhesive cures.
- Cross-Diagonal Measurement
A practical method for verifying squareness involves measuring the diagonals of a rectangular or square assembly. If the diagonals are equal in length, the assembly is considered square. Discrepancies in the diagonal measurements indicate a distortion or misalignment that requires correction. This technique is particularly useful for large assemblies where visual inspection alone may not be sufficient to detect subtle deviations. When constructing a table, diagonal measurements reveal any racking or parallelogram distortion.
These elements of squareness verification are indispensable when following “how to use pipe clamps woodworking”. By employing accurate measurement, corrective techniques, reference surfaces, and diagonal measurement, woodworkers can leverage pipe clamps to achieve assemblies that are not only structurally sound but also visually appealing. The combination of appropriate clamping pressure and rigorous squareness verification results in high-quality woodworking projects.
6. Adhesive Cleanup
Adhesive cleanup is a fundamental step in woodworking that directly influences the functionality and longevity of pipe clamps. The proper and timely removal of adhesive residue from the clamps is essential for maintaining their operational efficiency and preventing corrosion, ultimately ensuring reliable performance in future projects.
- Preventing Adhesive Bonding to Clamps
Adhesive residue, if allowed to cure on the clamp surfaces, can create a strong bond, hindering the clamp’s smooth operation and reducing its clamping force. This bond can make adjusting the clamp difficult, potentially leading to uneven pressure distribution and compromised joints. Applying wax paper or tape to the clamp jaws before use minimizes adhesive adherence. For instance, dried polyurethane adhesive is notoriously difficult to remove, necessitating diligent preventative measures.
- Minimizing Corrosion Risk
Certain adhesives, particularly those containing acidic components, can promote corrosion of the metal clamp parts. This corrosion weakens the clamp’s structural integrity and reduces its lifespan. Prompt removal of adhesive residue, followed by the application of a rust inhibitor, minimizes the risk of corrosion. Example: Using an abrasive pad to remove dried glue, followed by a rust inhibiting oil.
- Maintaining Thread Integrity
Adhesive buildup within the threaded components of the pipe clamp impairs smooth operation and increases wear. Threaded components require a clean working surface to apply optimal force. Adhesive residue impedes this. Cleaning the threads with a wire brush and applying a lubricant ensures smooth adjustment and prolonged clamp life. For example, careful cleaning of the threads after using a PVA glue, ensures the clamp is in optimal working condition.
- Ensuring Accurate Pressure Application
Inconsistent adhesive buildup on the clamp jaws can affect the uniformity of pressure applied to the workpiece. The hardened adhesive creates uneven contact points, leading to localized stress concentrations and potential distortion of the wood. Regular cleaning of the clamp jaws ensures consistent and even pressure distribution across the glued surfaces. A practical case involves clamping a mitered frame; any adhesive buildup can distort the corners. Ultimately, Adhesive Cleanup ensures accurate force when considering “how to use pipe clamps woodworking”.
These facets of adhesive cleanup are intrinsically linked with how to use pipe clamps woodworking. By addressing these issues, woodworkers can maximize the performance of their pipe clamps and produce projects of high quality and durability. Neglecting adhesive cleanup impacts functionality and could have long term consequences.
7. Clamp Maintenance
The longevity and consistent performance of pipe clamps depend significantly on adherence to routine maintenance practices. Such maintenance directly correlates with the quality and reliability of woodworking projects utilizing these clamps. Neglecting maintenance diminishes the clamping force, introduces inaccuracies, and ultimately reduces the effectiveness of the woodworking process.
- Regular Cleaning and Lubrication
Consistent removal of adhesive residue, sawdust, and other debris from the clamp’s threads and moving parts is essential for maintaining smooth operation. Lubrication with appropriate oils or greases reduces friction and prevents corrosion, extending the clamp’s lifespan. Failure to clean and lubricate can lead to seized threads and reduced clamping force. Application: after gluing operations, wire brush and lubricate.
- Inspection for Damage and Wear
Periodic inspection of the clamp’s components, including the pipe, jaws, and tightening mechanism, identifies signs of damage or wear that could compromise its performance. Bent pipes, cracked jaws, or stripped threads should be addressed promptly to prevent failure during use. Example: bending on the pipe after applying too much force needs prompt replacement.
- Proper Storage Techniques
Storing pipe clamps in a dry, organized manner minimizes the risk of corrosion and physical damage. Hanging clamps or storing them in a dedicated rack prevents them from being bent or scratched, ensuring they are readily accessible and in optimal condition when needed. An unorganized, humid storage environment accelerates corrosion.
- Thread Protection
The threads on pipe clamps are crucial for applying and maintaining clamping pressure. Protecting these threads from damage and corrosion is essential for ensuring accurate and reliable performance. Applying thread protectors or coating the threads with a rust-inhibiting compound safeguards them from environmental factors. An Example being covering threads with anti-corrosion grease for thread protection.
These maintenance facets are fundamental to optimizing how to use pipe clamps in woodworking. By diligently implementing these practices, woodworkers can ensure that their clamps remain reliable, accurate, and durable, contributing to the overall quality and success of their projects. Disregarding clamp maintenance creates operational risks and shortens the lifespan, making preventative care key.
Frequently Asked Questions
The following addresses common inquiries regarding the selection, utilization, and maintenance of pipe clamps in woodworking applications.
Question 1: What pipe diameter is generally recommended for woodworking pipe clamps?
Three-quarter-inch (3/4″) diameter pipes are frequently preferred for woodworking applications due to their balance of strength, rigidity, and affordability. While half-inch (1/2″) pipes are suitable for lighter-duty tasks, the 3/4″ provides increased resistance to bending under load, making it more appropriate for larger or more demanding projects. One-inch (1″) diameter pipes offer further strength but can be excessively heavy and expensive for typical woodworking requirements.
Question 2: How much clamping pressure is considered optimal when using pipe clamps on hardwood?
The appropriate clamping pressure for hardwood varies depending on the species and joint type, but a general guideline is to apply sufficient pressure to achieve consistent adhesive squeeze-out along the joint line. Excessive pressure can crush wood fibers and weaken the joint. Visual inspection remains crucial; even squeeze-out generally indicates sufficient pressure without over-stressing the material. Using cauls aids pressure distribution.
Question 3: What materials are suitable for creating cauls used in conjunction with pipe clamps?
Cauls require a high degree of rigidity and straightness to effectively distribute clamping pressure. Hardwoods, such as maple or oak, are frequently employed. Metal cauls, such as steel or aluminum bars, offer superior rigidity but require careful handling to prevent damage to the wood surface. The selected material must resist bending or deformation under the applied clamping force.
Question 4: How often should pipe clamps be cleaned and lubricated to maintain optimal performance?
Pipe clamps should be cleaned immediately after each use to remove adhesive residue. Lubrication should occur every few uses, or whenever the threads become stiff or difficult to adjust. Regular maintenance ensures smooth operation and prevents corrosion. Neglecting these steps can lead to reduced clamping force and premature failure.
Question 5: What are effective strategies for preventing pipe clamps from staining the wood surface?
Direct contact between the metal clamp and the wood surface can cause staining, particularly with certain wood species or finishes. Applying wax paper, cork, or leather pads to the clamp jaws provides a protective barrier. Care should be taken to prevent adhesive squeeze-out from contacting the metal components.
Question 6: Can pipe clamps be used to correct warping in wood?
While pipe clamps can be used to exert force and encourage a warped board back into alignment, they are primarily designed for holding components together during glue-up, rather than correcting existing distortions. Attempting to force a severely warped board into shape with clamps can result in excessive stress and potential damage to the wood. Other techniques, such as steaming or kerf-bending, are often more effective for addressing warping.
Consistent application of best practices contributes to reliable joint strength and extends tool lifespan.
The subsequent section details common pitfalls encountered when using these clamps and provides relevant troubleshooting guidance.
Conclusion
This exploration of how to use pipe clamps woodworking elucidated essential techniques for maximizing joint integrity and project precision. Surface preparation, clamp placement, pressure control, and wood protection emerged as critical factors influencing the quality and durability of assembled wood components. Attention to detail in each phase is paramount for achieving consistently successful outcomes.
Mastery of these clamping techniques constitutes a fundamental skill for woodworkers seeking to produce robust and aesthetically refined projects. Continued refinement of these methods ensures reliable results and upholds the craft’s enduring standards for quality and precision.


