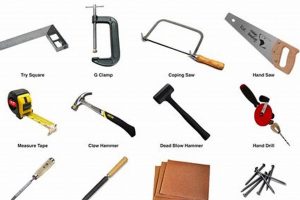
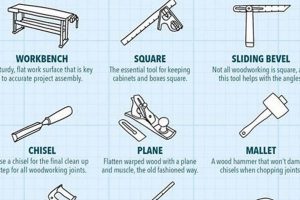
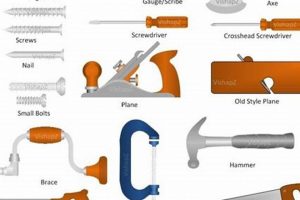
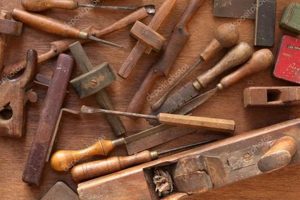
A compilation of manually operated implements employed in the shaping, cutting, joining, and finishing of wood constitutes a fundamental resource for artisans and hobbyists alike. This inventory typically includes items such as saws, planes, chisels, hammers, and measuring devices, each designed for specific tasks in the woodworking process. For instance, a dovetail saw facilitates the creation of intricate joints, while a smoothing plane refines wood surfaces to a flawless finish.
The significance of a carefully curated collection of these implements lies in its capacity to empower precise and controlled manipulation of wood. Historically, these instruments were the primary means of woodworking, demanding considerable skill and craftsmanship. Their continued relevance stems from their portability, versatility, and the unique tactile feedback they provide, allowing for nuanced adjustments and intricate detailing unattainable with power tools alone. The correct selection facilitates efficient and accurate project completion.
The subsequent discussion will categorize these essential implements based on their primary function, providing a structured overview of the most commonly utilized and beneficial choices. This organization will aid in understanding the purpose and application of each tool, fostering informed decisions when building a woodworking workshop or expanding an existing collection.
Essential Guidance for Woodworking Implements
The following recommendations serve as a guide to the selection, maintenance, and usage of manually operated implements, intended to optimize efficiency and accuracy in woodworking endeavors.
Tip 1: Prioritize Quality over Quantity: Investing in fewer, high-quality instruments from reputable manufacturers yields greater long-term value. Superior materials and construction ensure durability, performance, and improved results.
Tip 2: Sharpen Regularly: Maintaining keen edges on cutting tools such as chisels and planes is paramount. Dull edges necessitate excessive force, compromising precision and increasing the risk of injury. Employ appropriate sharpening techniques and equipment.
Tip 3: Understand Grain Direction: Cutting with the grain, rather than against it, minimizes tear-out and produces smoother surfaces. Careful observation of the wood’s grain pattern informs optimal cutting strategies.
Tip 4: Secure Workpieces Firmly: Employing vises, clamps, or other work-holding devices ensures stability during shaping and joinery. Adequate fixation prevents slippage, enhancing safety and accuracy.
Tip 5: Choose the Right Tool for the Job: Selecting an implement specifically designed for a particular task optimizes efficiency and reduces the likelihood of damage to the workpiece or tool. Avoid using tools for unintended purposes.
Tip 6: Proper Storage is Key: The organization and storage of instruments contributes to their longevity and ease of access. A dedicated tool cabinet, chest, or wall-mounted rack protects from damage and corrosion.
Tip 7: Learn Traditional Joinery Techniques: Mastery of classic joinery methods like dovetails, mortise and tenon, and rabbets expands design possibilities and produces structurally sound and aesthetically pleasing results.
Tip 8: Practice on Scrap Wood: Before committing to a final project, test techniques and setups on scrap material. This minimizes errors and allows for refinement of skills and processes.
Adherence to these guidelines promotes safe, efficient, and rewarding woodworking experiences, leading to enhanced craftsmanship and project outcomes.
The concluding section will summarize the core principles of selecting and utilizing manual implements, reinforcing the value of informed decision-making and skillful execution.
1. Precision measurement instruments
The accurate dimensioning and marking of wood are paramount to successful woodworking. Precision measurement instruments constitute a foundational component of any comprehensive “list of hand tools for woodworking”, ensuring the fidelity of design and the integrity of joinery.
- Marking Gauges: Parallel Lines and Material Removal
Marking gauges establish consistent, parallel lines on wood surfaces. These lines serve as visual guides for sawing, chiseling, or planing, ensuring uniform material removal. For example, a mortise gauge, a specialized type, allows for the precise layout of mortise and tenon joints, a fundamental element in furniture construction. Accuracy in this step directly influences the structural soundness of the finished piece.
- Squares: Establishing Right Angles and Trueness
Squares, encompassing try squares and combination squares, are essential for verifying and establishing right angles. In constructing a cabinet, for instance, a square ensures that the sides are perpendicular to the top and bottom, resulting in a stable and visually appealing structure. Deviation from square can lead to cumulative errors throughout a project, affecting overall dimensions and functionality.
- Rules and Tapes: Linear Measurement and Dimensioning
Rules and measuring tapes provide linear measurements for determining the size and proportions of wood components. These instruments are used in initial planning stages and throughout the construction process. For instance, accurately measuring and cutting lumber to specified lengths is crucial for creating elements like table legs or frame components. Discrepancies in length can lead to misaligned joints and structural instability.
- Bevel Gauges: Angle Transfer and Replication
Bevel gauges allow for the precise transfer and replication of angles. This is particularly useful in creating angled joinery or replicating existing architectural details. An example includes matching the angle of a crown molding to an existing trim piece in a home renovation project. The ability to accurately transfer angles ensures that new elements integrate seamlessly with existing structures.
The utilization of these measurement instruments, while seemingly basic, is critical for achieving precision in woodworking. Their accurate application, combined with skilled craftsmanship, ensures that projects are not only aesthetically pleasing but also structurally sound and dimensionally accurate, highlighting their essential role in any “list of hand tools for woodworking.”
2. Cutting implement variety
Cutting implements form a crucial category within any comprehensive “list of hand tools for woodworking.” The specific type of cutting implement utilized directly affects the efficiency, precision, and final quality of woodworking projects. The variety available arises from the diverse demands of woodworking, encompassing ripping, crosscutting, shaping, and joinery. The selection of an inappropriate implement leads to increased effort, reduced accuracy, and potential damage to the workpiece. For instance, using a crosscut saw to rip lumber along the grain results in a rough, inefficient cut, while a dull saw requires excessive force, increasing the risk of injury. A backsaw, with its rigid spine, allows for controlled, fine cuts when creating dovetail joints, a task poorly suited to a general-purpose hand saw.
The proper application of specific cutting implements necessitates an understanding of their design and intended use. A coping saw, characterized by its thin, flexible blade, excels at cutting intricate curves and shapes in thin materials, as demonstrated in the creation of decorative fretwork. A traditional rip saw is designed to cut along the grain of wood, while a crosscut saw is engineered to sever wood fibers perpendicular to the grain. Specialized saws, such as veneer saws or compass saws, are designed for specific tasks that general-purpose saws cannot perform effectively. This diversity in function necessitates careful consideration when compiling a “list of hand tools for woodworking,” as each implement contributes unique capabilities to the woodworking process.
The availability of a diverse range of cutting implements allows woodworkers to address a multitude of challenges with greater efficiency and precision. Selecting and maintaining the appropriate tools for each task maximizes productivity and ensures consistent, high-quality results. The value of “cutting implement variety” as a component of “list of hand tools for woodworking” is in enabling control, accuracy, and the ability to tackle intricate designs. Choosing the right saw for the cut is essential for success.
3. Shaping and smoothing essentials
The ability to refine and contour wood surfaces is fundamental to woodworking, necessitating a specific subset of implements categorized as shaping and smoothing essentials. Their presence on a comprehensive “list of hand tools for woodworking” indicates the capacity to move beyond basic joinery towards creating refined forms and high-quality finishes.
- Hand Planes: Surface Refinement and Dimensioning
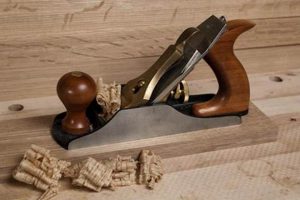
Hand planes are crucial for achieving flat, smooth surfaces and precise dimensional control. Different types of planes exist, each designed for specific tasks. A jack plane is used for initial rough shaping, a smoothing plane for final surface refinement, and a block plane for end-grain work and chamfering. For example, a smoothing plane removes minute imperfections from a tabletop, leaving a surface ready for finishing. The plane’s adjustable blade allows for precise material removal, achieving a level of flatness and smoothness often unattainable with power tools alone.
- Chisels: Controlled Material Removal and Detail Work
Chisels are employed for controlled material removal in shaping joinery, carving details, and cleaning up corners. Beveled-edge chisels allow access into tight spaces, while mortise chisels are specifically designed for creating deep, square mortises. A woodworker might use a chisel to refine the edges of a dovetail joint or to create a decorative inlay. The sharpness of the chisel and the control of the user determine the precision and quality of the resulting detail.
- Rasps and Files: Aggressive Shaping and Curved Surfaces
Rasps and files are abrasive tools used for shaping curved surfaces and removing material aggressively. Rasps, with their coarse teeth, are effective for shaping complex curves, while files, with their finer teeth, refine the surface. A cabinetmaker might use a rasp to shape a cabriole leg for a chair or a file to smooth the inside curve of a scroll. These tools enable the creation of organic forms and intricate details that add visual interest to woodworking projects.
- Abrasives: Progressive Surface Refinement
Abrasives, such as sandpaper and sanding blocks, are used to progressively refine wood surfaces, removing tool marks and preparing the wood for finishing. Sandpaper is available in various grits, ranging from coarse to very fine, allowing for a gradual reduction of surface imperfections. A woodworker might start with a coarse grit to remove plane marks and then progress through finer grits to achieve a smooth, polished surface. Proper sanding is essential for achieving a professional-looking finish and enhancing the beauty of the wood grain.
These shaping and smoothing implements, when skillfully employed, transform rough lumber into refined objects, highlighting the integral connection between surface quality and overall project success. Their inclusion in a “list of hand tools for woodworking” signifies the potential to create not only functional pieces but also objects of enduring aesthetic value. The ability to shape and smooth wood is paramount to creating pieces with professional touch.
4. Joinery tool necessities
The creation of robust and aesthetically pleasing woodworking projects hinges upon effective joinery, thereby rendering the instruments dedicated to this purpose indispensable. The composition of a comprehensive “list of hand tools for woodworking” must, therefore, consider the fundamental implements required for executing various joint types, ensuring structural integrity and visual appeal.
- Saws for Joinery: Precision Cutting for Interlocking Pieces
Saws designed for joinery, such as dovetail saws and tenon saws, are distinguished by their fine teeth and rigid backs, enabling precise cuts essential for tight-fitting joints. A dovetail saw, for instance, allows for the accurate creation of dovetails, a joint known for its strength and aesthetic appeal. The kerf, or width of the cut, must be minimal to ensure proper alignment and a seamless fit. Incorrect saw selection compromises joint strength and visual quality.
- Chisels for Joinery: Refining and Defining Joint Surfaces
Joinery chisels, including mortise chisels and paring chisels, serve to refine and define the surfaces of joints, ensuring proper mating and structural soundness. A mortise chisel, with its thick blade, is used to remove waste material from mortises, while a paring chisel, with its thin, flexible blade, is used to fine-tune joint surfaces. The sharp edge and precise control afforded by these chisels are crucial for creating tight-fitting joints that withstand stress and maintain alignment.
- Marking and Measuring Tools for Joinery: Accurate Layout and Execution
Accurate layout is paramount in joinery, necessitating the use of precise marking and measuring tools. Marking gauges, knives, and squares are used to transfer dimensions and establish reference lines for cuts and mortises. A marking gauge, for example, creates parallel lines for mortise depth, ensuring uniform material removal. Errors in layout translate directly into misalignment and weakened joints, underscoring the importance of precision in this phase.
- Planes for Joinery: Precision Surfacing of Joint Components
Hand planes like rabbet planes and shoulder planes are essential for the precise surfacing and fitting of joint components. A rabbet plane creates a recess along the edge of a board for creating rabbet joints, while a shoulder plane ensures that the shoulder of a tenon is perfectly square and flush with the adjoining surface. Accurate planing is crucial for achieving tight, seamless joints, particularly where the joinery will be visible in the finished piece.
The aforementioned implements represent the core components of a joinery toolkit, each contributing to the creation of robust, visually pleasing, and structurally sound woodworking projects. Their careful selection and skillful application are essential considerations when compiling a “list of hand tools for woodworking”, reflecting the central role of joinery in the craft.
5. Finishing applications range
The aesthetic appeal and protective qualities of a completed woodworking project are significantly influenced by the finishing processes employed. These processes, involving a diverse range of materials and techniques, necessitate specific implements. Therefore, a comprehensive “list of hand tools for woodworking” must account for the instruments required to effectively apply finishes, ensuring durability and visual enhancement.
- Brushes: Application of Liquid Finishes
Brushes, available in various sizes and bristle types, facilitate the application of liquid finishes such as stains, varnishes, and paints. Natural bristle brushes are typically used for oil-based finishes, while synthetic brushes are suitable for water-based products. The selection of an appropriate brush, along with proper technique, ensures uniform coverage and minimizes brush strokes. A poorly chosen brush can lead to uneven application and detract from the overall appearance of the finished piece. For instance, when applying varnish to a tabletop, a high-quality brush and careful application technique are essential for achieving a smooth, glass-like surface.
- Applicators: Even Distribution of Finishes
Applicators, including rags, pads, and sponges, provide alternative methods for distributing finishes, particularly for wiping stains and applying oil finishes. These implements allow for precise control over the amount of finish applied, minimizing drips and runs. For example, a clean, lint-free rag is often used to wipe off excess stain, revealing the grain pattern of the wood and creating a consistent color. The proper use of applicators ensures even distribution and prevents the buildup of finish in corners and crevices. Improper applicators could result in blotchy or uneven finishes that diminish the wood’s natural beauty.
- Scrapers: Surface Preparation and Finish Removal
Scrapers, consisting of card scrapers and cabinet scrapers, are used to prepare wood surfaces for finishing and to remove imperfections in existing finishes. A card scraper is used to smooth wood surfaces after planing, removing fine tool marks and creating a pristine surface for finish application. Scrapers can also be used to remove old varnish or paint, providing a clean slate for a new finish. Correctly sharpened and skillfully used, scrapers eliminate the need for extensive sanding, preserving the wood’s surface texture. Failing to prepare the surface properly results in finishes that do not adhere well, or show imperfections.
- Sandpaper and Sanding Blocks: Smoothing and Leveling
Sandpaper, in conjunction with sanding blocks, facilitates the smoothing and leveling of wood surfaces prior to finishing. Various grits of sandpaper are used to progressively refine the surface, removing scratches and imperfections. Sanding blocks provide a flat, even surface for sanding, ensuring uniform pressure and preventing uneven material removal. Sanding is a critical step in preparing wood for finishing, as it creates a smooth, consistent surface that allows the finish to adhere properly and enhances its visual appearance. Inadequate sanding results in finishes that highlight surface imperfections rather than concealing them.
The range of finishing applications, when considered within the context of a “list of hand tools for woodworking”, emphasizes the importance of selecting appropriate implements for each stage of the finishing process. From brushes and applicators to scrapers and sandpaper, these tools contribute to the creation of durable, aesthetically pleasing, and professionally finished woodworking projects.
Frequently Asked Questions
The following addresses common inquiries regarding the selection, maintenance, and application of manually operated implements used in woodworking.
Question 1: What constitutes an essential starting selection of manually operated implements for woodworking?
A fundamental compilation includes a crosscut saw, rip saw, smoothing plane, block plane, a set of chisels (various sizes), a marking gauge, a combination square, a measuring tape, and a sharpening stone. This assortment enables basic cutting, shaping, and jointing operations.
Question 2: How frequently should cutting tools be sharpened to maintain optimal performance?
Sharpening frequency depends on usage and wood type. However, cutting edges should be honed whenever resistance increases or the cut quality diminishes. Regular honing, perhaps after each use, maintains sharpness. Formal sharpening, removing metal to restore the edge, is required less often.
Question 3: What factors should influence the choice between traditional steel and high-speed steel (HSS) for cutting edges?
Traditional carbon steel is typically easier to sharpen to a keen edge, but HSS retains its sharpness longer. HSS is generally preferred for power tools or high-volume work, while carbon steel may be favored for fine hand work where ease of sharpening is paramount.
Question 4: Is specialized storage necessary for manual woodworking implements, or can they be stored in a general toolbox?
Dedicated storage is recommended. A tool chest, cabinet, or wall-mounted rack protects delicate edges from damage and prevents rust formation. Organized storage also improves efficiency by facilitating quick access to the required tool.
Question 5: Are there safety precautions particularly relevant when using manually operated woodworking implements?
Secure workpieces firmly to prevent slippage. Maintain sharp edges on all cutting tools to reduce the force required for cutting. Always cut away from the body, and wear appropriate eye protection. Proper technique is crucial in minimizing the risk of injury.
Question 6: How does one determine the appropriate size and type of hand plane for a specific woodworking task?
Plane size and type depend on the operation. A jack plane (approximately 14 inches long) is suitable for general flattening, a smoothing plane (approximately 9 inches long) is used for final surface refinement, and a block plane (approximately 6 inches long) is ideal for end grain work and chamfering. Consider the scale of the project and the desired finish quality when selecting a plane.
The information provided offers guidance for navigating the diverse world of manually operated woodworking implements, promoting informed decision-making and safe, effective practices.
The subsequent segment will provide supplementary resources and further reading for those seeking to expand their knowledge and skillset.
Conclusion
The preceding discourse provided an overview of essential implements utilized in woodworking. The information included detailed categorization based on function, application guidelines, and responses to frequently encountered inquiries. The discussion clarified the importance of precision measurement, the necessity of diverse cutting instruments, the value of shaping and smoothing capabilities, the requirements for sound joinery, and the options available for finishing applications. The provided insight into the “list of hand tools for woodworking” is a vital part of any woodworker’s education.
The mastery of these manual implements and associated techniques remains fundamental to the craft, regardless of technological advancements. Continued study and practice enhance proficiency, enabling the creation of enduring and aesthetically significant works. The informed selection and skillful application of these tools allow artisans to translate vision into tangible form.


