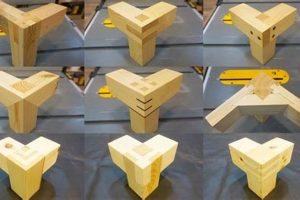
A method of joinery characterized by interlocking, fan-shaped projections emanating from two boards, provides exceptional strength and resistance to pulling forces. This construction technique is commonly employed to unite the sides of drawers, cases, and boxes, creating an aesthetically pleasing and robust connection. Examples include connecting the sides of a chest of drawers or the corners of a jewelry box.
This particular style of joinery provides a strong and durable bond, making it ideal for applications requiring resistance to stress and tension. Its visual appeal also contributes to the overall quality and craftsmanship of the finished piece. Historically, its use signified high-quality craftsmanship and attention to detail, often found in heirloom furniture and other treasured objects. This type of joint has long been valued for its structural integrity.
The subsequent sections will detail the various types of this method, the tools and techniques required for its creation, and the considerations for selecting the appropriate variation for specific applications. Furthermore, this article aims to provide a comprehensive overview of the process, from initial preparation to final assembly. The next topics will cover hand-cut versus machine-cut methods, common errors, and best practices.
Essential Guidelines
This section presents crucial guidelines for achieving optimal results when executing this specific joinery. Adhering to these recommendations will enhance both the structural integrity and aesthetic appeal of the finished product.
Tip 1: Wood Selection: Employ hardwoods such as maple, cherry, or walnut for enhanced durability and aesthetic results. Softwoods may be suitable for practice, but are generally less resistant to wear and tear when employing this joint.
Tip 2: Precision Marking: Accuracy in marking the pin and tail layouts is paramount. Utilize a sharp marking knife and a precise dovetail marker to ensure clean, defined lines. Inaccurate markings compromise the integrity and appearance of the joint.
Tip 3: Proper Sawing Technique: Employ a backsaw or dovetail saw with fine teeth to achieve clean, straight cuts. Maintaining a consistent angle and avoiding excessive force is crucial for preventing tear-out and ensuring a tight fit.
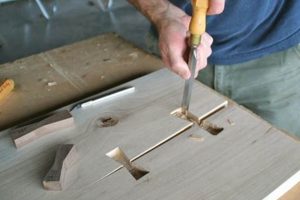
Tip 4: Careful Chisel Work: When removing waste material, utilize sharp chisels and a controlled paring motion. Working close to the baseline and gradually removing material minimizes the risk of over-cutting and ensures a clean, flat surface.
Tip 5: Test Fitting and Adjustment: Before applying glue, dry-fit the joint to identify any areas requiring adjustment. Minor discrepancies can be addressed with careful chiseling or sanding to achieve a snug, seamless fit.
Tip 6: Glue Application: Apply a thin, even layer of high-quality wood glue to all mating surfaces. Avoid excessive glue application, which can weaken the joint and create a messy appearance.
Tip 7: Clamping and Curing: Utilize clamps to apply even pressure during the glue curing process. Ensure that the joint is properly aligned and that excess glue is removed before it hardens. Allow sufficient time for the glue to cure completely before removing the clamps.
Adherence to these guidelines will significantly improve the quality and longevity of the assembled piece. The strength and visual appeal are directly correlated with the care taken during each stage of the process.
The following section will provide methods of troubleshooting common problems encountered with this process, and will offer solutions for common imperfections.
1. Strength
Strength, in the context of woodworking joinery, directly correlates with the load-bearing capacity and resistance to separation exhibited by an assembled joint. In the realm of woodworking, the utilization of this form of joinery is often predicated on its inherent capacity to withstand significant tensile and shear forces, which sets it apart from simpler joining methods.
- Interlocking Geometry
The defining characteristic is its interlocking structure. The splayed “tails” and corresponding “pins” create a mechanical bond that resists pulling forces along multiple axes. This geometric configuration effectively distributes stress across the joint, preventing localized failure. An example would be a heavily loaded drawer where the sides are securely connected to the front, preventing it from pulling apart over time.
- Glue Surface Area
This method maximizes the surface area available for glue adhesion. The intricate shapes of the pins and tails dramatically increase the bonding area compared to butt joints or other simple connections. This augmented surface area enhances the overall strength by providing a more extensive and secure bond between the wood fibers. More surface area equals more contact for the glue to bind, leading to a stronger final product.
- Resistance to Tensile Stress
One of the primary advantages is its exceptional resistance to tensile stress, or pulling forces. Unlike joints that rely solely on fasteners or glue, the interlocking geometry inherently resists separation when subjected to tension. This makes it particularly suitable for applications where the joint is likely to experience significant pulling forces, such as the corners of a chest or the connection between a table leg and apron.
- Wood Fiber Interlock
The interlocking nature of the joint leverages the inherent strength of wood fibers along different grain orientations. The pins and tails, when properly executed, create a complex weave of wood fibers that resists deformation and separation. This fiber interlock is especially crucial in hardwoods, where the density and rigidity of the wood contribute significantly to the joint’s overall strength.
The combined effect of interlocking geometry, enhanced glue surface area, tensile stress resistance, and wood fiber interlock contribute to the exceptional strength. This joinery is frequently selected when longevity and robustness are paramount, solidifying its role in high-quality woodworking and furniture construction. Compared to other forms of joinery, it is often seen as the gold standard for structural integrity.
2. Precision
The creation of woodworking dovetail joints hinges critically on precision. This level of accuracy is not merely an aesthetic consideration; rather, it is fundamental to the joint’s structural integrity and long-term performance. Any deviation from precise measurements and cuts directly compromises the joint’s ability to withstand stress, leading to potential failure. For instance, improperly angled tails or pins will result in gaps, diminished glue surface area, and a weaker overall connection. This demand for accuracy is the underlying cause of the perceived difficulty in mastering this joint.
Precision manifests throughout the process, from the initial layout and marking to the final fitting. The use of accurate measuring tools, such as precision squares and marking gauges, is indispensable. Similarly, the skill in executing clean, straight cuts with saws and chisels determines the tightness and strength of the interlocking components. Examples of practical applications where precision is paramount include constructing drawers that slide smoothly and seamlessly, or building cases where the joints remain flush and visually appealing over extended use.
In summary, precision in crafting these joints is not simply a desirable attribute but a prerequisite for success. Its influence extends from the initial layout to the final assembly, affecting both the structural soundness and aesthetic quality of the finished product. Overlooking this aspect introduces challenges in achieving a strong and visually refined joint. Ultimately, recognizing the integral role of precision is essential for mastering this enduring woodworking technique.
3. Aesthetics
Aesthetics in woodworking refers to the visual appeal and artistic qualities inherent in a finished piece. In joinery, the appearance of the joints significantly contributes to the overall aesthetic value. The method we use not only provides structural integrity but also offers unique visual characteristics that can enhance the design.
- Visual Harmony
The deliberate placement of pins and tails can create a visual rhythm and balance, contributing to the piece’s overall harmony. The pattern formed by the interlocking elements can be adjusted to complement the style of the furniture, from traditional to contemporary designs. For instance, half-blind applications on drawer fronts conceal the joint from the front, while exposed varieties showcase craftsmanship on the sides.
- Craftsmanship Display
Exposed variations often serve as a visual testament to the woodworker’s skill and attention to detail. The precision required for a tight-fitting, visually appealing joint highlights the artisan’s mastery of technique. This visible evidence of craftsmanship can elevate the perceived value and quality of the piece. Examples include hand-cut joints in fine furniture, where the slight imperfections are viewed as marks of authenticity.
- Material Contrast
Combining different wood species with contrasting colors can accentuate the joint’s visual impact. The interplay of light and dark woods creates a striking visual effect, drawing attention to the meticulous joinery. This approach can be employed to emphasize the joint as a decorative element rather than simply a structural necessity. One application is using a dark wood like walnut for the pins against a lighter wood like maple for the tails.
- Historical Significance
Historically, its presence has signified high-quality construction and attention to detail. In antique furniture, the presence is often considered a mark of authenticity and a reflection of the era’s woodworking standards. Replicating these historical styles requires not only technical skill but also an understanding of the aesthetic principles that guided their design.
The aesthetics related to this joinery is more than just a decorative element; it is an integral aspect of woodworking that reflects the skill, design sensibility, and historical context of the piece. The careful consideration of these aesthetic factors elevates it from a functional joint to a defining feature of the finished product. Consequently, it is often considered by both hobbyist and professional woodworkers alike.
4. Durability
Durability, in the context of woodworking, refers to the capacity of a finished piece to withstand wear, stress, and environmental factors over an extended period. The selection of joinery techniques significantly influences a piece’s long-term structural integrity, and this particular method is widely recognized for its contribution to creating robust and enduring wooden structures.
- Resistance to Joint Separation
The interlocking design inherently resists separation under stress, a key factor in long-term durability. The mechanical bond created by the pins and tails effectively distributes force, minimizing stress concentrations that can lead to joint failure. This inherent resistance ensures that the joint remains intact even under demanding conditions, such as repeated loading or environmental fluctuations. For instance, a chest of drawers constructed with this form of joinery is less likely to experience drawer front separation over time, compared to one assembled with less robust methods.
- Glue Surface Protection
The joint design also protects the glue line from direct stress. The interlocking components shield the glue from tensile and shear forces, preventing premature failure. The glue serves to further reinforce the mechanical connection, creating a synergistic effect that enhances durability. The protected glue line ensures that the joint maintains its integrity even after years of use. This is particularly relevant in applications where the joint is exposed to moisture or fluctuating temperatures, which can degrade adhesive bonds.
- Dimensional Stability
Properly executed joint contributes to dimensional stability by minimizing wood movement across the joint. The interlocking components constrain the natural expansion and contraction of wood due to changes in humidity, reducing the risk of warping or cracking. This is crucial for maintaining the integrity of larger structures, such as case goods or tables. In environments with fluctuating humidity levels, this stability prevents the joint from weakening and ensures that the piece retains its shape and function over time.
- Load Distribution
The design promotes effective load distribution across the joint. The interlocking pins and tails transfer weight evenly, preventing stress concentrations in specific areas. This even distribution enhances the overall strength and resilience of the joint, reducing the likelihood of localized failure. For example, in a heavy table, it can distribute the weight of the tabletop evenly across the legs, preventing undue stress on any single joint.
The enhanced resistance to separation, glue surface protection, dimensional stability, and load distribution all contribute to the exceptional durability. Consequently, the utilization of this method ensures that the finished piece maintains its structural integrity and aesthetic appeal for generations. It stands in contrast to simpler joinery methods, which may be faster to execute but lack the long-term resilience necessary for demanding applications. Therefore, it remains a preferred choice for woodworkers seeking to create enduring and heirloom-quality pieces.
5. Alignment
Perfect alignment stands as a non-negotiable prerequisite in achieving a structurally sound and aesthetically pleasing dovetail joint. Misalignment, even by a minimal degree, initiates a cascade of detrimental effects. The intended interlocking mechanism becomes compromised, diminishing the joint’s capacity to resist tensile forces. This deficiency leads to a weakened bond, increasing the likelihood of joint failure under stress. The precise mating of pins and tails, crucial for distributing load evenly, suffers irreparably. Real-world examples include drawers that bind or fail to sit flush within their frame, or casework where unsightly gaps appear at the corners. The practical significance lies in the understanding that meticulous attention to alignment during every stage of the process, from layout to final assembly, directly dictates the longevity and functionality of the piece.
Several factors contribute to maintaining optimal alignment. The initial layout necessitates the accurate transfer of measurements and angles from one workpiece to another. Deviations at this stage propagate throughout the subsequent steps. During the cutting process, consistent sawing and chiseling techniques are essential. Uneven cuts or improperly pared shoulders prevent the components from seating correctly. The glue-up phase presents further challenges. Clamping pressure must be applied uniformly to prevent shifting or twisting. Jigs and fixtures can be invaluable in maintaining the proper orientation of the parts while the adhesive cures. The successful execution hinges on the recognition that cumulative errors compound the problem, rendering corrective measures increasingly difficult. For instance, a picture frame will not be square if not aligned during the clamps up process.
In summary, achieving perfect alignment during the crafting is not merely a matter of aesthetic concern; it is a fundamental requirement for structural integrity. The challenges associated with maintaining alignment throughout the various stages highlight the need for precision, skill, and careful attention to detail. Understanding the interplay between alignment and the overall performance is crucial for any woodworker seeking to master this essential joinery technique. When alignment is achieved the longevity and functionality is assured.
6. Technique
Technique in the context of dovetail joinery encompasses the specific methods, tools, and procedural knowledge employed to execute this intricate woodworking joint. Mastering the relevant techniques is paramount for achieving accurate, strong, and aesthetically pleasing results, highlighting the critical interplay between skill and execution.
- Layout and Marking
Precise layout and marking are foundational to successful joinery. This involves accurately transferring dimensions and angles from one workpiece to another using precision instruments. Techniques include utilizing a dovetail marker to establish consistent tail angles, and employing a marking knife for creating crisp, defined baselines. Inaccurate layout directly translates to ill-fitting joints, compromising both strength and appearance. An example is meticulously marking the pin board to correspond exactly with the tail board, accounting for wood thickness and desired reveal.
- Sawing and Chiseling
The execution of clean and accurate cuts is central to the creation of tightly interlocking components. Sawing techniques involve using a fine-toothed dovetail saw to follow the marked lines precisely, maintaining a consistent angle and avoiding overcuts. Chiseling techniques require sharp, well-honed chisels and controlled paring motions to remove waste material up to the baseline, creating flat, square shoulders. An example is carefully chiseling the waste between tails, ensuring the sides are perfectly vertical for a snug fit with the pins.
- Fitting and Adjustment
Achieving a tight, seamless fit necessitates careful fitting and adjustment of the joint components. This involves dry-fitting the pins and tails to identify areas of interference, and then selectively removing material with chisels, files, or sandpaper to achieve a perfect match. Techniques include using a rasp to subtly adjust the angle of a tail or pin, or employing a small plane to refine the shoulder of a pin board. An example is lightly tapping the joint together to check for gaps, then addressing any discrepancies before applying glue.
- Glue-up and Clamping
Proper glue-up and clamping techniques ensure a strong and durable bond. This involves applying a thin, even layer of high-quality wood glue to all mating surfaces, and then using clamps to apply uniform pressure while the adhesive cures. Techniques include using cauls to distribute clamping force evenly across the joint, and cleaning up any excess glue before it hardens. An example is using multiple clamps to apply pressure along the entire length of the joint, ensuring the pins and tails are fully seated and the glue line is tight.
These elements illustrate how technique forms the bedrock of successful application. Proficiency in layout, cutting, fitting, and assembly is indispensable for producing joints that exhibit both structural integrity and aesthetic refinement. Mastery of technique translates directly to superior results in fine woodworking projects, validating the emphasis on skill and process knowledge.
7. Applications
The applications of woodworking dovetail joints are intrinsically linked to their inherent strength, durability, and aesthetic appeal. The choice to employ this particular method is driven by specific requirements of the project, notably when structural integrity is paramount. As a consequence, one observes its prevalence in furniture construction, particularly in pieces designed for long-term use and heavy load-bearing capacity. For example, drawer construction frequently utilizes this joining technique to ensure the drawer front remains securely attached to the sides over years of repeated use. Similarly, the corners of chests and boxes, designed to withstand significant weight and stress, are often joined with dovetails for enhanced durability. These applications demonstrate a direct cause-and-effect relationship, wherein the need for a robust joint leads to the selection of this technique.
Beyond structural considerations, the choice may also be influenced by aesthetic goals. In fine furniture making, exposed dovetails are often showcased as a mark of quality craftsmanship. The precise, interlocking pattern adds a visual element that enhances the overall design, elevating the piece from functional object to a display of artisanal skill. For instance, hand-cut dovetails on the sides of a cabinet are often intentionally left exposed to highlight the maker’s attention to detail. The importance of applications lies in their role as a component of woodworking dovetail joints. The selection of the joint is dictated by the needs of the application; therefore, understanding the potential applications is crucial for making informed decisions about its use. Its implementation also influences the final product aesthetic.
In conclusion, the practical significance of understanding the applications is that it allows woodworkers to make informed decisions about when and how to employ this technique. Recognizing the relationship between structural demands, aesthetic considerations, and the characteristics of the method enables the creation of durable, visually appealing, and high-quality woodworking projects. While other joining methods may be faster or easier to execute, the method remains a preferred choice when longevity and craftsmanship are prioritized, thus solidifying its enduring relevance in woodworking.
Frequently Asked Questions About Woodworking Dovetail Joints
The following questions address common concerns and misconceptions regarding the application and execution of a method of joinery characterized by interlocking, fan-shaped projections emanating from two boards. These answers aim to provide clarity and enhance understanding of this technique.
Question 1: What are the primary advantages of choosing this method over other joinery techniques?
The primary advantages stem from its exceptional strength and resistance to pulling forces, coupled with its aesthetic appeal. The interlocking design provides a mechanical bond superior to simpler joints, while the visible joinery often adds a touch of craftsmanship to the finished piece. Other techniques may be quicker, but lack the strength of this method.
Question 2: Is specialized equipment essential for creating this style of joinery, or can it be achieved with basic hand tools?
While specialized equipment, such as dovetail jigs, can expedite the process, excellent results are achievable with basic hand tools like saws, chisels, and marking gauges. The hand-cut approach, though more time-consuming, allows for a greater degree of control and customization, and also displays a greater level of skill.
Question 3: What types of wood are most suitable for woodworking dovetail joints, and are there any to avoid?
Hardwoods, such as maple, cherry, and walnut, are generally preferred due to their density and ability to hold the fine details of the joint. Softer woods can be used, but may require more careful handling to prevent tear-out and ensure a tight fit. Woods that are prone to splitting should be avoided.
Question 4: What are the most common mistakes to avoid when first attempting this style of joinery?
Common mistakes include inaccurate marking, overcutting the baselines, and failing to achieve a tight fit between the pins and tails. Proper preparation, sharp tools, and a methodical approach are essential to minimizing these errors. Patience is required, do not rush.
Question 5: How critical is glue in the overall strength and longevity of a woodworking dovetail joint?
While the mechanical interlocking of the pins and tails provides significant strength, glue is crucial for filling any gaps and creating a solid, lasting bond. High-quality wood glue, applied evenly and clamped properly, enhances the joint’s resistance to stress and moisture.
Question 6: Are there different variations, and what factors dictate the choice between them?
Yes, variations exist, including through, half-blind, and sliding. The choice depends on the desired aesthetic and structural requirements. Through styles are visible from both sides, while half-blind styles conceal the joint from the front, commonly used in drawer construction. Sliding dovetails are typically used for shelves.
These answers provide a foundational understanding of key considerations when working with this intricate style of joinery. Skillful execution requires attention to detail and a thorough understanding of the techniques involved.
The subsequent section will delve into methods for troubleshooting common problems encountered when constructing these joints, along with solutions for rectifying imperfections.
Conclusion
The preceding discussion has explored various facets of woodworking dovetail joints, underscoring their inherent strength, aesthetic appeal, and enduring relevance within the craft. From their historical significance as a marker of quality to the precision required for their execution, it is evident that these joints represent a confluence of structural integrity and artistic expression. Moreover, attention has been drawn to the diverse applications, which are dictated by factors such as load-bearing requirements and design considerations. The mastery of this technique demands a comprehensive understanding of tools, materials, and processes, as well as a commitment to precision and patience.
The pursuit of proficiency in woodworking dovetail joints is an investment in both craftsmanship and the longevity of finished works. Further exploration of advanced techniques and nuanced design applications remains a worthwhile endeavor for woodworkers seeking to elevate their skills and create heirloom-quality pieces. A continuous refinement of skills is always the goal for any type of joinery, therefore, making each creation stronger than the last.


