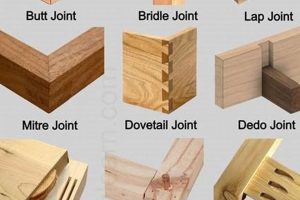
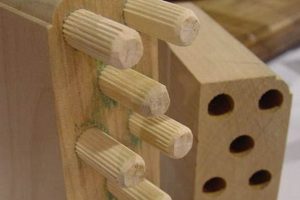
Connections between pieces of wood are essential elements in woodworking. These connections, achieved through various methods, determine the strength, aesthetic, and function of the finished object. Specific terms denote the types of these junctions, each possessing unique characteristics in terms of construction and application. Examples include dovetail configurations known for robust mechanical interlocking, mortise and tenon designs offering durable and traditional assembly, and simpler butt configurations suitable for less demanding applications. Understanding these terms is fundamental to effective woodworking practice.
Mastery of joinery techniques provides numerous advantages. Properly executed connections enhance structural integrity and longevity. They allow for greater design flexibility, enabling the creation of complex forms and intricate details. Historically, different approaches to achieving junctions have reflected evolving tool technologies and aesthetic preferences, often serving as markers of regional styles and craft traditions. The selection of an appropriate method affects both the functional performance and the visual appeal of a project.
This exposition will delve into a comprehensive overview of specific joining methodologies. Detailed descriptions, illustrated with examples, will clarify the construction process and optimal usage scenarios for a range of configurations. The following sections will address categories based on relative complexity, strength characteristics, and application contexts, ensuring a thorough understanding of the diverse options available to woodworkers.
Woodworking Joinery
Effective woodworking relies on the correct application of techniques for securely uniting timber components. The subsequent guidelines address critical aspects relevant to selecting and executing appropriate jointing solutions.
Tip 1: Method Selection Based on Load: Evaluate the intended load-bearing requirements. Configurations such as dovetails or mortise and tenons are appropriate for high-stress areas, whereas simpler options, such as butt configurations reinforced with fasteners, may suffice for lighter applications.
Tip 2: Grain Alignment for Stability: Pay attention to the orientation of wood grain in relation to the applied forces. Aligning the grain strategically enhances the strength and stability of the overall structure, mitigating potential warping or cracking.
Tip 3: Precision in Cutting and Fitting: Accurate measurements and precise cuts are paramount. Even slight discrepancies can compromise structural integrity and aesthetic appeal. Employ sharp tools and meticulous techniques to ensure tight, seamless unions.
Tip 4: Glue Selection for Compatibility: Choose an adhesive appropriate for the specific wood species and intended use. Consider factors such as open time, clamping pressure requirements, and moisture resistance when selecting an adhesive to optimize bond strength.
Tip 5: Reinforcement Strategies: When enhanced durability is needed, consider supplementary reinforcement. Dowels, screws, or metal fasteners can augment the mechanical strength of certain types, providing added security against failure.
Tip 6: Understanding Wood Movement: Account for natural expansion and contraction due to humidity changes. Incorporate design elements that allow for limited movement without compromising the integrity. This is particularly crucial in large projects or those exposed to variable environmental conditions.
Tip 7: Practice and Experimentation: Proficiency requires dedicated practice. Experiment with various configurations on scrap material to refine technique and understand their individual strengths and weaknesses prior to undertaking a final project.
Careful consideration of these guidelines ensures the production of durable, aesthetically pleasing woodworking projects. The judicious application of these principles contributes to the longevity and structural soundness of finished pieces.
The next segment will address specific types in greater detail, providing a more in-depth analysis of their individual characteristics and applications.
1. Butt
The term “Butt,” within the framework of woodworking joinery terminology, denotes a fundamental and frequently employed method for uniting two pieces of wood. Its simplicity belies its limitations, necessitating careful consideration of reinforcement strategies to ensure adequate structural integrity. Understanding its characteristics is vital for effective selection among the available options.
- Definition and Characteristics
A butt consists of two flat surfaces directly abutting each other, typically at a 90-degree angle. This configuration lacks inherent mechanical strength due to the absence of interlocking elements, relying primarily on adhesives and/or fasteners for its stability. The ease of execution makes it a common choice for preliminary assemblies or applications where load-bearing requirements are minimal.
- Applications and Limitations
Common applications include box construction, frame assemblies, and situations where a concealed or easily assembled connection is prioritized. However, it’s unsuited for high-stress areas without supplementary reinforcement. Its inherent weakness stems from the limited surface area available for adhesive bonding and the absence of mechanical interlocks that could resist shear forces.
- Reinforcement Techniques
To enhance the durability of connections achieved via this technique, reinforcement strategies are essential. These often include screws, nails, dowels, or metal fasteners applied perpendicular to the joint line to provide additional mechanical strength. Alternative solutions involve adding corner blocks or cleats to distribute stress and increase bonding surface area.
- Aesthetic Considerations
While not inherently visually appealing, strategic application can integrate seamlessly into a design. Concealing fasteners, careful selection of wood grain alignment, and precise execution of the mating surfaces contribute to a more refined appearance. Its unobtrusiveness makes it suitable for projects where emphasis is placed on other design elements.
Therefore, while the term “Butt” designates a straightforward type, its effective use within woodworking requires careful consideration of its inherent limitations and the implementation of appropriate reinforcement measures. Understanding the implications of this term is a crucial step in mastering the broader vocabulary of woodworking and selecting the correct methodology for a given project’s requirements.
2. Lap
Within the taxonomy of woodworking configurations, the designation “Lap” denotes a specific method of uniting two pieces of wood through overlapping their respective surfaces. Understanding the characteristics and applications of this configuration is essential to comprehending its role within the broader field.
- Definition and Geometry
A lap consists of two pieces of timber joined by overlapping a portion of each piece’s surface. The resulting connection typically involves removing material from one or both pieces to create flush surfaces where they meet. This overlap provides a larger surface area for adhesive bonding, enhancing the overall strength compared to a simple butt configuration. The extent of the overlap influences the strength and stability of the completed assembly.
- Types and Variations
Variations of this joint include the full configuration, where one piece overlaps the other completely, and the half configuration, in which half the thickness of each piece is removed to create a flush surface. Other modifications include angled overlaps for specialized applications. These variations allow for flexibility in design and adaptation to diverse structural requirements. The choice depends on factors such as load distribution and aesthetic preferences.
- Applications in Woodworking
This configuration is commonly employed in frame construction, drawer assembly, and situations where increased bonding area is required. Applications range from simple boxes to complex casework. Their relative ease of execution and inherent strength make them suitable for both amateur and professional woodworkers. The prevalence in furniture making highlights their utility in creating durable and visually appealing pieces.
- Strengths and Limitations
While offering improved strength over butt, they are not as robust as interlocking methods such as dovetails or mortise and tenons. Its primary strength lies in the increased surface area for adhesive bonding. Limitations include the potential for visual discontinuity if not carefully executed. Consideration must be given to proper grain alignment and adhesive selection to maximize its effectiveness. Supplementary fasteners may be required for high-stress applications.
Consequently, the identification of this particular approach contributes to a more complete understanding of connection methodologies in woodworking. Its characteristics, variations, and applications illustrate its significance within the spectrum of options available for creating stable and aesthetically pleasing wooden structures.
3. Mortise and Tenon
The “Mortise and Tenon” represents a critical component within the broader category of “names of joints in woodwork.” Its significance stems from its structural integrity and historical prevalence. The mortise, a cavity or hole cut into one piece of wood, receives the tenon, a protruding tongue-like extension from the second piece. This precise fit creates a mechanically strong bond resistant to various stresses. The effectiveness of this connection directly impacts the durability and longevity of wooden structures, making its understanding crucial for woodworkers.
The impact of “Mortise and Tenon” extends beyond mere assembly. For example, traditional timber framing relies heavily on variations of this connection for structural support in buildings. Furniture construction frequently employs this technique to create durable and aesthetically pleasing pieces. Failure to properly execute the mortise and tenon can lead to weakened structures, joint failure under load, and ultimately, a compromised final product. Historical examples, from ancient Egyptian furniture to medieval cathedrals, demonstrate the enduring importance of this joint in crafting enduring structures.
In summary, the “Mortise and Tenon” occupies a central position within the nomenclature and practice of woodworking. Its proper implementation ensures structural integrity, while its misuse can lead to significant failures. Comprehending its principles and techniques is essential for anyone seeking mastery in the craft of woodworking. Although variations and alternative methods exist, the fundamental concept behind the mortise and tenon remains a cornerstone of robust and reliable wood construction.
4. Dovetail
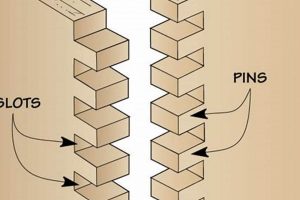
The term “Dovetail,” within the comprehensive lexicon of “names of joints in woodwork,” designates a specific configuration characterized by its exceptional tensile strength. This method derives its name from the fan-shaped, interlocking projections resembling a dove’s tail. Its inherent resistance to pulling forces renders it a preferred choice for applications demanding robust mechanical union. The presence of a properly executed dovetail is a direct indicator of quality craftsmanship and durability within wooden constructions.
As a component of “names of joints in woodwork,” the “Dovetail” stands apart due to its self-locking mechanism. The splayed shape of the “tails” and corresponding “pins” creates a mechanical interlock that prevents the joint from pulling apart without adhesive. Examples of this junction are prevalent in drawer construction, cabinet making, and box fabrication, where long-term structural integrity is critical. A well-executed example will withstand significant stress without the need for additional fasteners, highlighting its superior mechanical advantage over simpler options.
In conclusion, the “Dovetail” configuration exemplifies a sophisticated approach to timber assembly. Its inclusion within the broader set of “names of joints in woodwork” underscores the diverse methods available for joining wooden elements. Understanding the principles behind the “Dovetail,” including its strengths and limitations, is essential for any woodworker seeking to create durable and aesthetically pleasing pieces. While other options may suffice for less demanding applications, the “Dovetail” remains a benchmark for robust and reliable connections in woodworking.
5. Miter
Within the comprehensive domain of “names of joints in woodwork,” the term “Miter” identifies a specific configuration where two pieces of material are joined at an angle to form a corner. Typically, this angle is a bisection of a right angle, resulting in two 45-degree cuts to create a 90-degree corner. The effect of this angular intersection is to conceal the end grain of the wood, resulting in a visually continuous surface along the assembled edge. This feature is particularly desirable in applications where aesthetic appeal is paramount, such as picture frames, decorative moldings, and furniture trim. The precise execution of the miter is crucial; inaccuracies lead to gaps and a compromised visual outcome.
The practical significance of understanding the miter, as a component of “names of joints in woodwork,” stems from its ability to create clean, aesthetically pleasing corners without exposing the raw end grain of the wood. In frame construction, for instance, a properly executed miter contributes significantly to the perceived quality and visual harmony of the finished product. Furthermore, the miter provides a larger surface area for gluing compared to a simple butt , enhancing the strength of the assembly. However, its reliance on accurate angular cuts and the potential for weakness without reinforcement necessitates a thorough understanding of woodworking principles and techniques. Real-life examples, such as poorly assembled picture frames with noticeable gaps, underscore the practical importance of mastering the miter
In summary, the miter represents a specialized approach to joining wood within the broader context. Its value lies in its ability to create visually seamless corners. While its inherent strength may be limited, the aesthetic advantages it provides, combined with proper reinforcement strategies, make it a vital technique for woodworkers. Mastering the miter expands a woodworker’s repertoire and contributes to the creation of high-quality, visually appealing projects.
6. Rabbet
The term “Rabbet,” as an element within the comprehensive set of “names of joints in woodwork,” identifies a specific recessed channel or groove cut along the edge of a piece of wood. This recess, typically running the full length of the edge, serves as a receiving slot for another piece, enabling it to fit flush against the surface. The creation of a rabbet intrinsically alters the structural properties of the timber, influencing the resulting joint’s strength and alignment. Examples of its application are visible in cabinet backs, drawer bottoms, and door casings, where a flush, secure fit is desired. The practical significance of understanding the rabbet lies in its ability to simplify assembly and improve the overall stability of numerous woodworking projects, particularly in situations where precise alignment is paramount.
The function of a rabbet in woodworking extends beyond mere aesthetics; it directly impacts the structural integrity of the assembled piece. For instance, a properly executed rabbet that houses the back panel of a cabinet provides crucial support, preventing racking and maintaining squareness. Similarly, in drawer construction, the rabbet that receives the drawer bottom contributes to the drawer’s rigidity and resistance to sagging. While rabbets can be created using a variety of tools, including routers, table saws, and hand planes, accuracy is paramount. An improperly cut rabbet can lead to gaps, misalignments, and a weakened structure, necessitating remedial measures and potentially compromising the final appearance and functionality of the project. Therefore, mastery of rabbet creation techniques is an essential skill for any woodworker seeking to produce durable and aesthetically pleasing results.
In conclusion, the rabbet represents a fundamental method within the broader field of timber joinery. The understanding and correct execution of the rabbet joint are crucial for achieving stability, alignment, and aesthetic refinement in a variety of woodworking applications. The rabbet exemplifies a fundamental principle within the domain of joinery: the effective integration of individual components leads to a structurally sound and visually coherent whole.
Frequently Asked Questions
The following addresses common inquiries regarding methods for uniting wood components, a critical aspect of woodworking practice. These answers aim to provide clarity and enhance comprehension of terminology and techniques.
Question 1: What is the primary factor differentiating a mortise and tenon from a dovetail?
The fundamental distinction lies in the load-bearing characteristics. Mortise and tenons excel at resisting shear and bending forces, whereas dovetails are specifically designed to withstand tensile (pull-apart) forces. This difference dictates their suitability for various applications.
Question 2: Why is grain direction critical when executing a butt joint?
Grain alignment directly influences the joint’s strength and stability. Aligning grain patterns minimizes differential expansion and contraction, preventing stress concentrations that can lead to cracking or separation. Proper grain orientation enhances the longevity of the construction.
Question 3: What are the common causes of failure in mitered corners?
Inaccurate angle cuts and inadequate reinforcement are primary culprits. Gaps caused by imprecise miters compromise the adhesive bond, while insufficient mechanical reinforcement leaves the corner vulnerable to separation under stress. Accurate cuts and proper reinforcement are essential.
Question 4: How does the surface area of a lap affect its overall strength?
Increased surface area directly correlates with enhanced adhesive bonding. A larger overlap provides more surface for the adhesive to grip, resulting in a stronger and more durable union. The lap’s strength is proportional to its overlap area.
Question 5: What considerations dictate the choice between a full and a half lap?
Load distribution and aesthetic preferences primarily influence the selection. A full lap provides maximum surface area and strength but creates a thicker profile. A half lap offers a flush surface but sacrifices some strength. The selection depends on the specific requirements.
Question 6: What role does adhesive selection play in joint integrity?
Adhesive selection is paramount. The adhesive must be compatible with the wood species, provide adequate open time, and offer sufficient bond strength for the intended load. Incompatible or inadequate adhesives will lead to premature joint failure.
A comprehensive understanding of these concepts promotes informed decision-making, resulting in durable and aesthetically pleasing woodworking projects.
The following section will provide an overview on the history and the evolution in woodworking.
Names of Joints in Woodwork
This exposition has explored the core terminology associated with structural connections in wooden assemblies. These designations, ranging from basic “Butt” to intricate “Dovetail,” represent fundamental methodologies in the craft. Understanding the attributes, limitations, and proper applications is crucial for successful woodworking endeavors. Effective utilization necessitates informed selection based on load requirements, material properties, and aesthetic considerations.
The ongoing evolution of woodworking continues to introduce novel approaches and refinements to traditional techniques. However, the foundational principles embodied by these established descriptions remain relevant. Mastery of these terminologies and associated practices empowers woodworkers to create enduring and structurally sound objects. Continued study and practical application will ensure the preservation and advancement of this essential craft.


