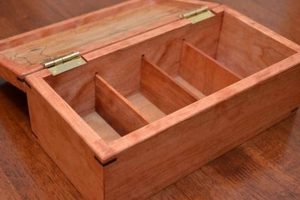
Instructions detailing the construction of basic, rectilinear containers from wood represent a foundational element of woodworking. These instructions typically include material lists, dimensioned diagrams, and step-by-step assembly procedures. For instance, a plan might specify using pine boards to build a small storage unit with a hinged lid, providing precise measurements for each component.
The ability to follow instructions for creating rudimentary wooden containers offers several advantages. It provides an accessible entry point into the craft, allowing individuals to develop essential skills such as measuring, cutting, joining, and finishing wood. Historically, the construction of these containers has been integral to storage, organization, and transportation of goods, demonstrating a long-standing practical application.
Subsequent sections will delve into the selection of appropriate materials, the utilization of various joinery techniques, and considerations for achieving a professional finish on handcrafted wooden containers.
Essential Guidance for Basic Wooden Container Construction
The following points provide crucial guidance for those undertaking the creation of fundamental wooden containers, emphasizing precision and structural integrity.
Tip 1: Material Selection: Opt for kiln-dried lumber with minimal knots. This reduces the likelihood of warping or cracking over time and provides a more stable foundation for construction.
Tip 2: Precise Measurement and Cutting: Accuracy is paramount. Utilize a sharp measuring device and a precision cutting tool, such as a miter saw, to ensure all components are cut to the specified dimensions.
Tip 3: Joint Selection and Execution: Choose a joint appropriate for the intended load and aesthetic. Butt joints, while simple, require reinforcement with fasteners or glue. Stronger options include rabbet joints, dado joints, or miter joints.
Tip 4: Secure Fastening: Use appropriate fasteners for the chosen wood type. Pre-drilling pilot holes prevents splitting, especially when working with hardwoods. Consider the fastener’s head style for a flush or decorative finish.
Tip 5: Adhesive Application: When employing glue, ensure a clean, tight fit between surfaces. Apply an even layer of high-quality wood glue and clamp the assembly securely until the adhesive has fully cured, following the manufacturer’s instructions.
Tip 6: Sanding and Surface Preparation: Thoroughly sand all surfaces to eliminate imperfections and create a smooth finish. Progress through various grits of sandpaper, from coarse to fine, for optimal results.
Tip 7: Finishing Application: Apply a finish appropriate for the intended use and environment. Consider factors such as moisture resistance, UV protection, and aesthetic preferences. Multiple thin coats are preferable to a single heavy coat.
Adhering to these principles promotes the creation of durable, aesthetically pleasing, and structurally sound containers from wood. Careful planning and meticulous execution are essential for achieving professional-quality results.
The subsequent section will address advanced techniques and customization options for enhancing the basic wooden container design.
1. Material Selection
Material selection is a foundational element in the successful execution of basic wooden container projects. The properties of the chosen material directly influence the final product’s structural integrity, aesthetic qualities, and overall longevity. For instance, using a softwood like pine is suitable for containers intended for light storage due to its workability and cost-effectiveness. However, for containers expected to withstand heavier loads or exposure to moisture, a hardwood such as oak or maple is more appropriate. Therefore, the intended use case dictates the material selection process within these basic projects.
The type of wood also impacts the required joinery techniques and finishing processes. Softer woods may necessitate specific fastening methods to prevent splitting, while hardwoods might require specialized tools for cutting and shaping. Similarly, the grain pattern and density of the wood will influence the absorption and appearance of stains, paints, and protective coatings. Consider a plain container where the grain of cherry wood is intentionally showcased with a clear finish, versus a painted pine container where the wood grain is intentionally obscured. These examples highlight how material selection interrelates with construction and finishing decisions.
In summary, understanding the characteristics of various wood types is essential for informed decision-making when executing rudimentary container designs. Neglecting this aspect can lead to structural failures, aesthetic shortcomings, and reduced lifespan of the finished product. Therefore, comprehensive consideration of material selection ensures that basic wooden containers meet the intended functional and aesthetic requirements.
2. Precise Measurements
The creation of fundamental rectilinear wooden containers is inextricably linked to the adherence to precise measurements. Any deviation from specified dimensions directly impacts the structural integrity and aesthetic appeal of the final product. Inaccurate measurements manifest as misaligned joints, uneven surfaces, and ultimately, a functionally compromised container. For instance, if the length of one side panel is shorter than specified, the resulting container will be out of square, affecting the fit of the lid or the stability of stacked containers.
Precise measurements facilitate efficient material usage and minimize waste. Accurate cutting lists, derived from precise dimensioning, reduce the likelihood of costly errors and ensure optimal yield from lumber stock. Furthermore, accurate measurements simplify the assembly process, allowing for predictable and repeatable results. This is particularly crucial in batch production scenarios, where consistent dimensions are essential for interchangeability and uniformity. A real-world example would be the creation of a set of stacking storage units, where each unit must conform to identical dimensional specifications for proper functionality.
In conclusion, precise measurements are not merely a procedural step, but a fundamental requirement for successful rudimentary wooden container construction. The implications of inaccurate measurements range from aesthetic imperfections to structural failures, emphasizing the critical role of meticulous attention to detail. Overcoming the challenge of measurement errors requires a commitment to proper tool calibration, careful marking techniques, and consistent verification throughout the construction process. The relationship between accurate dimensioning and successful project outcomes underscores the practical significance of this core principle.
3. Secure Joinery
The structural integrity of any container constructed following basic woodworking instructions is fundamentally dependent on the methods employed to join its constituent parts. The selection and execution of appropriate joinery techniques directly impact the container’s ability to withstand applied loads, resist deformation, and maintain its intended form over time.
- Butt Joints and Reinforcement
Butt joints, where two surfaces are simply abutted and fastened, represent the simplest form of joinery. However, in the context of rudimentary container construction, they inherently lack significant strength and require reinforcement. This reinforcement typically involves the use of mechanical fasteners such as screws or nails, or the application of adhesives. An example is a simple box constructed with butt joints secured with screws and glue, which provides adequate strength for light storage purposes but would fail under significant stress.
- Rabbet and Dado Joints
Rabbet joints, where one piece of wood is recessed to accept another, and dado joints, where a groove is cut into one piece to receive another, offer increased strength and stability compared to butt joints. These joints provide a larger gluing surface and mechanical interlock, enhancing resistance to racking and shear forces. A common application is the use of rabbet joints to attach the bottom panel to the sides of a basic box, providing a robust connection that prevents the bottom from detaching under load.
- Miter Joints and Corner Reinforcement
Miter joints, where two pieces of wood are cut at an angle (typically 45 degrees) to form a corner, create a visually appealing, seamless appearance. However, like butt joints, they inherently lack strength and require reinforcement. This reinforcement may involve the use of splines, keys, or metal fasteners. Consider a picture frame constructed with miter joints reinforced with v-nails; while aesthetically pleasing, the v-nails provide the necessary structural support to prevent the corners from separating.
- Dovetail Joints for Enhanced Durability
Dovetail joints, characterized by interlocking wedge-shaped projections, represent a significantly stronger and more durable joinery method. These joints offer exceptional resistance to pulling forces and are commonly employed in high-stress applications. While more complex to execute than simpler joints, dovetails provide a superior level of structural integrity. An example is the use of dovetail joints in the construction of drawer boxes, where the joint’s inherent strength is critical for withstanding repeated opening and closing.
The selection of an appropriate jointing strategy is thus a critical determinant of the overall success of a project adhering to basic woodworking guidelines. The choice hinges on factors such as the intended load, aesthetic requirements, and the skill level of the craftsperson. Proper execution of the chosen joinery technique, including precise cutting and secure fastening, is paramount for ensuring the construction of a durable and functional container.
4. Surface Finishing
Surface finishing, in the context of elementary wooden container constructions, encompasses any process applied to the exterior of the object to protect, enhance, or modify its appearance. The selection and application of appropriate finishes directly impact the durability, aesthetics, and overall utility of the completed container.
- Protection Against Environmental Factors
Surface treatments provide a barrier against moisture, ultraviolet radiation, and physical abrasion, mitigating the risk of warping, cracking, fading, and scratching. For example, a wooden container intended for outdoor use requires a finish formulated to resist water damage and UV degradation, such as a marine-grade varnish. Without adequate protection, the container’s lifespan is significantly reduced.
- Aesthetic Enhancement
Finishes alter the visual characteristics of wood, enhancing the grain pattern, modifying the color, and adjusting the sheen. Stain is often applied to alter the wood’s color, while clear finishes such as lacquer or polyurethane can accentuate the natural wood grain. The choice of finish significantly influences the perceived quality and aesthetic appeal of the container.
- Ease of Maintenance
Certain finishes create a smooth, non-porous surface that is easier to clean and maintain. Surfaces treated with oil-based finishes may require periodic reapplication to maintain their protective properties. Finishes like polyurethane create a durable, cleanable surface suitable for containing items that may spill or stain.
- Modification of Wood Properties
Some finishing processes, such as wood hardening treatments, can increase the surface hardness and resistance to indentation. Chemical treatments can also be applied to modify the wood’s susceptibility to decay or insect infestation. This is particularly relevant for containers intended for long-term storage or use in environments conducive to biological degradation.
In summary, surface finishing is an indispensable step in the creation of basic wooden containers. The proper selection and application of finishes safeguard against environmental damage, elevate aesthetic qualities, simplify maintenance, and, in some cases, enhance the wood’s inherent properties. By considering these factors, the longevity, utility, and visual appeal of these containers are demonstrably improved.
5. Plan Comprehensibility
The utility of any set of instructions designed for the creation of fundamental wooden containers is intrinsically linked to its comprehensibility. The ease with which an individual can interpret and follow the provided information directly influences the success of the project, the efficiency of resource utilization, and the overall satisfaction of the craftsperson. Opaque or ambiguous instructions invariably lead to errors, wasted materials, and potentially hazardous situations.
- Clarity of Dimensional Information
The dimensional specifications, including lengths, widths, and thicknesses, represent a critical component of any set of construction instructions. Accurate and unambiguous representation of these dimensions, typically through detailed diagrams and explicit numerical values, minimizes the risk of misinterpretation and subsequent errors in material cutting and assembly. An example of clarity would be designating 3/4 consistently for all boards instead of fluctuating measurements like “20 mm”. The implications of unclear dimensional information may include incorrectly sized components, leading to ill-fitting joints and structural instability.
- Visual Representation of Assembly Steps
Diagrams and illustrations serve as crucial visual aids in conveying the sequence of operations required for assembling a container. Clear and concise visual representations of each step, accompanied by explanatory text, facilitate understanding and reduce the potential for misinterpretation. Detailed exploded views, for example, effectively illustrate the relative positions of each component during assembly. The absence of adequate visual aids often results in confusion and errors, particularly for individuals with limited woodworking experience.
- Explicit Material Lists and Tool Requirements
A comprehensive material list, specifying the exact quantities and types of materials required for the project, streamlines the procurement process and minimizes the risk of material shortages or substitutions. Similarly, a detailed list of necessary tools, including hand tools and power tools, enables the craftsperson to prepare adequately before commencing construction. An incomplete or ambiguous material list may lead to project delays and necessitate costly revisions. For example, if a plan calls for “nails” without specifying the length or type, the user is forced to guess, leading to a potential structural failing.
- Logical Sequencing of Instructions
The order in which instructions are presented directly impacts the flow of the construction process. A logical and sequential arrangement of steps minimizes backtracking and prevents unnecessary complications. Instructions should progress from simple tasks to more complex operations, building upon previously acquired skills and knowledge. A poorly sequenced set of instructions may result in inefficient workflow and increased potential for errors. An example is if a plan asks for a finish to be put on a board before it is cut. The act of cutting the board will remove the finish and require a new application on the edges.
In conclusion, the comprehensibility of woodworking instructions is paramount for ensuring the successful creation of fundamental wooden containers. Clarity in dimensional information, visual representation of assembly steps, explicit material lists, and logical sequencing of instructions each contribute to the accessibility and efficacy of a set of instructions. By prioritizing comprehensibility, designers and publishers of such materials can significantly enhance the user experience and improve the likelihood of achieving desired outcomes.
Frequently Asked Questions
The subsequent section addresses common inquiries regarding instructions for producing simple wooden containers, emphasizing precision and informed decision-making.
Question 1: What is the most critical aspect of following instructions for simple container construction?
Adherence to dimensional specifications is paramount. Accurate measurements ensure proper component fit and overall structural integrity.
Question 2: What type of wood is generally recommended for beginners utilizing such instructions?
Softwoods, such as pine, are typically recommended due to their workability and affordability, facilitating ease of learning and minimizing material costs.
Question 3: What joint is suitable for beginners?
Butt joints are the simplest to execute but require reinforcement. Rabbet joints offer a balance of simplicity and strength, providing a good starting point for novice woodworkers.
Question 4: Is specialized equipment necessary for executing container construction?
While hand tools are sufficient for basic constructions, power tools such as miter saws and drills enhance precision and efficiency. Access to power tools is advantageous but not always essential.
Question 5: How are dimensional inaccuracies prevented when utilizing basic construction techniques?
Employing sharp measuring devices, calibrating tools regularly, and meticulously marking cut lines minimize inaccuracies. Double-checking measurements before cutting is highly recommended.
Question 6: What type of finish is appropriate for protecting the completed wooden container?
The choice of finish depends on the intended use and environment. Polyurethane provides a durable, water-resistant finish suitable for indoor applications, while spar varnish offers superior protection for outdoor use.
Mastering these instructions requires careful attention to detail, precise execution, and a thorough understanding of fundamental woodworking principles. Consistent practice will yield increasingly refined results.
The subsequent section will explore advanced techniques and customization possibilities for enhancing fundamental wooden container designs.
Simple Box Woodworking Plans
This document has detailed fundamental aspects of simple box woodworking plans. These aspects encompass material selection, precision in measurement, secure joinery techniques, appropriate surface finishing, and above all, the comprehensibility of construction documentation. Adherence to these principles is critical for the production of durable and aesthetically pleasing containers.
The principles and skills acquired through simple box woodworking plans serve as a foundation for more intricate woodworking endeavors. Continued practice and exploration of advanced techniques will foster expertise and allow for more complex design execution. The enduring utility of well-crafted wooden containers serves as a testament to the value of mastering these foundational skills.


