Detailed schematics outlining the construction process for a specialized workbench designed for woodworking are essential tools. These blueprints provide precise measurements, material lists, and step-by-step instructions needed to build a durable and functional workspace. For instance, such documentation might specify the exact dimensions of the tabletop, the joinery techniques for the legs, and the placement of integrated features like vises or storage.
Carefully designed construction guides offer numerous advantages to woodworkers. They ensure structural integrity and safety during use, promote efficient material usage, and facilitate repeatable, consistent results. Historically, formalized diagrams were primarily the domain of master craftsmen, passed down through apprenticeships. Today, widespread availability has democratized access to woodworking knowledge, allowing both hobbyists and professionals to create high-quality work surfaces.
The following sections will explore different considerations in workbench design, from selecting appropriate materials and joinery methods to incorporating specialized features that enhance the woodworking experience. Furthermore, the accessibility and utilization of such documentation will be addressed.
Optimizing Woodworking Workbench Design
This section provides targeted advice to enhance the design and execution of woodworking workbench construction, leading to a more functional and durable final product.
Tip 1: Prioritize a Stable Foundation: The rigidity of the workbench legs is paramount. Employ mortise-and-tenon joints or robust bolted connections to ensure minimal wobble during intensive use.
Tip 2: Select Appropriate Wood Species: Hardwoods such as maple or beech are ideal for the tabletop due to their resistance to wear and deformation. Softwoods can be used for less critical components, such as the base framing.
Tip 3: Integrate a Functional Vise System: A well-placed vise is crucial for securing workpieces. Consider the type of projects undertaken to determine the most suitable vise configuration, whether it be a face vise, tail vise, or leg vise.
Tip 4: Optimize Tabletop Thickness: A thicker tabletop provides increased mass and stability, dampening vibrations and preventing racking. A minimum thickness of 3 inches is generally recommended for a robust workbench.
Tip 5: Incorporate Integrated Storage: Drawers, shelves, or cabinets beneath the workbench can improve workflow and minimize clutter. Consider the size and type of tools to be stored when designing storage solutions.
Tip 6: Ensure a Flat and Level Work Surface: Precision is paramount. Check the tabletop for flatness using a straightedge and shims, and adjust as necessary to create a truly level working platform.
Tip 7: Implement Dog Holes Strategically: Dog holes, used in conjunction with bench dogs, provide versatile clamping options. Plan their placement carefully to accommodate a wide range of workpiece sizes and shapes.
By carefully considering these elements, the woodworking workbench will offer enhanced performance, longevity, and user satisfaction. A well-designed and constructed workbench is a cornerstone of any successful woodworking endeavor.
The subsequent discussion will explore detailed techniques for executing specific joinery methods applicable in workbench construction.
1. Dimensions and stability
Workbench dimensions are inextricably linked to its stability, influencing the overall functionality and safety of the woodworking workspace. Detailed woodworking workbench construction documents typically specify precise measurements for all components, including the tabletop, legs, and supporting framework. These dimensions are not arbitrary; they are calculated to provide a stable platform that resists racking, vibration, and movement during woodworking operations. For example, a workbench blueprint for heavy-duty use might call for thicker legs and a wider stance to prevent tipping when planing large boards. The cause-and-effect relationship is direct: inadequate dimensions result in instability, while appropriate dimensions contribute to a solid, unwavering foundation.
Stability is an essential element of any reliable workbench blueprint. Without it, precision tasks become difficult and potentially dangerous. Consider a scenario where a woodworker is hand-planing a delicate piece; an unstable workbench would introduce unwanted movement, leading to inaccuracies and potentially damaging the workpiece. Dimension, thus, supports not just steadiness, but precision and efficiency. Another practical example is the use of a woodworking bench for mortise and tenon joinery, where chisel strikes require a stable platform to ensure clean, accurate cuts. A bench lacking in dimensional stability translates to compromised joint integrity and structural weakness in the final project.
In summary, the dimensions specified in a woodworking workbench schematic are not merely aesthetic considerations; they are critical determinants of the bench’s stability and overall performance. Understanding this connection allows woodworkers to appreciate the importance of adhering to these measurements and making informed decisions when adapting the design to their specific needs. While adjustments can be made, it is crucial to consider how these alterations will affect the bench’s stability, ensuring the final result remains a safe and effective woodworking tool.
2. Joinery Type
The selection and execution of joinery significantly determine the structural integrity, longevity, and aesthetic of a woodworking workbench. The choice of joinery in a workbench plan is not arbitrary; it is a calculated decision based on load-bearing requirements, wood properties, and the desired style.
- Mortise and Tenon Strength
Mortise and tenon joints, particularly through-tenons and wedged tenons, are often favored in heavy-duty workbench construction due to their exceptional resistance to racking forces. These joints involve a projecting tenon from one piece of wood fitting precisely into a mortise (hole) in another. A properly executed mortise and tenon provides substantial glue surface area and mechanical interlocking, creating a robust connection capable of withstanding the stresses associated with woodworking tasks. These are often used to connect the legs and stretchers.
- Dovetail Joint Precision
Dovetail joints, though more complex to execute, offer both strength and aesthetic appeal, particularly when used in drawer construction or for securing a breadboard end to a tabletop. The interlocking tails and pins of the dovetail joint resist pulling forces, preventing separation over time. A well-cut dovetail speaks to the craftsman’s skill and contributes to the overall quality of the workbench.
- Lap Joint Versatility
Lap joints, where two pieces of wood overlap and are joined with adhesive and fasteners, provide a simpler alternative for less critical connections. Half-lap joints, where half the thickness of each piece is removed to create a flush surface, offer improved strength compared to simple butt joints. Lap joints can be effectively employed in constructing the base frame or for joining stretchers to legs.
- Bolted Connections Adjustability
While traditional joinery relies on wood-to-wood connections, the incorporation of bolted connections provides adjustability and the potential for disassembly. Bolted joints can be used to secure the legs to the tabletop or to attach accessories like vises or tool holders. Careful selection of hardware and proper execution of the bolt holes are essential to ensure a secure and reliable connection.
The strategic implementation of these joinery techniques within a workbench schematic is paramount to achieving a stable, durable, and functional woodworking platform. Selecting appropriate methods provides a solid woodworking base.
3. Material selection
Material selection forms a cornerstone of any successful woodworking workbench schematic. The properties of chosen materials directly influence the workbench’s stability, durability, and overall suitability for intended woodworking tasks.
- Hardwood Tabletop Durability
Hardwoods such as maple, beech, or oak are frequently specified for workbench tabletops due to their high density and resistance to wear. A durable tabletop withstands the impacts of hammering, planing, and other woodworking operations, maintaining a flat and stable surface over time. A softer wood would quickly become marred and uneven, compromising accuracy.
- Softwood Base Framing Considerations
While hardwoods excel in surface durability, softwoods like pine or fir can be suitable for the base framing. These materials offer a balance of strength and cost-effectiveness, making them ideal for components not directly subjected to heavy impact or abrasion. The workbench documentation must account for the lower density of softwoods by specifying appropriate dimensions and joinery techniques to ensure structural integrity.
- Moisture Content Stability
Wood’s moisture content significantly impacts its stability. Schematics should emphasize the importance of using kiln-dried lumber and allowing it to acclimate to the workshop environment before construction. Fluctuations in moisture content can cause warping, cracking, and joint failure, compromising the workbench’s flatness and overall structural soundness.
- Hardware Compatibility and Corrosion Resistance
The selection of hardware, including screws, bolts, and vises, is equally crucial. Blueprints should specify appropriate materials (e.g., steel, brass) and finishes (e.g., zinc plating) to prevent corrosion and ensure compatibility with the chosen wood species. Incompatible hardware can lead to premature failure or staining of the wood.
These material choices are intrinsic to a high-quality woodworking bench. Each component of a successful schematic is a direct representation of its durability. By carefully considering these material aspects, a durable workbench will provide a solid base for years to come.
4. Vise placement
The strategic placement of vises is a critical design consideration in woodworking workbench schematics. The location and type of vise directly impact the bench’s utility and versatility, dictating the range of woodworking tasks that can be efficiently and effectively performed.
- Front Vise Accessibility and Support
A front vise, typically mounted flush with the edge of the workbench tabletop, provides accessibility for clamping workpieces of varying sizes. Its placement should allow for unobstructed clamping action and provide adequate support to prevent workpiece deflection. A typical arrangement places this on the front left (for right-handed users) to take advantage of the dominant arm’s power. This positioning facilitates planing, sawing, and joinery operations on the face of a board.
- Tail Vise Integration and Functionality
A tail vise, often integrated into the end of the workbench, works in conjunction with bench dogs to secure long workpieces for edge planing or joinery. Its placement must be carefully considered to ensure proper alignment with the bench dog holes and sufficient travel to accommodate a wide range of workpiece lengths. This location creates a clamping system that distributes force evenly, minimizing the risk of bowing or distortion.
- Leg Vise Stability and Leverage
A leg vise, mounted vertically on one of the workbench legs, offers exceptional clamping power for thick or awkwardly shaped workpieces. Its placement near the base of the bench provides stability and leverage, allowing the woodworker to apply significant force without causing the bench to shift. This is particularly useful for tasks like chopping mortises or shaping curves. It is most often employed at the front right leg for dominant hand usability.
- Consideration of Dominant Handedness
The location of the various types of vises may also need to consider dominant handedness to promote optimal workflow. Layouts that disregard this aspect may lead to awkward postures or difficulties in properly securing workpieces. A common strategy involves positioning the front vise and tail vise to favor the woodworker’s dominant hand for increased control and efficiency.
These aspects of vise position contribute significantly to work quality. Each placement represents an opportunity for efficiency, stability, and effective outcomes. All these elements require consideration to optimize the woodworking experience.
5. Dog hole layout
The arrangement of dog holes on a woodworking bench is a crucial element detailed within construction documents. The pattern directly influences the bench’s clamping versatility and efficiency. The strategic placement of these holes, designed to accommodate bench dogs, enables the secure fixing of workpieces for various operations, from joinery to finishing. The location, spacing, and diameter specified in a schematic define the bench’s adaptability to different project requirements. Failure to plan the layout adequately limits the range of clamping possibilities, reducing the bench’s overall utility. For instance, a bench intended for dovetailing requires closely spaced holes along the front edge to support precise alignment and clamping during hand-cutting.
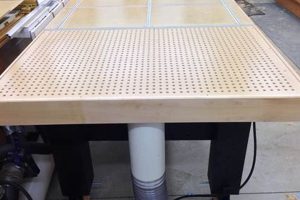
The dimensions within a workbench plan dictate the dog hole pattern, influencing material usage and construction complexity. Common configurations include a grid pattern across the tabletop, or rows aligned with the front and tail vises. A dense pattern offers greater clamping flexibility but increases the labor required for drilling and can potentially weaken the tabletop structure. A more sparse pattern simplifies construction but reduces clamping options. Real-world examples demonstrate the practical effects of layout decisions. A furniture maker building large case pieces benefits from a comprehensive grid, while a woodturner might only require a few strategically placed holes for securing jigs. Therefore, understanding the intended applications of the bench is essential for optimizing dog hole placement.
In conclusion, dog hole layout is an intrinsic component of woodworking workbench blueprints. It is not merely an afterthought, but a carefully considered aspect that directly impacts the bench’s clamping capabilities and overall functionality. Proper consideration of the layout ensures the bench can effectively support a wide range of woodworking tasks. Challenges in design include balancing versatility with structural integrity and construction complexity. Ignoring this aspect results in a workbench that is less efficient and less adaptable to the evolving needs of the woodworker.
6. Storage Integration
The incorporation of storage solutions within woodworking workbench schematics represents a fundamental design consideration, impacting workspace efficiency and organization. An effective workbench construction plan integrates drawers, shelves, or cabinets to house essential tools and materials, minimizing clutter and maximizing accessibility. This integration transforms the workbench from a mere work surface into a comprehensive woodworking station. The cause-and-effect relationship is clear: a poorly planned storage system results in a disorganized and inefficient workspace, while a well-designed system promotes productivity and reduces wasted time searching for tools. The absence of storage necessitates the use of external containers or shelving, consuming valuable floor space and increasing the distance between tools and the work area.
Detailed woodworking workbench blueprints address storage integration by specifying dimensions, materials, and construction methods for drawers, shelves, and cabinets. Considerations include drawer slide mechanisms, door hardware, and the overall structural support required to accommodate the weight of stored items. For example, plans for a professional-grade workbench might incorporate deep drawers with full-extension slides to house hand planes, chisels, and other frequently used tools. Smaller drawers or shelves could be designed for storing measuring devices, fasteners, and marking tools. Open shelving provides easy access to larger items like saws, squares, or works in progress. A historical example of such is the Shaker style workbench, known for its incorporation of drawers and shelving as a means of promoting efficiency and order within their workshops. This historical integration displays a long-term goal for practical craftsmanship. Furthermore, integrated dust collection systems can be considered an integral part of storage, reducing cleanup and keeping the workspace functional.
In summary, storage integration is an essential element within woodworking workbench schematics. This integration maximizes productivity by keeping tools within reach and eliminating clutter. Challenges in implementation include balancing storage capacity with structural integrity and minimizing the workbench’s overall footprint. Disregarding this design element can result in a workspace that is disorganized, inefficient, and ultimately hinders the woodworking process. Efficient storage within the workbench will greatly optimize one’s process.
7. Ergonomic height
Ergonomic height is a pivotal consideration within woodworking workbench design. The schematics must specify a height appropriate to the woodworker’s stature and typical tasks. Inadequate height, whether too low or too high, induces strain, fatigue, and potential long-term musculoskeletal issues. Properly designed woodworking workbench construction documentation reflects an understanding of biomechanics, tailoring the workbench to the individual user. The cause-and-effect relationship is direct: an improperly sized workbench leads to discomfort and reduced productivity, while a properly sized bench promotes efficiency and well-being. Neglecting this parameter during planning results in a work surface that hinders rather than facilitates woodworking endeavors. For instance, if a woodworker is frequently hunched over a low bench, this can cause lower back pain.
Woodworking workbench blueprints often include guidelines for determining optimal height. A common recommendation involves setting the workbench surface at a height that allows the woodworker to comfortably plane a board without excessively bending or reaching. This height varies based on individual height and arm length. Practical applications of this principle are evident in custom-built workbenches, where woodworkers carefully measure and adjust the leg length to achieve the perfect fit. An example could be a taller craftsman adding a platform to reach his ideal height on a workbench constructed from existing plans. Another example is the use of adjustable-height legs, a feature increasingly incorporated into modern workbench designs to accommodate multiple users or varying task requirements. The presence of these features is a positive factor.
In summary, ergonomic height is an integral component of woodworking workbench schematics, significantly affecting the woodworker’s comfort, safety, and efficiency. It presents challenges such as accommodating multiple users and integrating adjustable features without compromising structural integrity. Recognizing and addressing this element within the design process contributes to a woodworking environment that is both productive and health-conscious. An optimized workbench with precise ergonomic integration represents a significant step toward worker wellbeing.
Frequently Asked Questions
This section addresses common inquiries pertaining to schematics for constructing woodworking workbenches, clarifying technical details and design considerations.
Question 1: What factors determine the optimal dimensions for woodworking bench blueprints?
Workbench dimensions are dictated by the anticipated scale of projects, available workspace, and the woodworker’s stature. Tabletops should be sufficiently large to accommodate common workpiece sizes, while height must promote ergonomic posture. Adequate leg spacing ensures stability. Each element is an interrelation between scale, space, and posture.
Question 2: Why are certain wood species recommended for particular components?
Hardwoods like maple or beech are favored for work surfaces due to their resistance to abrasion and deformation. Softwoods such as pine or fir may be suitable for base framing, offering a balance of strength and cost-effectiveness. Material selection is a balance of expense, weight, and hardness qualities.
Question 3: How critical is the precise execution of joinery detailed in the documents?
Accurate joinery is paramount to structural integrity. Poorly executed joints compromise stability, reduce load-bearing capacity, and potentially lead to premature failure. Precise joinery is essential for a quality design.
Question 4: What considerations govern the strategic arrangement of dog holes?
Dog hole placement should facilitate versatile clamping options. Patterns may vary depending on the types of projects typically undertaken. A grid pattern provides maximum flexibility, while rows aligned with vises offer specialized support.
Question 5: How does the integration of storage impact workbench design and functionality?
Integrated storage, such as drawers or shelves, enhances organization and accessibility. Designs must account for the weight of stored items and ensure that storage solutions do not compromise structural stability. A strategic plan to utilize open space is a positive for a workbench.
Question 6: What is the optimal way to adjust available plans to fit individual requirements?
Adaptations should be approached cautiously, considering potential impacts on stability and structural integrity. Changes to dimensions or material specifications may necessitate adjustments to joinery methods or support structures. It is essential to have a structural understanding of the plans.
These FAQs address fundamental considerations in woodworking workbench planning. Adherence to these principles will contribute to a robust and functional woodworking environment.
The subsequent section will present case studies of successful workbench implementations based on exemplary schematics.
Conclusion
This exploration of blueprints for constructing woodworking workbenches has highlighted essential aspects of design and implementation. Careful consideration of dimensions, material selection, joinery techniques, vise placement, dog hole layout, storage integration, and ergonomic height is paramount to achieving a stable, functional, and enduring structure. The quality of the initial documentation directly correlates with the ultimate success of the workbench.
The pursuit of optimized workspaces remains a central tenet of woodworking. The principles outlined herein offer a solid foundation for informed decision-making, enabling the creation of benches tailored to individual needs and ensuring both efficiency and longevity. Consistent adherence to rigorous planning improves the results of the woodworking process and is an excellent step towards efficiency.


![Best Collapsible Woodworking Table [Workbench Guide] Step-by-Step Guides, Tools & Inspiration to Build Beautiful Wooden Decor on a Budget Best Collapsible Woodworking Table [Workbench Guide] | Step-by-Step Guides, Tools & Inspiration to Build Beautiful Wooden Decor on a Budget](https://woodfromhome.com/wp-content/uploads/2026/02/th-439-300x200.jpg)


![Perfect Woodworking Table Top with Holes [DIY Plans] Step-by-Step Guides, Tools & Inspiration to Build Beautiful Wooden Decor on a Budget Perfect Woodworking Table Top with Holes [DIY Plans] | Step-by-Step Guides, Tools & Inspiration to Build Beautiful Wooden Decor on a Budget](https://woodfromhome.com/wp-content/uploads/2026/02/th-351-300x200.jpg)
