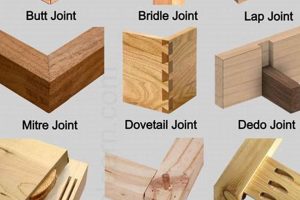
An angled connection formed by joining two pieces of material, each cut at a complementary angle, is a fundamental technique in woodworking. The resulting intersection typically forms a 90-degree corner, though other angles are achievable. For example, crafting a picture frame or a multi-sided box often relies on this precise method of joinery.
This approach allows for visually appealing, seamless corners, concealing end grain and creating a more refined aesthetic. Its prevalence in furniture construction, trim work, and cabinet making stems from its strength and ability to enhance the overall appearance of finished projects. Historically, its use reflects a commitment to craftsmanship and attention to detail.
The following sections will delve into the specific tools, techniques, and considerations involved in creating accurate and durable versions of this joint, covering topics such as angle measurement, cutting methods, and appropriate adhesives.
Essential Considerations for Accurate Angled Connections
Achieving precise and durable angled connections in woodworking necessitates careful attention to detail. The following tips highlight crucial factors for successful execution.
Tip 1: Angle Measurement Accuracy: Employ a precise measuring tool, such as a digital protractor or a high-quality combination square, to determine the exact angle required for each piece. Even slight errors in measurement will compound at the joint, resulting in visible gaps or misalignment.
Tip 2: Saw Blade Selection: Use a saw blade designed for fine cuts and minimal tear-out. A blade with a high tooth count is recommended for achieving clean edges and preventing splintering, especially when working with delicate materials.
Tip 3: Miter Saw Calibration: Regularly check and calibrate the miter saw to ensure accurate angle settings. Use a precision square to verify that the saw blade is perfectly perpendicular to the fence at 90 degrees and that the angle adjustments are precise.
Tip 4: Consistent Cutting Technique: Maintain a steady and controlled cutting speed throughout the process. Avoid forcing the material through the blade, which can cause inaccuracies and damage. Let the saw do the work.
Tip 5: Test Cuts and Refinement: Before cutting the final pieces, make test cuts on scrap material to verify the accuracy of the angle settings. Use a sharp hand plane or sandpaper to refine the angles for a perfect fit.
Tip 6: Glue Application: Apply an even and adequate amount of high-quality wood glue to both surfaces of the joint. Ensure that the glue covers the entire mating surface for optimal adhesion.
Tip 7: Clamping Pressure: Use appropriate clamps to apply consistent and even pressure to the joint while the glue dries. Ensure the pieces are aligned correctly before tightening the clamps. Consider using corner clamps specifically designed for holding angled joints.
These recommendations, if followed diligently, contribute significantly to the creation of strong, visually appealing, and precisely aligned angled connections. Mastery of these techniques elevates the quality and durability of woodworking projects.
With a solid understanding of these tips, the subsequent sections will focus on advanced techniques and troubleshooting common issues associated with this woodworking method.
1. Accurate angle measurement
Accurate angle measurement forms the cornerstone of successful miter joint woodworking. It directly dictates the precision of the joint’s fit and the aesthetic quality of the finished piece. Inaccurate measurements, even by a fraction of a degree, result in noticeable gaps at the mitered corners, detracting from both the visual appeal and the structural integrity of the joint. The cause-and-effect relationship is clear: imprecise measurement invariably leads to flawed miter joints. Consider the construction of a picture frame. If each corner is off by even one degree, the resulting frame will not be a true rectangle, and the misaligned corners will be readily apparent.
The importance of precise angle determination extends beyond mere aesthetics. In applications requiring structural strength, such as cabinet frames or architectural moldings, poorly fitted miter joints compromise the joint’s ability to withstand stress and load. Furthermore, discrepancies in angle measurement necessitate additional corrective measures, such as filling gaps with wood filler or re-cutting pieces, adding time and material costs to the project. In contrast, accurate angle measurement streamlines the process, reduces waste, and contributes to a more professional and durable final product. The implementation of digital protractors and precision angle finders ensures measurement accuracy.
In summary, accurate angle measurement is not merely a preliminary step; it is an indispensable component of miter joint woodworking. Its influence on both the visual appeal and structural soundness of the joint is undeniable. While achieving perfect accuracy presents challenges, the benefits of investing in precise measuring tools and techniques far outweigh the costs associated with rectifying poorly executed miter joints. Continued adherence to best practices in angle measurement remains paramount for achieving consistently high-quality results.
2. Sharp blade essential
The condition of the saw blade is paramount in miter joint woodworking, directly influencing the quality of the cut and, consequently, the integrity of the joint. A sharp blade cleanly severs wood fibers, producing a smooth, precise surface that allows for tight adhesion when gluing the miter. Conversely, a dull blade tears rather than cuts, resulting in splintered edges and a less-than-perfect fit. This imperfection compromises the joint’s strength and aesthetic appeal. The construction of fine furniture, for example, demands flawlessly executed miter joints. The use of a dull blade in such projects inevitably leads to visible imperfections and reduced structural stability.
The significance of a sharp blade extends beyond mere aesthetics. A clean cut minimizes gaps along the mitered edge, maximizing the surface area for glue adhesion. This increased surface contact translates directly into a stronger, more durable joint. Furthermore, a sharp blade reduces the likelihood of tear-out, especially when working with hardwoods or veneered materials. The application of sharp blades, with high tooth counts, becomes even more critical when processing these delicate materials. Proper blade maintenance, including regular sharpening and the use of appropriate blade cleaners, prolongs the blade’s life and ensures consistently high-quality cuts. It’s also imperative to match the correct blade type to the wood species. For instance, blade geometry optimized for hardwoods may struggle with softer materials like pine.
In conclusion, the use of a sharp blade is not merely a recommended practice but a fundamental requirement for successful miter joint woodworking. Its impact on the cut quality, glue adhesion, and overall joint strength is undeniable. Regular blade maintenance and selection of the appropriate blade for the material at hand are essential steps in achieving consistently precise and aesthetically pleasing miter joints. Neglecting this aspect can result in compromised joint integrity and diminished project quality, undermining the intended value of woodworking endeavors.
3. Precise miter saw setup
Precise miter saw setup represents a critical determinant in achieving accurate and consistent miter joints in woodworking. A properly configured miter saw minimizes errors, reduces material waste, and enhances the overall quality and efficiency of woodworking projects involving angled connections.
- Blade Squareness to Fence
Ensuring the saw blade is perfectly square to the fence is fundamental. Any deviation introduces inaccuracies in the cut angle. For instance, if the blade is off by even half a degree, each mitered piece will be skewed, resulting in a visible gap at the joint. Accurate squareness is verified using a precision square, and adjustments are made according to the saw manufacturer’s instructions. In cabinet making, where tight-fitting joints are essential for structural integrity, a square blade is non-negotiable.
- Angle Scale Calibration
The angle scale on the miter saw must be accurately calibrated. This calibration ensures that the saw cuts at the intended angle. A poorly calibrated scale leads to cumulative errors, especially when cutting multiple pieces for complex assemblies. Calibration is often checked against a precision protractor or a known accurate angle. Applications such as picture frame construction, where symmetry is paramount, demand an accurately calibrated angle scale.
- Fence Alignment
The fence on the miter saw must be perfectly straight and aligned with the blade. A warped or misaligned fence introduces variations in the cut, causing inconsistent miter angles. Fence alignment is checked using a straightedge, and adjustments are made to ensure a consistent reference surface for the workpiece. In large-scale trim work, a straight and aligned fence is essential for maintaining uniformity in the mitered corners of walls and ceilings.
- Workpiece Support and Clamping
Adequate support for the workpiece is necessary to prevent movement or vibration during the cut. Instability leads to inaccurate cuts and potential safety hazards. Clamping the workpiece securely to the fence further minimizes movement and ensures consistent angles. For long pieces, extension wings or rollers provide additional support. Crown molding installation, where precise and repeatable cuts are required, benefits significantly from stable workpiece support and secure clamping.
Collectively, these facets of precise miter saw setup contribute directly to the creation of accurate and consistent miter joints. Addressing each aspect diligently minimizes errors, reduces material waste, and improves the overall quality and efficiency of woodworking projects. Continued attention to detail in miter saw setup remains paramount for achieving professional-level results in miter joint woodworking.
4. Consistent cutting technique
Consistent cutting technique is not merely a matter of habit but a prerequisite for achieving precise and repeatable results in miter joint woodworking. Variations in technique directly impact the accuracy of the cut angle and the smoothness of the cut surface, ultimately affecting the integrity and aesthetic appeal of the finished joint. The subsequent points detail key facets of consistent cutting technique and their implications for miter joint construction.
- Steady Feed Rate
Maintaining a steady feed rate throughout the cutting process is essential. Abrupt changes in speed or applied pressure can cause the saw blade to deflect, resulting in inaccuracies in the cut angle. A consistent feed rate ensures that the blade engages the wood fibers evenly, producing a smoother and more precise cut. In the context of framing, where multiple mitered pieces must match precisely, a consistent feed rate minimizes variations between cuts.
- Proper Hand Placement
Correct hand placement on the workpiece and the saw handle is crucial for maintaining control and stability during the cut. A firm, yet relaxed grip allows for precise guidance of the saw blade and minimizes the risk of slipping or jerking. Improper hand placement can lead to uneven pressure on the blade, resulting in skewed cuts and increased tear-out. The construction of intricate moldings or decorative trim demands precise hand placement to ensure accurate and consistent miter angles.
- Saw Blade Engagement
Engaging the saw blade smoothly and consistently at the start and end of each cut is vital for preventing splintering and tear-out. A jerky or abrupt start can damage the wood fibers, particularly on delicate edges. A controlled and deliberate engagement ensures a clean entry and exit of the blade, resulting in a smooth and precise cut. This is critical when working with expensive hardwoods, where minimizing waste and imperfections is paramount.
- Following the Cut Line
Accurately following the cut line marked on the workpiece is fundamental for achieving the desired miter angle. Deviations from the line, even by a small margin, can accumulate across multiple cuts, resulting in significant errors in the finished joint. Visual tracking and careful attention to the saw blade’s position relative to the line are essential. In projects involving complex geometric patterns, precise adherence to the cut line is necessary for achieving accurate and visually appealing results.
These aspects of consistent cutting technique collectively contribute to the creation of accurate and reliable miter joints. The diligent application of these techniques reduces the likelihood of errors, minimizes material waste, and ensures the production of high-quality woodworking projects. Furthermore, a commitment to consistent cutting technique fosters efficiency and predictability in the woodworking process, leading to greater satisfaction and improved outcomes.
5. Proper adhesive selection
The integrity of a miter joint, characterized by its end-grain-to-end-grain bond, is critically dependent on proper adhesive selection. The inherent weakness of end-grain adhesion necessitates the use of adhesives formulated for high strength and minimal creep. Failure to select an appropriate adhesive directly leads to joint failure under stress, manifesting as gaps or complete separation. The construction of picture frames, for instance, often showcases this principle. A frame assembled with inadequate adhesive will exhibit corner separation over time, especially in environments with fluctuating humidity.
Considerations for adhesive selection include wood species, joint geometry, and environmental conditions. Hardwoods with tight grain structures may require adhesives with gap-filling properties to ensure adequate bond strength. Joint geometry influences the distribution of stress, necessitating adhesives with high shear strength in joints subject to lateral forces. Environmental conditions, such as temperature and humidity, impact the curing process and long-term performance of the adhesive. Polyurethane adhesives, known for their strength and water resistance, are frequently employed in outdoor miter joint applications, such as exterior trim or garden furniture.
In summary, proper adhesive selection represents a fundamental component of successful miter joint woodworking. The use of inappropriate adhesives compromises joint strength and long-term durability. Careful consideration of wood species, joint geometry, and environmental factors is essential for selecting an adhesive that provides a robust and reliable bond. Adherence to these principles minimizes the risk of joint failure and ensures the creation of aesthetically pleasing and structurally sound woodworking projects. Practical understanding of this aspect minimizes both rework and material cost, adding to a professional and efficient outcome.
6. Adequate clamping force
Adequate clamping force constitutes a crucial factor in achieving structurally sound and visually appealing miter joints in woodworking. Clamping applies pressure that forces the mitered surfaces into intimate contact during the adhesive curing process. Insufficient clamping pressure results in gaps along the joint line, reducing both the strength of the bond and the aesthetic quality of the finished piece. A weak bond increases the likelihood of joint failure under stress, as the adhesive cannot effectively bridge the space between the poorly mated surfaces. Picture frames, for example, are prone to separation at the mitered corners if inadequate clamping is applied during assembly.
The appropriate level of clamping force varies depending on several factors, including the wood species, adhesive type, and joint geometry. Hardwoods generally require greater clamping pressure than softwoods due to their denser cellular structure. Certain adhesives, such as epoxy resins, benefit from higher clamping forces to ensure proper wetting of the wood fibers. Miter joints with small surface areas require precise clamping to distribute pressure evenly across the entire bond line. Furthermore, the type of clamp usedband clamp, corner clamp, or bar clampaffects the distribution of clamping force. Band clamps, for instance, provide uniform pressure around the perimeter of a mitered frame, while corner clamps focus pressure at the joint itself. The selection of appropriate clamping tools and techniques is therefore essential for maximizing the effectiveness of the clamping process. Ensuring all areas of the joint are properly mated leads to more resilient joints.
In conclusion, adequate clamping force is indispensable for achieving strong and durable miter joints in woodworking. Insufficient clamping leads to weakened bonds and aesthetic imperfections, while excessive clamping can damage the wood fibers or distort the joint. Careful consideration of wood species, adhesive type, joint geometry, and clamp selection is essential for applying the appropriate level of pressure. By adhering to best practices in clamping, woodworkers can ensure the creation of high-quality miter joints that withstand the test of time. A deeper understanding of this process is key to any professional woodworking endeavor.
7. Joint alignment verification
Joint alignment verification is an indispensable step in miter joint woodworking, ensuring the precision and structural integrity of the finished product. Its purpose extends beyond mere visual inspection, encompassing the active confirmation that the joined pieces adhere to the intended geometric arrangement. The absence of diligent verification inevitably results in skewed corners, compromised structural support, and an overall reduction in the quality of the finished piece. Therefore, meticulous attention to alignment is critical throughout the joining process.
- Pre-Adhesive Dry Fit
Prior to adhesive application, a dry fit simulates the final assembly. This crucial step allows for the detection of any misalignment issues arising from inaccurate cuts or improperly calibrated tools. By clamping the pieces together without glue, the woodworker can visually assess the fit and make necessary adjustments before committing to the final bond. A dry fit prevents the costly waste of materials and adhesive associated with correcting errors after the joint has been permanently assembled. For example, cabinet face frames undergo dry fitting to identify and correct subtle misalignments that would otherwise result in uneven door gaps or distorted overall dimensions.
- During-Clamping Monitoring
Maintaining constant vigilance during the clamping process is essential for preventing slippage or shifting of the mitered pieces. Clamping pressure, while necessary for secure bonding, can inadvertently induce movement, leading to misalignment. By periodically inspecting the joint while the adhesive is wet, minor adjustments can be made to ensure the pieces remain perfectly aligned. The use of visual aids, such as squares or reference lines, facilitates this monitoring process. Consider a multi-sided box construction where each miter must align precisely to form the intended shape. Vigilant monitoring during clamping prevents distortion and ensures a seamless geometric form.
- Post-Curing Inspection
After the adhesive has fully cured, a thorough inspection is conducted to verify the final alignment and identify any residual imperfections. This inspection involves both visual assessment and tactile examination. Gaps, uneven surfaces, or skewed angles indicate potential alignment issues that may require corrective action. The use of precision measuring tools, such as calipers or straightedges, aids in detecting subtle deviations from the intended geometry. In furniture making, post-curing inspection is critical for identifying and addressing any misalignments that could compromise the structural integrity or aesthetic appeal of the piece.
- Surface Plane Verification
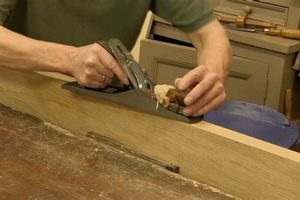
Checking the surface plane across the mitered joint is crucial to ensure a smooth and continuous transition. Any inconsistencies in the surface plane indicate misalignment or uneven material removal during the cutting process. This is especially important when preparing a miter joint for subsequent finishing operations, such as sanding or painting. A well-aligned joint requires minimal sanding to achieve a smooth, level surface. Picture frames are a prime example, where an uneven surface plane at the mitered corners detracts from the overall visual quality. This aspect is often addressed using specialized hand planes or sanding blocks for precise surface refinement.
The interconnectedness of these facets in joint alignment verification underscores its integral role in achieving high-quality miter joint woodworking. Each stage contributes to a comprehensive approach to ensure accuracy, stability, and aesthetic appeal. Without diligent verification, even the most carefully cut miter joints may fall short of expectations. The dedication to these detailed practices separates professional woodworking from amateur efforts, culminating in a superior final product.
Frequently Asked Questions About Miter Joint Woodworking
This section addresses common inquiries and clarifies critical aspects of miter joint woodworking, providing concise explanations to enhance understanding and skill.
Question 1: What is the primary advantage of a miter joint compared to a butt joint?
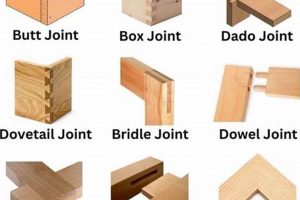
A miter joint conceals end grain, resulting in a cleaner, more aesthetically pleasing appearance, particularly at corners. A butt joint, conversely, exposes end grain, which is less visually appealing and often more susceptible to damage.
Question 2: What degree of angle is typically used for creating a 90-degree corner using a miter joint?
Each piece is cut at a 45-degree angle. When joined, these two 45-degree angles combine to form a 90-degree corner.
Question 3: What type of saw is best suited for cutting miter joints?
A miter saw, particularly a powered miter saw, provides the precision and accuracy necessary for cutting consistent angles. Hand saws, such as a backsaw with a miter box, are also suitable for smaller projects requiring fine control.
Question 4: How can gaps in a miter joint be minimized?
Gaps are minimized by precise angle measurement, the use of sharp saw blades, and accurate saw calibration. Careful clamping during glue-up ensures tight contact between the mitered surfaces.
Question 5: Which adhesives are recommended for miter joints, and why?
Polyurethane glues and epoxy resins are often favored for miter joints due to their superior strength and gap-filling capabilities. These adhesives create a robust bond, compensating for the inherent weakness of end-grain adhesion.
Question 6: Is a miter joint inherently strong?
No, a miter joint is not inherently strong due to the limited long-grain gluing surface area. Reinforcement methods, such as splines, dowels, or biscuits, are frequently employed to enhance its structural integrity.
The knowledge offered in this FAQ provides a firmer grasp on miter joint techniques and materials, fostering better project planning and execution.
The next section will explore the practical applications of miter joint woodworking in various projects, providing insights into real-world examples and best practices.
Miter Joint Woodworking
This exposition has examined miter joint woodworking, detailing essential techniques, crucial considerations, and commonly encountered challenges. The accuracy of angle measurement, the sharpness of cutting implements, and the precision of saw setup have been identified as primary determinants of joint quality. Adherence to consistent cutting techniques, coupled with appropriate adhesive selection and adequate clamping force, further contributes to achieving structurally sound and aesthetically pleasing results. The significance of joint alignment verification throughout the process cannot be overstated.
Mastery of miter joint woodworking demands a comprehensive understanding of these interconnected elements. Continued refinement of skills and meticulous attention to detail will yield superior results in diverse woodworking applications. Future advancements in tooling and adhesives promise to further enhance the efficiency and reliability of this fundamental technique. The enduring relevance of miter joint woodworking lies in its ability to create seamless connections and elevate the visual appeal of crafted objects.


