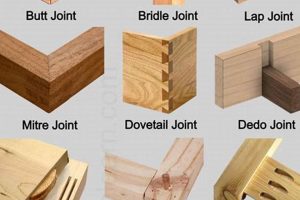
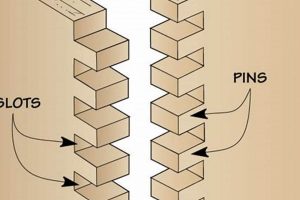
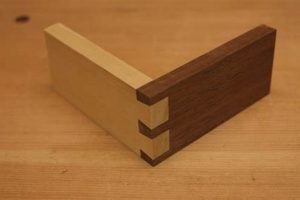
These interlocking connections, often seen in box construction and edge-to-edge board joining, offer a significant mechanical advantage. The arrangement resembles interlaced fingers, hence the descriptive term. A common application is in drawer construction where the strength of the joint is critical to withstand repeated use and stress.
The robust nature of this joint style stems from the increased gluing surface area and the mechanical resistance to pulling forces. Its design distributes stress across a larger area, resulting in a stronger bond compared to butt joints or lap joints. Historically, it has been employed where durability and longevity are paramount, contributing to the structural integrity of furniture and other wooden objects for generations.
The subsequent sections will delve into various aspects of this construction technique, encompassing the tools required for its creation, the optimal adhesives for bonding, and step-by-step instructions for producing these strong connections. The intricacies of machine-cut versus hand-cut variations will also be discussed, along with strategies for achieving consistently precise and aesthetically pleasing results.
Essential Guidance for Strong Interlocking Wood Connections
Achieving consistent success requires careful attention to detail throughout the process. The following tips offer practical advice to enhance the strength and appearance of these joints.
Tip 1: Precision is Paramount: Ensure accurate measurements and cuts. Even slight deviations can compromise the integrity of the final assembly, leading to weaker bonds and visible gaps.
Tip 2: Grain Orientation Matters: Pay close attention to grain direction when joining boards. Aligning the grain for optimal strength helps prevent splitting or warping over time.
Tip 3: Test Fit Before Gluing: Always dry-fit the joint before applying adhesive. This allows for adjustments and ensures a proper fit, preventing irreversible errors once the glue is applied.
Tip 4: Adhesive Selection is Critical: Use a high-quality wood glue specifically designed for joinery. Consider factors like open time, clamp time, and moisture resistance based on the intended application.
Tip 5: Apply Even Pressure During Clamping: Distribute clamping pressure evenly across the entire joint surface. This ensures a consistent bond line and prevents distortion during the curing process.
Tip 6: Remove Excess Adhesive Promptly: Wipe away any excess glue that squeezes out of the joint before it dries. This simplifies cleanup and prevents hardened glue from interfering with finishing.
Tip 7: Sanding for a Seamless Finish: After the adhesive has fully cured, carefully sand the joint to create a smooth, flush surface. Use progressively finer grits to eliminate any imperfections.
Adhering to these guidelines will contribute significantly to the creation of robust and aesthetically pleasing connections. Meticulous preparation and execution are key to realizing the full potential of this robust joinery method.
The subsequent sections will provide further insight into advanced techniques and applications, enabling the craftsman to confidently incorporate this durable joint style into a wide range of woodworking projects.
1. Interlocking Finger Geometry
The geometry of interlocking fingers is fundamental to the structural performance of these specific wood joints. The design directly dictates the strength, stability, and aesthetic appeal of the finished product.
- Finger Length and Width
The dimensions of individual fingers, specifically length and width, influence the gluing surface area and mechanical resistance. Longer fingers generally increase the surface area available for adhesive bonding, leading to a stronger joint. However, excessively long fingers can become more prone to breakage during assembly if not properly supported. Width is also a key parameter as it directly impacts the number of interlocks within a given joint dimension; more interlocks typically equate to a stronger joint, provided that the wood stock remains structurally sound at the reduced finger width.
- Finger Pitch and Spacing
Finger pitch, or the distance between adjacent fingers, and the spacing between fingers within the joint, determine the distribution of stress along the joint line. Optimal pitch allows for even distribution of forces, preventing concentrated stress points that could lead to failure. Tight spacing ensures maximum interlocking and limits the potential for movement or slippage. Inadequate spacing or overly large pitch can diminish the mechanical advantage provided by the interlocking design.
- Finger Angle and Profile
While traditionally rectangular, the angle and profile of fingers can be modified to enhance either strength or aesthetic qualities. Dovetail variations, for example, create a mechanical lock that further resists pulling forces. Rounded or chamfered edges can improve the visual appeal of the joint and reduce the risk of splintering or chipping during handling. The choice of angle and profile often depends on the specific requirements of the project and the desired balance between functional performance and appearance.
- Joint Fit Tolerance
The precision with which the fingers interlock is crucial for optimal joint performance. Excessive clearance between fingers results in a weaker joint with reduced glue surface contact. Conversely, an overly tight fit can make assembly difficult and may even damage the wood. Achieving a tight, consistent fit requires careful planning and execution, taking into account the properties of the wood species being used and the accuracy of the cutting tools.
In summary, the precise arrangement of interlocking fingers forms the backbone of a robust wood connection. Careful attention to each geometric parameter ensures the joint’s strength and longevity. Deviations from established principles can compromise the integrity of the woodworking piece. The correlation between “Interlocking Finger Geometry” and the success of woodwork finger joints is direct and undeniable.
2. Adhesive Bonding Surface
The efficacy of interlocking wood connections is significantly influenced by the area available for adhesive application. Maximizing this bonding surface contributes directly to the joint’s overall strength and resistance to stress.
- Surface Area Amplification
The finger design inherently increases the available gluing surface compared to simple butt joints. Multiple fingers provide numerous faces for adhesion, distributed along the joint length. This amplification enhances the mechanical bond, allowing the joint to withstand greater tensile and shear forces. Drawer construction is a practical application, where this increased surface area bolsters the joint against daily use and weight-bearing stress.
- Adhesive Type Considerations
The choice of adhesive must align with the wood species and joint application. Polyvinyl acetate (PVA) adhesives are commonly used for their ease of application and strong bond strength on many wood types. However, specialized adhesives, like polyurethane or epoxy, may be necessary for oily or exotic woods that resist traditional glues. The selected adhesives viscosity should also facilitate even coverage across the entire joint surface.
- Surface Preparation Techniques
Proper preparation of the bonding surface is essential for optimal adhesion. This includes ensuring the wood is clean, dry, and free of contaminants like dust, oil, or wax. Light sanding can improve the surface profile, creating microscopic textures that enhance mechanical interlocking with the adhesive. Failure to prepare the surface adequately reduces the adhesives ability to penetrate the wood fibers, weakening the bond.
- Clamp Pressure and Distribution
Consistent clamp pressure during the adhesive curing process is critical for achieving a strong bond. Clamps distribute force evenly across the interlocking fingers, ensuring intimate contact between the wood and adhesive. Insufficient pressure results in gaps and inconsistent adhesion, while excessive pressure can squeeze out too much adhesive, creating a glue-starved joint. Careful monitoring and adjustment of clamping pressure are vital.
The various surface considerations directly correlate to the longevity and reliability of a woodwork finger joint. Maximizing adhesive bonding surface area, by utilizing the proper adhesive, surface preparation, and evenly distributed clamp pressure ensures that the joint’s potential is met, providing strength and stability.
3. Precision Cutting Accuracy
In the creation of woodwork finger joints, precision cutting accuracy stands as a foundational requirement, significantly influencing the strength, stability, and visual appeal of the final product. Without accurate cuts, the interlocking structure cannot function as intended, resulting in a compromised joint.
- Dimensional Consistency
Maintaining consistent dimensions across all fingers is crucial. Variations, even slight ones, can lead to gaps and uneven stress distribution within the joint. For example, if some fingers are marginally wider than others, they may create undue pressure during assembly, potentially causing cracking or misalignment. In contrast, if some fingers are too narrow, the resulting gaps will diminish the gluing surface area and weaken the overall bond.
- Angularity and Squareness
The angles and squareness of the fingers must be precisely aligned. Deviation from 90-degree angles, where applicable, will prevent the fingers from meshing correctly, leading to a weakened joint and an unprofessional appearance. Ensuring that each finger is perfectly square with the adjoining surface minimizes gaps and maximizes the contact area for adhesive bonding, contributing to enhanced structural integrity.
- Kerf Management
Kerf, the width of the cut made by the saw blade, requires careful consideration. Inaccurate kerf compensation can result in fingers that are either too tight or too loose. For instance, if the kerf is not properly accounted for during the cutting process, the assembled joint may require excessive force to fit together, potentially damaging the wood. Conversely, if the kerf is overcompensated, the resulting joint will exhibit undesirable gaps and reduced strength.
- Tool Calibration and Maintenance
Achieving precision cutting accuracy necessitates properly calibrated and well-maintained cutting tools. Dull saw blades or misaligned fences can introduce inaccuracies that compound across multiple cuts. Regular maintenance, including sharpening blades and verifying tool alignment, is essential for ensuring consistent and reliable results. The investment in quality tools and their upkeep directly translates to the quality and durability of the resulting finger joints.
These facets of precision cutting accuracy are not isolated considerations but rather interconnected elements contributing to the success of woodwork finger joints. Failure to address any of these aspects will invariably lead to a compromised outcome. The commitment to precision throughout the cutting process is, therefore, a fundamental requirement for creating robust and visually appealing connections.
4. Material Grain Alignment
The orientation of wood grain within a joint directly affects its structural integrity and susceptibility to stress. In “woodwork finger joints,” proper grain alignment mitigates potential weaknesses, particularly when subjected to bending or tensile forces. Longitudinal alignment, where the grain runs parallel to the primary stress direction, maximizes the wood’s inherent strength. Conversely, misaligned grain introduces vulnerable points, increasing the risk of splitting or failure, especially in areas subjected to significant load. For instance, in drawer construction, grain orientation perpendicular to the front panel can result in separation over time due to repeated pulling and closing.
Consider the practical application in frame construction; aligning the grain along the length of the frame members ensures that the wood can effectively resist bending forces. Alternating grain direction within the fingers can also provide a degree of balanced resistance against warping or twisting. However, complex grain patterns, such as those found in highly figured wood, pose challenges. In these cases, meticulous selection and orientation of the material are crucial to distribute stress evenly and prevent localized failures. This often requires careful planning and selective cutting to ensure that the grain direction is optimized within each interlocking finger.
In summation, material grain alignment is not merely an aesthetic consideration but a critical factor in the durability of “woodwork finger joints.” Challenges arise with complex grain patterns, necessitating careful material selection and alignment. Understanding this relationship is essential for producing robust, long-lasting wooden structures, mitigating potential failure points, and ensuring the sustained integrity of the constructed object.
5. Assembly Clamping Pressure
Assembly clamping pressure exerts a critical influence on the strength and longevity of woodwork finger joints. Proper pressure ensures optimal adhesive bonding, which is paramount for the joint’s structural integrity. Insufficient or excessive pressure can compromise the bond, leading to premature failure.
- Optimal Pressure Range
The ideal clamping pressure falls within a specific range, varying based on adhesive type and wood species. Excessive pressure can starve the joint by squeezing out too much adhesive, leaving a thin and weak bond line. Conversely, insufficient pressure fails to establish intimate contact between the wood surfaces, resulting in gaps and reduced adhesion. Researching adhesive specifications and wood characteristics is crucial for determining the correct clamping force.
- Even Pressure Distribution
Uniform pressure distribution across the entire joint surface is vital. Uneven clamping can create areas of concentrated stress or insufficient contact, leading to localized weaknesses. Using cauls, which are rigid blocks that distribute pressure evenly, is a common technique. Careful clamp placement and proper caul design help ensure consistent contact across all interlocking fingers.
- Clamp Type Selection
The choice of clamping mechanism influences the applied pressure and its distribution. Bar clamps provide substantial force and are suitable for larger joints, while pipe clamps offer flexibility in length adjustment. Hand screws are useful for applying localized pressure and accommodating irregular shapes. Selecting the appropriate clamp type ensures that the correct pressure can be applied precisely where it is needed.
- Curing Time and Pressure Maintenance
Maintaining consistent pressure throughout the adhesive curing period is essential for proper bond formation. Premature release of pressure can disrupt the bonding process, leading to a weakened joint. The recommended clamping time varies depending on the adhesive type, ambient temperature, and humidity levels. Adhering to the adhesive manufacturer’s guidelines ensures that the joint achieves its full strength potential.
In essence, the meticulous application and maintenance of assembly clamping pressure are indispensable for maximizing the performance of woodwork finger joints. Attention to pressure range, even distribution, clamp selection, and curing time contributes significantly to the creation of robust and durable wooden structures.
Frequently Asked Questions about Woodwork Finger Joints
The subsequent questions address common points of inquiry concerning this robust joinery method, aiming to provide clarity on their application, strength, and limitations.
Question 1: What is the primary advantage of utilizing interlocking wood connections compared to simpler joinery techniques?
This joint style significantly increases the gluing surface area and provides mechanical resistance to pulling forces, resulting in a stronger bond compared to butt joints or lap joints.
Question 2: Which wood adhesives are most suitable for creating durable interlocking connections?
Polyvinyl acetate (PVA) adhesives are commonly employed due to their ease of application and strong bonding capabilities. However, epoxy or polyurethane adhesives may be necessary when working with oily or exotic wood species.
Question 3: How does grain orientation influence the strength of a woodwork finger joint?
Grain direction should ideally align for optimal strength. Proper alignment helps prevent splitting or warping over time, contributing to the joint’s overall integrity.
Question 4: What level of precision is required when cutting fingers for interlocking wood connections?
High precision is paramount. Even minor dimensional inconsistencies can compromise the joint’s integrity, leading to weaker bonds and visible gaps. Accuracy in measurements and cuts is crucial.
Question 5: How much clamping pressure should be applied during the adhesive curing process?
Clamping pressure should be evenly distributed and sufficient to ensure intimate contact between the wood surfaces. Excessive pressure, however, can squeeze out too much adhesive, resulting in a weakened joint.
Question 6: Can interlocking wood connections be effectively employed with all wood types?
While adaptable, specific wood characteristics, such as density and oil content, can influence the joint’s strength. Certain wood species may require specialized adhesives or modifications to the joint design.
In summary, the durability of these joints relies on careful execution, encompassing precise cuts, appropriate adhesive selection, strategic grain alignment, and controlled clamping pressure. A thorough understanding of these elements is key to successful implementation.
The next section will explore advanced techniques and applications, enabling craftsmen to confidently incorporate this joinery method into a broader spectrum of woodworking projects.
Conclusion
This exposition has detailed the multifaceted nature of woodwork finger joints, emphasizing the critical elements for successful implementation. Precision in cutting, appropriate adhesive selection, mindful grain alignment, and controlled clamping pressure each contribute significantly to the strength and longevity of these interlocking connections. Deviations from established best practices inevitably lead to compromised results, potentially undermining the structural integrity of the woodworking project.
Therefore, the informed application of these principles remains paramount. Woodwork finger joints, when executed with diligence and precision, offer a robust and reliable method for creating enduring wooden structures. Continued adherence to sound techniques will ensure the continued relevance and effectiveness of this time-honored joinery approach.


