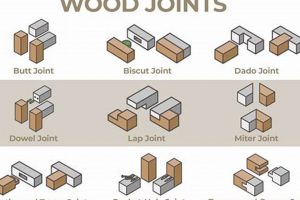
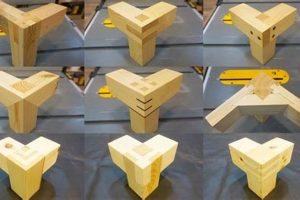
A particular method of joinery, typically employed where two members meet at an angle, this technique creates a strong and aesthetically pleasing union. One element is cut with a sloping surface that corresponds to the angle of intersection, allowing it to seat firmly against the other member. A common application is in the construction of roof rafters where they meet at the hip, creating a seamless transition and transferring loads efficiently.
The use of this method provides structural integrity and visual appeal to woodworking projects. Its strength stems from the large surface area of the glued or fastened connection. Historically, this technique has been favored in complex framing and cabinetry due to its ability to create durable and elegant transitions, improving the overall stability and longevity of crafted items.
This construction methodology is fundamental to understanding advanced carpentry practices. Subsequent discussion will explore the specific tools, techniques, and considerations necessary for accurate execution, as well as variations suitable for different applications.
Essential Considerations for Angled Joinery
Achieving a precise and durable connection at an angle requires meticulous planning and execution. The following considerations are crucial for success.
Tip 1: Accurate Angle Measurement: Precise angle measurement is paramount. Utilize a bevel gauge and protractor to determine the exact angle of intersection. Errors at this stage will compound throughout the process.
Tip 2: Consistent Material Thickness: Variations in material thickness will compromise the joint’s integrity. Ensure both members are dimensioned to the same thickness before commencing cutting operations.
Tip 3: Precise Cutting Techniques: A sharp saw, coupled with controlled movements, is essential for creating clean, accurate cuts. Practice on scrap material to refine technique before working on the final pieces.
Tip 4: Proper Glue Application: Apply adhesive evenly across the entire mating surface. Insufficient adhesive will lead to a weak bond; excessive adhesive can create a messy and difficult-to-clean joint.
Tip 5: Secure Clamping Methods: Clamping pressure must be applied evenly to ensure full contact between the two members. Utilize cauls to distribute pressure and prevent damage to the wood’s surface.
Tip 6: Dry Fitting and Adjustment: Before applying adhesive, perform a dry fit to assess the joint’s fit and alignment. Make any necessary adjustments to ensure a seamless and gap-free connection.
Tip 7: Wood Grain Orientation: Consider the orientation of the wood grain in relation to the joint. Aligning the grain for maximum strength will enhance the joint’s overall durability.
Adhering to these principles will yield a strong and visually appealing joint, enhancing the structural integrity and aesthetic quality of woodworking projects.
The subsequent section will address common challenges encountered in angled joinery and offer practical solutions.
1. Accurate Angle Calculation
In the creation of joints between wooden members at an oblique angle, particularly in structures employing complex framing, accurate angle calculation is a non-negotiable prerequisite. Minute errors in angular measurement propagate significantly, impacting the structural integrity and aesthetic appeal of the completed piece.
- Compound Miter Angles
The establishment of precise compound miter angles is essential for aligning members that intersect on both the horizontal and vertical planes. Miscalculation results in gaps, weak points, and a visually flawed appearance. In hip roofs, for example, accurately calculated angles ensure that rafters meet flush, distributing loads evenly and preventing structural failure.
- Bevel Gauge Utilization
Employing a bevel gauge with precision is crucial for transferring angles from architectural plans or existing structures to the workpiece. An improperly set bevel gauge leads to inconsistent cuts and necessitates iterative adjustments, increasing the likelihood of cumulative errors and material waste.
- Trigonometric Functions
Trigonometric functions (sine, cosine, tangent) provide a mathematical framework for determining angles and side lengths with utmost accuracy. These functions are indispensable in complex geometric layouts where direct measurement is impractical or impossible. Failing to accurately apply these functions results in imprecision and structural instability.
- Digital Angle Finders
The use of digital angle finders can minimize human error in angle measurement. These tools provide precise readings, reducing the risk of misinterpretation or estimation. However, reliance solely on digital tools without a fundamental understanding of angular geometry can lead to errors if the device is improperly calibrated or misused.
The interconnectedness of these elements highlights the importance of accurate angle calculation in angled wood connections. A deep understanding of geometry, coupled with meticulous measurement and execution, is essential for achieving strong, aesthetically pleasing, and structurally sound results. Accurate angle calculation also helps minimises material waste which reduces the costs. Such care elevates a basic carpentry task to a high-level craft.
2. Precise Cutting Execution
Precise cutting execution is not merely a desirable trait; it is a foundational requirement. Without accurate cuts, the mating surfaces will not align correctly, leading to gaps, weakened glue lines, and a compromised structural integrity. Consider the construction of a complex roof system. If the sloping surfaces of the hip rafters are not cut with exacting precision, the resulting roof will be susceptible to water damage and premature failure due to uneven load distribution.
The necessity for precise cuts dictates the tools and techniques employed. Sharp, well-maintained saws, whether hand-powered or machine-driven, are indispensable. Skilled use of these tools, including proper blade selection and controlled feed rates, is paramount. Jigs and fixtures are often employed to ensure consistent and repeatable cuts, particularly when dealing with complex angles or large production runs. Furthermore, meticulous layout work, utilizing sharp marking tools and accurate measuring devices, precedes every cut. Any deviation from the intended line, however small, can compound errors and compromise the finished product. This is apparent in building staircases.
In summary, the ability to execute precise cuts directly affects the strength, aesthetics, and overall longevity of woodworking projects involving angled intersections. Challenges in this area can be addressed through careful tool maintenance, diligent layout procedures, and a commitment to refining cutting techniques. The successful integration of precise cutting execution ensures a result that meets both structural and aesthetic demands. Accurate and detailed cuts minimize material waste and maximise profits.
3. Material Thickness Consistency
In the context of joinery involving angled intersections of wooden members, uniformity in material thickness emerges as a critical factor influencing the overall structural integrity and aesthetic quality. Discrepancies, even seemingly minor, can propagate through the assembly, leading to compromised joints, uneven surfaces, and ultimately, a reduction in the lifespan and visual appeal of the finished piece.
- Uniform Load Distribution
Consistency in material thickness ensures that loads are distributed evenly across the joint. Variations in thickness create stress concentrations, potentially leading to premature failure or deformation. In roof framing, for instance, non-uniform rafters could cause uneven weight distribution, which stresses individual components, resulting in sags or collapses. For a table top, a consistent thickness creates uniform aesthetic appeal.
- Precise Mating Surfaces
Consistent dimensions are crucial for the creation of precise mating surfaces. Joints designed to interlock or bear against each other require accurate alignment, which is compromised when material thicknesses differ. This directly impacts the glue surface area and the overall strength. In cabinet construction, varying panel thicknesses in a frame and panel construction can lead to gaps and misalignment, undermining the joint’s integrity and visual appeal.
- Aesthetic Harmony
Uniformity in material thickness directly influences the aesthetic harmony of the finished piece. Variations can create visible discrepancies and detract from the overall visual appeal. This is particularly important in applications where symmetry and alignment are paramount. In furniture design, inconsistent wood thickness is readily observed and regarded as less desirable than a finished product with uniformed thickness.
- Predictable Joint Geometry
Maintaining consistent material thickness allows for predictable joint geometry and accurate layout. When dimensions are known and reliable, the angles and depths of cuts can be calculated with greater precision. This reduces the likelihood of errors and simplifies the assembly process. Accurate dimensions minimizes material waste and cuts down costs associated with labour time.
These facets underscore the critical role of material thickness consistency in this specialized area of woodworking. The principles of sound joinery demand meticulous attention to detail, including careful selection and preparation of materials, ensuring that dimensions are consistent and reliable. Precise execution not only yields structurally sound and aesthetically pleasing results but also contributes to the longevity and enduring value of the finished piece.
4. Effective Adhesive Application
Adhesive application plays a pivotal role in the structural integrity and longevity of joinery. The connection between members is paramount to the success of this application. In the context of hip roof framework, the transfer of load hinges on a properly bonded interface between the angled components.
- Surface Preparation and Joint Strength
Proper surface preparation is crucial for achieving optimal adhesion. Surfaces must be clean, dry, and free from contaminants such as dust, grease, or old finish. Abrading the surface slightly increases the bonding area and promotes mechanical interlocking. In structural applications, such as joining hip rafters, insufficient surface preparation can lead to adhesive failure under load. Joints are strong because of effective preparation.
- Adhesive Selection and Compatibility
The choice of adhesive must be compatible with the wood species and the intended application. Different adhesives possess varying strengths, water resistance, and open times. For exterior applications, such as exposed timber framing, a waterproof adhesive is essential. Utilizing an inappropriate adhesive can result in delamination and structural compromise, particularly under fluctuating environmental conditions. This is apparent in outdoor deck constructions.
- Open Time and Clamping Pressure
Adhering to the adhesive’s recommended open time and clamping pressure is essential for achieving maximum bond strength. Applying excessive clamping pressure can starve the joint of adhesive, while insufficient pressure may prevent full contact between mating surfaces. Precise clamping and effective timing will increase joint lifetime.
- Coverage and Uniformity
Uniform adhesive coverage across the entire mating surface ensures optimal load transfer and minimizes stress concentrations. Gaps or voids in the adhesive layer create weak points that are susceptible to failure under stress. Apply the adhesive evenly to both mating surfaces to prevent dry spots and ensure a consistent bond line. Adhesive coverage is key.
These facets underscore the importance of effective adhesive application in maintaining joints. By adhering to established best practices, woodworkers can maximize the strength, durability, and aesthetic quality of their work. The careful selection of adhesives, coupled with proper surface preparation and application techniques, ensures the successful integration of angled members in complex woodworking projects.
5. Secure Clamping Techniques
Effective implementation of secure clamping techniques is indispensable for achieving high-quality results. Clamping pressure applied during the adhesive curing phase is instrumental in maintaining intimate contact between the mating surfaces. Inadequate or improperly applied clamping pressure may result in weak or failed joints, irrespective of the precision of angle calculations, cutting execution, or adhesive selection. As a consequence, the structural integrity and visual appearance of the assembled component are compromised. A practical example can be observed in the creation of a hip roof. Here, the angled surfaces of the rafters require consistent and even clamping pressure to ensure a gap-free glue line and optimal load transfer. Without secure clamping, the roof’s ability to withstand environmental stressors such as wind and snow loads is significantly reduced.
Various clamping methods are employed depending on the joint’s geometry and size, as well as the specific tools available. Traditional bar clamps, pipe clamps, and specialized miter clamps are frequently utilized. Custom-built jigs and cauls may also be required to distribute clamping pressure evenly across complex or irregularly shaped surfaces. Consideration must also be given to the type of wood and the adhesive used, as excessive clamping pressure can damage softer woods or squeeze out too much adhesive, leading to a starved joint. Similarly, insufficient clamping pressure can result in gaps and reduced bond strength. Clamping strategies should be tested and refined to ensure optimal performance for each particular application.
In conclusion, secure clamping techniques are not merely ancillary processes, but rather integral components. Effective clamping ensures proper contact between surfaces, optimizing the adhesive’s bonding capacity and resulting in a strong, durable, and aesthetically pleasing component. Attention to appropriate clamping strategies is therefore paramount for successful outcomes. Poor clamping leads to weakened structural integrity and potentially costly repairs.
Frequently Asked Questions
The following questions address common inquiries and misconceptions regarding the creation of strong, durable, and aesthetically pleasing joints between wooden members at an angle.
Question 1: What is the primary challenge in creating joints at an angle?
The paramount challenge lies in achieving precise alignment and a gap-free connection between the mating surfaces. Errors in angle calculation, cutting execution, or material preparation accumulate, leading to compromised structural integrity and visual imperfections.
Question 2: What role does adhesive play in ensuring the longevity of a joint?
Adhesive provides a critical bonding interface between the wooden members, distributing stress and preventing separation over time. The selection of an appropriate adhesive, coupled with proper surface preparation and application techniques, significantly influences the joint’s resistance to environmental stressors and mechanical loads.
Question 3: Why is consistent material thickness so critical?
Variations in material thickness disrupt load distribution, create stress concentrations, and compromise the aesthetic symmetry of the finished piece. Maintaining consistent dimensions ensures that the joint functions as designed, providing optimal strength and visual harmony.
Question 4: How does clamping pressure affect the overall strength of the joint?
Clamping pressure applied during adhesive curing ensures intimate contact between the mating surfaces, maximizing bond strength and minimizing the risk of gaps or voids. The correct clamping pressure, which may vary depending on wood species and adhesive type, is essential for achieving a durable connection.
Question 5: What tools are essential for achieving accurate angled cuts?
Essential tools include a precise bevel gauge, protractor, sharp saw (hand-powered or machine-driven), and reliable measuring devices. Jigs and fixtures can enhance accuracy and repeatability, particularly for complex angles or production runs.
Question 6: How does wood grain orientation affect joint strength?
The alignment of wood grain in relation to the joint influences its overall resistance to stress. Optimizing grain orientation to maximize strength is a crucial consideration in the design and execution of robust structures.
Mastering these principles will yield a robust understanding of constructing the desired connection, improving both project quality and longevity.
This FAQ section provides a foundation for understanding critical aspects of the discussed area. The subsequent segment delves into advanced techniques and specialized applications.
Conclusion
This exploration has illuminated the intricacies inherent in executing sound angled joints. Key aspects such as precise angle calculation, consistent material thickness, judicious adhesive application, and secure clamping techniques are not merely procedural steps, but rather interdependent factors that determine the structural integrity and aesthetic quality of the final product. A comprehensive understanding of these elements is essential for any practitioner seeking to master this specialized form of carpentry.
The successful implementation of these principles demands a commitment to precision and a dedication to continuous refinement of skill. The complexities involved in achieving strong, visually appealing, and long-lasting angled wood connections should encourage further exploration and experimentation, ultimately contributing to the advancement of the craft. Continued research and practice are vital to ensure the preservation and evolution of these essential woodworking techniques.


