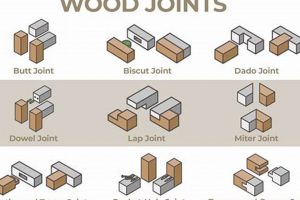
A method in carpentry joins two pieces of wood by overlapping them. The thickness of each piece is reduced at the point of connection, allowing the resulting joint to remain relatively flush. A practical example is seen when constructing a drawer; the sides are often connected to the front using this type of intersection.
This technique provides substantial strength due to the increased surface area available for adhesive application. Historically, it has been favored in furniture making and structural applications where durability is paramount. The resulting connection is less prone to racking and twisting compared to simpler joining methods.
The subsequent sections will detail various types, including full, half, and dovetail variations, along with the tools and techniques necessary for creating strong and aesthetically pleasing connections of this kind. Considerations for wood selection and finishing will also be addressed.
Tips for Successful Lap Joint Woodworking
Achieving strong and visually appealing results requires attention to detail and adherence to established best practices. The following tips aim to improve the quality and durability of this type of connection.
Tip 1: Accurate Measurement and Marking: Precise measurement is crucial. Utilize a sharp marking knife and a reliable measuring tool to ensure accurate layout. Inaccurate dimensions will compromise the integrity of the joint.
Tip 2: Consistent Material Removal: When removing material to create the recesses, strive for uniform depth. Hand tools, such as chisels and planes, can be used for fine adjustments. A consistent depth guarantees a flush final surface.
Tip 3: Proper Adhesive Selection: Choose an adhesive appropriate for the wood species and the intended application. Consider factors like open time, water resistance, and joint fill capabilities. The chosen adhesive should bond effectively with the specific wood and intended environment.
Tip 4: Adequate Clamping Pressure: Apply sufficient clamping pressure to ensure a tight bond. Use cauls to distribute pressure evenly across the joint surface. Insufficient pressure will result in weak adhesion and potential failure.
Tip 5: Dry Fitting Before Gluing: Always dry-fit the components before applying adhesive. This allows for any necessary adjustments and ensures a proper fit. Addressing issues before gluing prevents irreversible errors.
Tip 6: Grain Direction Considerations: Pay attention to the grain direction of both pieces being joined. Aligning the grain can improve the joint’s resistance to seasonal movement. Failure to consider grain direction can lead to warping or cracking.
Tip 7: Surface Preparation: Ensure the surfaces to be glued are clean and free of debris. Lightly sanding the surfaces prior to gluing can enhance adhesion. Contaminants can impede bonding, compromising joint strength.
Careful execution of these recommendations contributes to a stronger, more durable, and more aesthetically pleasing result. The inherent simplicity of this joinery method should not overshadow the need for precision and thoughtful execution.
The subsequent sections will provide further details regarding the specific tools, techniques, and finishing considerations related to achieving optimal outcomes.
1. Strength
In the context of overlapped connections, structural integrity is a primary consideration. The strength of such a junction is directly proportional to the surface area available for bonding. A larger surface facilitates a more substantial adhesive bond, resisting separation under stress. The method’s inherent design, involving overlapping pieces, intrinsically provides a greater bonding area than butt joints or similar techniques. This characteristic makes it suitable for applications demanding resistance to tensile and shear forces. For example, in traditional timber framing, this type of joining has been utilized for centuries to create robust and enduring structures. The ability to distribute load across an extended area contributes significantly to the longevity of the framework.
Furthermore, the type of wood utilized, along with the adhesive’s properties, profoundly affects the junction’s ability to withstand external pressures. Hardwoods, for example, generally exhibit greater compressive and tensile strength than softwoods, making them preferable for high-stress applications. The selection of an appropriate adhesive, tailored to the wood species and environmental conditions, is equally critical. Polyurethane adhesives, known for their high strength and water resistance, are frequently employed in outdoor applications, whereas PVA adhesives are commonly used in interior projects. Beyond material selection, the accuracy of the cut and the even distribution of clamping pressure during adhesive curing directly influence the final strength. Gaps or uneven pressure can compromise the bond and create points of weakness.
In conclusion, achieving maximum structural integrity in this type of wood connection hinges on careful consideration of several interdependent variables. The surface area of the joint, the material properties of the wood and adhesive, and the precision of the construction process all contribute significantly to its overall strength. While the method provides a naturally robust connection, neglecting any of these factors can diminish its effectiveness. A thorough understanding of these principles is essential for ensuring the durability and longevity of any wood structure incorporating this joining technique.
2. Accuracy
In joinery, specifically with overlapping connections, accuracy is not merely a desirable trait, but a fundamental prerequisite for structural soundness and aesthetic appeal. Imprecise cuts or measurements lead to gaps, misalignment, and a compromised bond. These imperfections diminish the load-bearing capacity of the connection and detract from the overall quality of the finished piece. For instance, if the recesses are not of uniform depth, the resulting surface will be uneven, impacting the stability of the joined components and requiring additional, often unsightly, corrective measures. Such inaccuracies can propagate through the entire project, creating cumulative errors that are difficult to rectify. A practical example is the construction of a drawer. Inaccurate dimensions in the overlapped corners will result in a drawer that is either too loose within its frame or too tight, hindering its smooth operation and potentially causing premature wear.
The correlation between dimensional precision and joint strength is direct. Inadequate contact between the mating surfaces reduces the effectiveness of the adhesive. This, in turn, weakens the bond, making the joint susceptible to failure under stress. Furthermore, deviations from square or plumb can induce internal stresses within the assembly, increasing the likelihood of warping or cracking over time. This is especially critical in large structural elements where even minor inaccuracies can be magnified, resulting in significant structural compromise. Consider, for example, the construction of a table leg; an out-of-square joined corner compromises stability and aesthetics. Proper execution requires the use of precise measuring tools, sharp marking instruments, and carefully controlled cutting techniques.
In summary, accuracy in overlapping joint construction is paramount. It is a non-negotiable aspect of achieving strong, durable, and visually pleasing results. The effort invested in precise measurement, marking, and cutting translates directly into the longevity and functionality of the finished product. While the method itself is relatively straightforward, the success hinges on unwavering attention to detail and a commitment to maintaining dimensional precision throughout the entire process. The consequences of neglecting this principle can range from cosmetic blemishes to catastrophic structural failures, underscoring the critical importance of accuracy.
3. Adhesive selection
The choice of adhesive is a critical determinant of the long-term integrity of overlapped wood connections. The adhesive acts as the primary binding agent, transferring stress between the wood components. Appropriate selection depends on several key factors, including wood species, environmental conditions, and anticipated load.
- Wood Species Compatibility
Different wood types possess varying densities, porosities, and chemical compositions. Adhesives must be compatible with these characteristics to ensure proper bonding. For instance, oily woods like teak require specialized adhesives formulated to penetrate the oil and achieve adequate adhesion. Using an inappropriate adhesive can result in a weak or non-existent bond, leading to premature failure.
- Environmental Resistance
The environment in which the wood assembly will reside dictates the necessary moisture and temperature resistance of the adhesive. Exterior applications demand water-resistant adhesives, such as polyurethane or epoxy, to prevent degradation from exposure to rain, humidity, and temperature fluctuations. Interior applications may suffice with PVA adhesives, provided they are not subjected to excessive moisture. Ignoring environmental factors can lead to adhesive breakdown, weakening the joint over time.
- Joint Fill Capability
Gaps or imperfections in the joint can compromise its strength. Adhesives with gap-filling properties, such as epoxy resins, can effectively fill these voids, providing a more uniform bond. This is particularly important when working with imperfectly fitted surfaces. Using a thin, low-viscosity adhesive on a poorly fitted joint will result in a weak connection due to insufficient adhesive material.
- Open Time and Cure Time
Open time refers to the duration an adhesive remains workable after application. Cure time is the period required for the adhesive to reach its full strength. These properties must align with the workflow and complexity of the assembly. A long open time is beneficial for intricate assemblies, while a fast cure time can expedite the production process. Mismatched timing can result in weakened bonds or assembly delays.
Effective implementation of overlapped wood connections necessitates careful evaluation of adhesive properties relative to specific project requirements. Ignoring these factors leads to compromised structural integrity and reduces the longevity of the wood assembly. The selection process directly impacts the overall success of any project utilizing this construction method.
4. Clamping pressure
Clamping pressure, in the context of overlapped wood connections, represents a critical variable directly influencing joint strength and durability. The application of adequate and evenly distributed pressure during adhesive curing ensures intimate contact between the joined surfaces. This intimate contact is paramount for optimal adhesive bonding, allowing the adhesive to effectively penetrate the wood fibers and establish a robust mechanical interlock. Insufficient clamping pressure results in gaps and voids within the bond line, significantly reducing the overall strength of the connection. An example of this can be observed in furniture construction. If insufficient force is applied while gluing overlapped drawer corners, the drawer may exhibit premature failure under stress. The resulting wobble or eventual separation demonstrates the direct consequence of inadequate pressure.
Effective clamping techniques involve the use of appropriate clamping devices, such as bar clamps, pipe clamps, or specialized corner clamps, depending on the size and configuration of the joint. Cauls, often constructed from wood or other rigid materials, are employed to distribute pressure evenly across the joint surface, preventing localized pressure points that can deform the wood or squeeze out excessive adhesive. The force exerted by the clamps must be sufficient to close any minor gaps and maintain consistent contact throughout the curing process, but not so excessive as to crush the wood fibers or starve the joint of adhesive. Consider the assembly of a large tabletop using overlapped connections. Unevenly distributed clamping pressure can lead to warping or twisting of the tabletop as the adhesive cures, resulting in a compromised and visually unappealing surface.
In conclusion, clamping pressure is an indispensable element in the successful execution of overlapped wood connections. The application of adequate and evenly distributed pressure during adhesive curing ensures intimate contact between the joined surfaces, maximizing bond strength and promoting long-term durability. Understanding the principles of clamping, selecting appropriate clamping devices, and employing proper techniques are essential for achieving robust and aesthetically pleasing results. Neglecting this aspect compromises the joint’s structural integrity and diminishes the overall quality of the finished product. The direct cause-and-effect relationship between this pressure and joint integrity highlights its crucial role.
5. Flush surfaces
Attaining flush surfaces is a primary objective in joinery. In the context of overlapped wood connections, achieving such a surface is critical for both aesthetic appeal and functional performance. Deviations from a smooth, continuous plane detract from the visual quality of the finished piece and can compromise its structural integrity. Careful execution during each stage of the construction process is essential to ensure the final result meets the desired specifications.
- Precise Material Removal
Accurate material removal is fundamental to achieving flushness. When creating the recesses for the overlap, uniformity in depth is paramount. Variations in depth result in uneven surfaces, requiring subsequent corrective measures. Techniques such as using depth stops on routers or carefully paring with chisels are employed to maintain consistent material removal. This precision minimizes the need for post-assembly adjustments.
- Accurate Alignment During Assembly
Even with precise material removal, misalignment during assembly can negate the benefits of careful preparation. Proper alignment of the components prior to clamping and adhesive application is crucial. Techniques such as using reference lines or temporary fasteners can assist in maintaining accurate alignment. Failure to properly align the components will result in a stepped surface, detracting from the overall appearance and potentially weakening the joint.
- Surface Preparation and Sanding
Preparation of the wood surfaces before assembly also contributes to the attainment of flushness. Sanding the surfaces to remove imperfections and ensure a smooth, even plane is essential. Minor variations in thickness can be addressed through sanding after assembly. However, excessive sanding can round over edges and compromise the sharpness of the joint. Careful sanding techniques are required to maintain the desired profile.
- Clamping and Pressure Distribution
Uniform distribution of clamping pressure during adhesive curing is crucial for maintaining flush surfaces. Uneven pressure can cause the components to shift during the curing process, resulting in misalignment. The use of cauls or clamping jigs can help distribute pressure evenly across the joint. Ensuring adequate clamping force prevents the components from moving relative to each other, preserving the desired flushness.
These elements intertwine to determine the final surface quality. By focusing on precise material removal, alignment during assembly, meticulous surface preparation, and controlled clamping pressure, a flush surface can be consistently achieved in overlapped connections. This is crucial not only for aesthetic reasons but also for ensuring the structural integrity and longevity of the woodworking project. The combination of these factors transforms a basic joinery method into a refined and durable connection.
6. Wood grain
Wood grain orientation holds significant implications for the strength, stability, and aesthetic qualities of overlapped wood connections. Understanding and strategically managing grain direction is essential for achieving durable and visually harmonious results in joinery.
- Longitudinal Strength Maximization
Aligning the grain direction of both overlapping pieces along the length of the joint maximizes the longitudinal strength. Wood is inherently stronger along the grain than across it. This alignment prevents the joint from easily splitting or fracturing under tensile stress. Structural applications, such as framing, benefit significantly from this practice.
- Minimizing Seasonal Movement Effects
Wood expands and contracts primarily across the grain due to changes in humidity. Orienting the grain of the overlapping pieces in the same direction minimizes the differential movement within the joint. This reduces the likelihood of stress buildup, warping, or cracking. Furniture construction, particularly in environments with fluctuating humidity, necessitates careful grain orientation.
- Aesthetic Continuity and Visual Harmony
Consistent grain direction enhances the visual appeal of the joint. Aligning the grain patterns creates a seamless transition between the overlapping pieces, resulting in a more refined and professional appearance. Cabinet making and fine woodworking prioritize aesthetic continuity to create visually pleasing finished products.
- Glue Surface Optimization
The orientation of the grain affects the adhesive’s ability to penetrate and bond with the wood fibers. A long-grain-to-long-grain glue surface provides a more robust bond than an end-grain-to-long-grain surface. Proper orientation ensures optimal adhesive penetration and a stronger, more durable connection.
Strategic consideration of wood grain orientation is a crucial aspect of successful overlapped wood connections. By aligning the grain to maximize strength, minimize seasonal movement, enhance aesthetic continuity, and optimize the glue surface, woodworkers can create joints that are both structurally sound and visually appealing. Neglecting these principles compromises joint integrity and diminishes the overall quality of the finished product.
Frequently Asked Questions About Lap Joint Woodworking
The subsequent section addresses common inquiries regarding lap joint woodworking, providing concise and informative answers to enhance understanding and practical application.
Question 1: What distinguishes full, half, and mortise variants in lap joint woodworking?
A full version retains the complete thickness of both members, whereas a half version reduces the thickness of each by half at the joint, creating a flush surface. The mortise variety incorporates a recess, or mortise, in one piece to receive a tenon from the other, adding mechanical strength beyond adhesive bonding.
Question 2: Which wood species are most suitable for lap joint woodworking applications?
Hardwoods, such as oak, maple, and cherry, offer superior strength and durability, making them ideal for load-bearing applications. Softwoods, like pine and fir, are more easily worked but may require reinforcement in high-stress situations.
Question 3: What adhesives are recommended for lap joint woodworking?
Polyvinyl acetate (PVA) adhesives are suitable for general-purpose interior applications. Polyurethane adhesives offer superior water resistance for exterior projects. Epoxy resins provide exceptional strength and gap-filling capabilities when tolerances are less precise.
Question 4: How is proper clamping pressure determined in lap joint woodworking?
Clamping pressure should be sufficient to ensure intimate contact between the mating surfaces without crushing the wood fibers or squeezing out excessive adhesive. The appropriate force varies depending on wood density and adhesive viscosity. Trial runs are advisable to determine optimal pressure.
Question 5: What strategies mitigate warping or cupping in lap joint woodworking?
Select dimensionally stable wood, orient grain direction strategically, and apply a balanced finish to all surfaces. Additionally, ensure proper acclimatization of the wood to its intended environment prior to construction.
Question 6: Are specialized tools required for lap joint woodworking?
While basic hand tools such as saws, chisels, and planes can be employed, power tools like routers, table saws, and jointers can enhance precision and efficiency. Specialized clamping jigs can also aid in maintaining alignment during assembly.
Understanding these fundamental aspects contributes to more effective and reliable execution of lap joint woodworking techniques.
The subsequent section will delve into advanced applications and design considerations related to lap joint woodworking.
Conclusion
This exploration has underscored the multifaceted nature of lap joint woodworking. From the initial definition to detailed examinations of strength, accuracy, adhesive selection, clamping pressure, surface flushness, and wood grain, the critical factors influencing success have been elucidated. The practical tips and frequently asked questions further aimed to solidify comprehension of this fundamental joinery technique.
Mastery of lap joint woodworking represents a crucial skill for woodworking professionals and enthusiasts alike. The principles outlined herein, when diligently applied, contribute to creating durable, aesthetically pleasing, and structurally sound projects. Continued exploration and refinement of these techniques will undoubtedly yield further advancements in design and construction capabilities.


