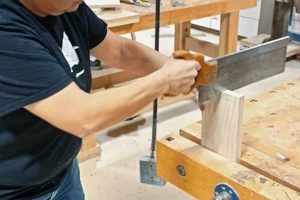
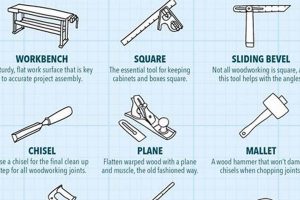
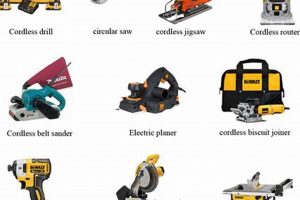
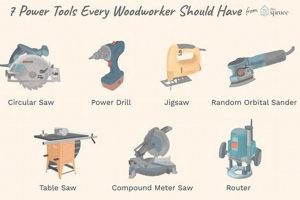
Essential implements facilitate the creation and manipulation of wooden materials within a do-it-yourself (DIY) framework. These implements span a wide range, from hand-operated devices like saws and chisels to power-driven equipment such as drills and sanders. An example would be utilizing a hand saw to precisely cut lumber for a shelving unit, or employing a power drill to assemble furniture.
The appropriate selection and skillful application of these implements are paramount to achieving quality results in woodworking projects. They empower individuals to realize custom designs, repurpose materials, and engage in a fulfilling creative process. Historically, woodworking relied entirely on manual implements, evolving to incorporate powered alternatives that enhance efficiency and precision, though traditional methods remain valued for their tactile engagement.
The subsequent sections will explore the diverse categories of these essential items, focusing on their specific functions, proper usage techniques, and maintenance requirements. A comprehensive understanding of these elements is vital for anyone embarking on a woodworking endeavor, ensuring both safety and successful project completion.
Essential Guidance for Woodworking Implement Utilization
Optimizing the selection and application of woodworking implements is crucial for achieving desired project outcomes and ensuring user safety. The following provides several key considerations to maximize efficiency and quality when working with materials.
Tip 1: Prioritize Safety Equipment: Protective eyewear is essential to prevent debris from entering the eyes. Ear protection mitigates noise exposure when operating powered implements. Dust masks or respirators are vital to minimize the inhalation of sawdust and harmful particles.
Tip 2: Select the Correct Implement: Employing the appropriate implement for each task is critical for efficiency and accuracy. For instance, a jigsaw is suitable for curved cuts, while a circular saw provides straight, rapid cuts on larger materials.
Tip 3: Maintain Sharp Cutting Edges: Dull blades and bits necessitate greater force, increasing the risk of workpiece slippage and potential injury. Regularly sharpen blades or replace them as needed to ensure clean, efficient cuts.
Tip 4: Secure the Workpiece: Properly securing the material to a workbench or using clamps is vital for stability during cutting, sanding, or assembly. Instability increases the likelihood of inaccurate cuts and potential accidents.
Tip 5: Practice Proper Technique: Adhering to manufacturer guidelines and utilizing proper grip, stance, and motion reduces the risk of strain and improves control over the implement. Consistent practice improves skill and precision.
Tip 6: Implement Routine Maintenance: Regularly clean and lubricate moving parts to prolong the lifespan of powered implements. Inspect cords and plugs for damage before each use to prevent electrical hazards.
Tip 7: Invest in Quality Implements: While more expensive initially, higher-quality implements offer improved precision, durability, and longevity. This reduces the frequency of replacements and ensures consistent performance.
Adhering to these guidelines significantly improves the safety, efficiency, and overall quality of woodworking projects. Proper preparation and execution are paramount for achieving optimal results.
The concluding section will summarize the key elements for selecting and utilizing appropriate woodworking items, emphasizing safety and efficient working practices.
1. Precision Cutting
Precision cutting, a cornerstone of woodworking, demands accuracy and control over material removal to achieve desired dimensions and joinery. The selection and skillful use of implements directly correlate to the quality and outcome of projects. This section outlines several facets of achieving accuracy in the manipulation of wooden material.
- Blade Selection and Maintenance
The type and condition of cutting implement blades significantly influence precision. Fine-toothed blades in saws yield smoother cuts with minimal tear-out, suitable for delicate work. Regularly sharpened blades maintain their efficiency, reducing material waste and minimizing the force needed during cuts. Dull blades compromise accuracy and increase the risk of slippage, potentially damaging the material or causing injury. Proper blade maintenance is thus integral to achieving precision.
- Guided Cutting Systems
Guided cutting systems, such as fences and jigs, provide stable references for saws and routers. These devices promote consistent cuts by maintaining a fixed distance and angle. Circular saws benefit from straight-edge guides for long, accurate rips, while miter saws utilize protractors and stops for precise angle cuts. Jigs are particularly useful for replicating identical cuts across multiple workpieces, ensuring uniformity in assembled components.
- Measurement and Marking Techniques
Accurate measurement and marking are prerequisite to precise cutting. Calibrated measuring tapes, squares, and marking gauges ensure dimensional accuracy. Sharp marking implements, such as knives or fine-tipped pencils, leave clear, thin lines that serve as precise cutting guides. Errors in measurement or marking compound during the cutting process, leading to misaligned parts and compromised assemblies. Meticulous measurement is therefore essential.
- Tool Control and Stability
Maintaining stable control over cutting implements contributes significantly to precision. A firm grip, coupled with a controlled cutting speed, prevents wandering cuts and material splintering. Securing the workpiece with clamps or vises minimizes movement during cutting, further enhancing accuracy. Practice and familiarity with each implement are necessary to develop the required dexterity and control. Proper technique is paramount for consistent results.
Collectively, these facets illustrate the critical role of implement selection, maintenance, and technique in realizing precision cutting in woodworking. Mastering these aspects leads to higher-quality projects with tight-fitting joints, accurate dimensions, and enhanced overall aesthetics. These elements serve as the foundation for a woodworking project.
2. Secure Fastening
Secure fastening, in the realm of woodworking, constitutes the methods and implements employed to unite individual components, thereby ensuring structural integrity and longevity. The efficacy of these methods is directly contingent on the appropriate selection and skillful application of relevant implements.
- Screw Driving Implements and Techniques
Screws offer a robust and often reversible method for joining wood. Electric screwdrivers and hand-operated screwdrivers, each with appropriate bit sizes, are fundamental. Pilot holes are frequently required, especially in hardwoods, to prevent splitting and ensure proper screw engagement. The torque setting on power drivers must be carefully calibrated to avoid stripping screw heads or damaging the surrounding wood fibers. Correct screw driving technique, including applying consistent pressure and maintaining alignment, is vital for a secure and lasting bond.
- Nailing and Stapling Devices
Nails and staples provide quicker fastening options, though generally less structurally robust than screws. Hammers, nail guns, and staple guns are the primary implements. Nail selection depends on the wood type and the application. For instance, finish nails are preferred for trim work due to their small heads. Nail guns offer speed and precision for high-volume fastening, while staple guns are commonly used for upholstery and securing thin materials. The correct angle of impact and consistent driving depth are essential to prevent bending or damaging the material.
- Adhesive Application Methods
Adhesives, such as wood glue, epoxy, and polyurethane, offer a seamless and often exceptionally strong method of fastening. Proper application techniques include ensuring clean and properly prepared surfaces. Clamps are typically required to maintain pressure during the curing process. The selection of adhesive depends on the wood species, environmental conditions, and the desired strength of the bond. Even distribution of the adhesive and adequate clamp pressure are crucial for achieving optimal adhesion.
- Clamping Devices and Strategies
Clamps are indispensable for maintaining pressure during adhesive curing or mechanical fastening. Bar clamps, pipe clamps, and spring clamps provide varying levels of force and versatility. The placement and number of clamps are critical to ensure uniform pressure across the joint. Protective pads are often employed to prevent clamp marks on the workpiece. Proper clamping strategies distribute force evenly, preventing warping or distortion of the assembled components, and thus achieving secure fastening.
The successful integration of these secure fastening methods, utilizing appropriate implements and techniques, is fundamental to creating durable and aesthetically pleasing woodworking projects. The synergy between implement selection, application technique, and fastening method determines the long-term stability and functionality of the constructed object.
3. Effective Shaping
Effective shaping, a critical facet of woodworking, refers to the controlled manipulation of wooden material to achieve a desired form or contour. The capability to execute effective shaping hinges directly on the selection and proficient application of woodworking implements. Shaping failures, resulting from inadequate or incorrectly applied implements, manifest as dimensional inaccuracies, undesirable surface textures, and compromised structural integrity. An example illustrating cause and effect involves the use of a dull plane. This inevitably leads to a rough, uneven surface, requiring additional corrective measures. In contrast, a sharp, properly adjusted plane allows for smooth, controlled material removal, directly impacting the final appearance and functionality of the workpiece.
The importance of effective shaping is evident in various woodworking projects. Consider the creation of a curved table leg. Success relies on implements such as spoke shaves, rasps, and files, employed sequentially to refine the initial rough shape into a smooth, aesthetically pleasing contour. Similarly, carving intricate details on a wooden box necessitates specialized chisels and gouges. Each implement enables specific shaping actions, such as creating defined edges, removing concave material, or achieving surface texture. The absence of the correct tools or the inability to utilize them effectively severely limits the scope and complexity of woodworking endeavors.
A comprehensive understanding of effective shaping methods and the implements associated with them is crucial for any aspiring woodworker. The correct implements, coupled with a commitment to honing skill and technique, are indispensable for executing complex designs and realizing creative visions. Challenges in achieving effective shaping often stem from improper tool selection, inadequate sharpening practices, or a lack of understanding of wood grain behavior. Overcoming these challenges requires consistent practice, attention to detail, and a willingness to learn from both successes and failures, ultimately enhancing the quality and precision of woodworking projects.
4. Surface Refinement
Surface refinement in woodworking addresses the processes of smoothing, texturing, and finishing wooden surfaces to enhance both their aesthetic appeal and functional properties. Success in this area is directly contingent upon the selection and skillful application of appropriate implements and techniques, impacting the final quality and utility of woodworking projects.
- Sanding Implements and Abrasives
Sanding encompasses a range of techniques employing abrasive materials to remove imperfections, smooth rough surfaces, and prepare wood for finishing. Hand-sanding blocks, orbital sanders, and belt sanders represent the primary implements. Abrasive selection, ranging from coarse grits for initial stock removal to fine grits for final polishing, is crucial for achieving desired surface texture. Proper sanding technique, involving consistent pressure and overlapping strokes, prevents unevenness and ensures a uniform surface. Failure to employ correct sanding methods can result in visible scratches, swirl marks, and compromised adhesion of subsequent finishes.
- Planes and Scraping Tools
Planes, both hand-operated and power-driven, offer a method of achieving exceptionally smooth surfaces by shaving thin layers of wood. Hand planes, such as smoothing planes and block planes, require careful adjustment and technique to produce consistent results. Scraping tools, including card scrapers and cabinet scrapers, are employed to remove fine imperfections and create a glass-like surface. The sharpness of the blade is critical for effective planing and scraping, and regular honing or sharpening is essential. When used correctly, these implements minimize the need for aggressive sanding and enhance the natural beauty of the wood grain.
- Finishing Application Techniques
Finishing techniques involve the application of protective coatings, such as varnishes, lacquers, oils, and waxes, to enhance the appearance and durability of wooden surfaces. Brushes, spray guns, and wiping cloths are the primary application implements. Proper surface preparation, including thorough sanding and cleaning, is vital for optimal finish adhesion. Multiple coats are often required to achieve the desired level of protection and sheen. Careful attention to application technique, including uniform coverage and minimal brush strokes, prevents drips, runs, and uneven textures. The selection of the appropriate finish depends on the intended use of the object and desired aesthetic characteristics.
- Buffing and Polishing Methods
Buffing and polishing are employed to further enhance the smoothness and sheen of finished surfaces. Buffing wheels, polishing compounds, and microfiber cloths are the primary implements. These techniques remove residual imperfections and create a highly reflective surface. The selection of appropriate buffing compounds and polishing techniques depends on the type of finish applied. Excessive buffing or polishing can remove the finish entirely, necessitating reapplication. When properly executed, buffing and polishing create a professional-quality finish with enhanced clarity and luster.
The interplay between these surface refinement methods and the implements utilized underscores the importance of meticulous technique and informed decision-making in woodworking. Skillful application of sanding, planing, finishing, and polishing techniques, with a focus on detail and precision, yields surfaces that are both aesthetically pleasing and functionally robust. These refined surfaces add intrinsic value to projects.
5. Accurate Measurement
Accurate measurement forms the foundational basis for all successful woodworking endeavors. Precision in dimensional assessment directly influences the fit, function, and aesthetic qualities of the final product. Without reliable measurement, woodworking projects are prone to errors, material waste, and structural instability.
- Measuring Tapes and Rules
Measuring tapes and rules are the most fundamental implements for linear measurement. Tapes, typically flexible and retractable, are suitable for measuring longer distances, while rules, often rigid, provide greater accuracy for smaller dimensions. Graduations, usually in inches or millimeters, necessitate careful interpretation to avoid errors. Examples include using a measuring tape to determine the length of a board for a table or using a rule to mark a precise location for a mortise joint. Errors in reading these implements can propagate throughout the project, leading to misaligned components and compromised structural integrity.
- Squares and Angle Finders
Squares and angle finders are essential for ensuring right angles and accurate miter joints. Combination squares, speed squares, and protractors enable the precise marking and verification of angles. Applications include ensuring the squareness of a cabinet frame or determining the correct angle for a picture frame. Misalignment of angles due to inaccurate measurement results in visually unappealing and structurally weak joints.
- Marking Gauges and Calipers
Marking gauges are used to create parallel lines for mortises, rabbets, and other joinery details. Calipers, both dial and digital, allow for precise measurement of thicknesses and diameters. For example, a marking gauge can be used to define the depth of a mortise, while calipers can ensure consistent thickness of a tabletop. Inaccurate settings on these implements lead to improperly sized joinery, affecting the fit and strength of the assembly.
- Laser Levels and Digital Measuring Tools
Laser levels and digital measuring tools offer enhanced accuracy and efficiency for larger projects or complex layouts. Laser levels can establish horizontal and vertical reference lines for installing shelves or aligning cabinets. Digital measuring tools provide precise readings for determining distances and angles. While offering greater convenience, these implements require careful calibration and usage to prevent errors. Incorrect calibration can lead to skewed layouts and misaligned components.
The selection and proficient application of these measuring implements are crucial for achieving accurate dimensions and angles in woodworking projects. Consistent use of reliable measuring practices minimizes errors, reduces material waste, and ensures the creation of high-quality, structurally sound wooden objects.
6. Safe Operation
Safe operation is intrinsically linked to the effective utilization of woodworking implements within the do-it-yourself context. The inherent power and cutting capabilities of many implements pose significant risks if handled improperly. These dangers range from minor cuts and abrasions to severe lacerations, amputations, and even fatalities. Consequently, a comprehensive understanding of safety protocols and the consistent application of appropriate safeguards are paramount.
An instance highlighting cause and effect involves the use of a table saw without a blade guard. The unguarded blade presents an immediate hazard, increasing the likelihood of accidental contact and resulting in serious injury. Conversely, the consistent use of the blade guard mitigates this risk, providing a physical barrier that prevents inadvertent contact. The same principle applies to other implements. Using safety glasses protects the eyes from flying debris, while wearing a respirator minimizes the inhalation of harmful dust particles. Adequate shop lighting reduces the risk of errors and accidents caused by poor visibility. Furthermore, proper maintenance, such as keeping blades sharp and tools correctly adjusted, reduces the force required for operation, thereby decreasing the potential for loss of control.
Safe operation within woodworking demands a proactive approach. This includes a thorough understanding of each implement’s operating manual, the consistent use of personal protective equipment, and the maintenance of a clean and organized workspace. It requires a mindset of continuous risk assessment and a commitment to prioritizing safety above speed or convenience. Ultimately, integrating safe practices ensures that woodworking remains a rewarding and fulfilling activity rather than a source of potential harm.
Frequently Asked Questions
The following addresses common inquiries concerning the selection, application, and maintenance of implements within a do-it-yourself woodworking environment.
Question 1: What constitutes the minimum set of implements required for basic woodworking projects?
A foundational set typically includes a measuring tape, combination square, hand saw, block plane, wood chisels, a hand drill with assorted drill bits, screwdrivers, a hammer, and various grades of sandpaper. This collection allows for basic cutting, shaping, joining, and finishing operations.
Question 2: What factors should influence the selection of power-driven versus hand-operated implements?
The scale and complexity of the project, available budget, and desired level of precision are primary determinants. Power implements offer increased speed and efficiency for larger tasks, while hand implements often provide greater control and tactile feedback for intricate work.
Question 3: What measures mitigate the risk of injury when operating woodworking implements?
Consistent use of personal protective equipment (safety glasses, hearing protection, dust mask), adherence to manufacturer’s instructions, maintaining sharp cutting edges, and securing workpieces are crucial for injury prevention.
Question 4: How frequently should woodworking implements undergo maintenance?
The frequency depends on usage. Cutting edges require sharpening or replacement as soon as a decline in performance is noticeable. Moving parts should be lubricated regularly. Electrical implements demand periodic inspection of cords and connections.
Question 5: What are the essential considerations for storing woodworking implements?
Implements should be stored in a clean, dry environment to prevent rust and corrosion. Cutting edges should be protected with sheaths or blocks. Power implements should be stored with cords neatly coiled.
Question 6: How does one determine the appropriate wood adhesive for a specific application?
Considerations include wood species, joint type, environmental conditions, and the desired strength of the bond. Polyvinyl acetate (PVA) glue is suitable for general-purpose interior applications, while polyurethane glue offers greater moisture resistance for exterior projects. Epoxy provides superior strength and gap-filling capabilities.
The appropriate selection, consistent maintenance, and safe operation of woodworking implements are paramount to successful do-it-yourself projects. A commitment to acquiring knowledge and honing skills will enhance the quality and longevity of woodworking creations.
The subsequent section transitions to a summary of the key points discussed, providing a concise overview of the essential considerations for do-it-yourself woodworking implement utilization.
Conclusion
This exploration of tools for diy woodworking has underscored the critical role of appropriate selection, diligent maintenance, and consistent application of safety protocols. Mastery of these implements enables individuals to transform raw materials into functional and aesthetically pleasing objects. Comprehending the function of various saws, fastening devices, shaping implements, and finishing materials is paramount for successful project execution.
The pursuit of woodworking proficiency demands a commitment to continuous learning and refinement of skills. Adherence to best practices, coupled with a mindful approach to tool handling, will empower individuals to realize their creative visions while minimizing potential hazards. The value of this competence extends beyond mere project completion; it fosters resourcefulness and ingenuity in shaping the physical environment.


