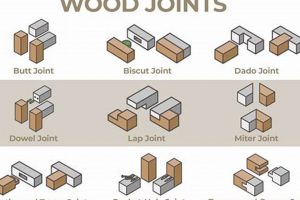
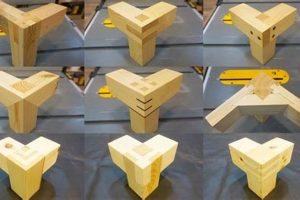
A construction method where three separate pieces of wood are connected at a single point is a fundamental technique in woodworking. This junction provides a means to create complex frameworks, distribute loads effectively, and achieve intricate designs. An example is the intersection of a table leg with both the apron and a stretcher, forming a strong and stable support structure.
The value of this type of construction lies in its ability to enhance structural integrity and aesthetic appeal. Historically, it has been employed in furniture making, timber framing, and various forms of carpentry to create durable and visually interesting pieces. Its strength contributes to the longevity of the finished product, while the visual complexity can elevate its design.
The following sections will delve into specific techniques for achieving strong and accurate connections of this type, exploring various joint designs, appropriate adhesive usage, and best practices for ensuring a secure and lasting bond. Understanding these principles is essential for any woodworker aiming to produce high-quality, structurally sound projects.
Essential Considerations for Three-Way Woodworking Joints
Achieving strong and visually appealing connections where three pieces of wood converge requires careful planning and precise execution. The following tips outline key considerations for successful implementation.
Tip 1: Joint Selection Based on Load: The type of joint employed must be appropriate for the expected load. Mortise and tenon joints offer superior strength for load-bearing applications, while less demanding connections may benefit from simpler joinery such as dowel or biscuit joints.
Tip 2: Accurate Measurement and Marking: Precise measurements and clear markings are critical for achieving tight-fitting joints. Errors in measurement will compound when joining three pieces, leading to instability or visual imperfections. Use precision tools and double-check all dimensions.
Tip 3: Dry Fitting is Essential: Always dry fit the components before applying adhesive. This step allows for identification and correction of any discrepancies in the joint fit. A proper dry fit should require slight pressure to assemble the joint completely.
Tip 4: Adhesive Application Technique: Apply adhesive evenly to all mating surfaces. Avoid excessive adhesive, which can weaken the joint and create a messy cleanup. Use a brush or roller to ensure uniform coverage.
Tip 5: Clamping Pressure: Adequate clamping pressure is necessary to ensure a strong bond while the adhesive cures. Use appropriate clamps and protective pads to distribute the pressure evenly and avoid damaging the wood. The specific clamping duration will vary based on the adhesive type.
Tip 6: Grain Direction Alignment: Consideration of grain direction is paramount. Aligning the grain of all three pieces parallel to the primary stress will maximize the joint’s overall strength. Misalignment of grain can create weak points prone to failure.
Tip 7: Reinforcement Considerations: In high-stress applications, consider incorporating reinforcing elements such as screws or metal fasteners to augment the strength of the adhesive bond. These elements provide additional mechanical support and can prevent joint failure.
Mastering these essential techniques results in robust and aesthetically pleasing junctions in complex woodworking projects. Understanding the specific demands of each design and carefully selecting appropriate joinery techniques is key to long-lasting and durable constructions.
These tips provide a foundation for effective three-way connections. Further exploration of specific joint designs and woodworking techniques will build upon this knowledge and enhance the quality of finished projects.
1. Strength Distribution
Strength distribution is a critical factor in the design and execution of woodworking joints where three pieces of wood intersect. The ability of the joint to effectively transfer loads across its components directly impacts its overall stability and longevity. Failure to properly address stress distribution can result in premature joint failure, compromising the structural integrity of the entire assembly.
- Joint Geometry and Load Transfer
The geometry of the joint significantly influences how forces are distributed. Mortise and tenon joints, for example, offer superior strength because the tenon provides a large surface area for adhesive bonding and mechanical interlocking, effectively transferring loads from one piece to another. Conversely, a simple butt joint relies solely on the adhesive, making it less effective at distributing stress and more prone to failure under significant load.
- Material Properties and Stress Concentration
The type of wood used and its inherent strength characteristics impact stress distribution. Softer woods may be more susceptible to compression or shear forces at the joint, leading to deformation or failure. Furthermore, sharp corners or abrupt changes in geometry can create stress concentrations, where forces are amplified, increasing the risk of fracture. A well-designed joint incorporates smooth transitions and distributes forces evenly across the entire joint surface.
- Adhesive Performance under Load
The chosen adhesive plays a crucial role in transmitting forces between the wooden components. Different adhesives possess varying strengths and flexibilities, influencing the joint’s overall load-bearing capacity. An adhesive with high shear strength is essential for joints subjected to lateral forces, while an adhesive with good gap-filling properties can compensate for minor imperfections in the joint fit. However, adhesive strength alone cannot compensate for poor joint design or inadequate surface preparation.
- Reinforcement and Load Sharing
In high-stress applications, reinforcing elements such as screws, dowels, or metal fasteners can enhance strength distribution. These elements act as mechanical load-sharing components, reducing the stress on the adhesive bond and distributing the forces over a larger area. The placement and orientation of these reinforcing elements are crucial for optimizing their effectiveness in preventing joint failure.
Proper strength distribution is an essential component of successful three-way joints. By carefully considering joint geometry, material properties, adhesive performance, and the potential need for reinforcement, woodworkers can create robust and long-lasting connections that withstand the demands of their intended use. Neglecting these factors can lead to catastrophic failures, emphasizing the importance of a comprehensive understanding of force transfer within the joint.
2. Joint Geometry
Joint geometry exerts a fundamental influence on the structural integrity and aesthetic appeal of three-way woodworking joints. The specific angles, shapes, and dimensions of the intersecting wooden components directly dictate how loads are distributed within the joint, influencing its resistance to stress and propensity for failure. For example, a precisely executed mortise and tenon joint, where a projecting tenon from one piece fits snugly into a mortise cut in another, inherently provides greater surface area for adhesion and mechanical interlocking compared to a simple butt joint. This increased contact area translates to enhanced load-bearing capacity, demonstrating a direct cause-and-effect relationship between joint geometry and structural performance. The selection of appropriate geometry must align with the intended function and anticipated stress on the assembled piece.
The practical significance of understanding joint geometry in the context of three-way intersections extends to various woodworking applications. In furniture construction, consider the junction of a table leg with both the tabletop and a stretcher. A carefully designed dovetail joint, offering exceptional resistance to pulling forces, could connect the stretcher to the leg, while a mortise and tenon might secure the leg to the tabletop. These choices, driven by geometric considerations, ensure the table’s stability under load. In contrast, relying solely on screws or nails to connect these components would likely result in a weaker and less durable assembly. Furthermore, the aesthetic aspects of joint geometry cannot be overlooked. The visible intersection of meticulously crafted joints contributes significantly to the overall visual appeal and perceived quality of the finished piece.
In conclusion, joint geometry is an indispensable element in three-way woodworking. Accurate planning, precise execution, and a thorough understanding of how different geometric configurations distribute stress are essential for creating strong, durable, and aesthetically pleasing woodworking projects. Although various methods exist, each presents unique challenges related to precision and material compatibility. Mastery of joint geometry significantly impacts the success and longevity of woodworking endeavors, establishing a strong link between design and structural function.
3. Material Compatibility
The selection of materials for three-way woodworking joints is not merely a matter of aesthetic preference; it is a crucial determinant of the joint’s structural integrity, longevity, and overall performance. Incompatible materials can lead to premature failure, compromising the entire woodworking project. The following outlines critical facets of material compatibility in this context.
- Wood Species Compatibility
Joining wood species with significantly different expansion and contraction rates due to moisture content fluctuations can induce stress within the joint. For example, combining a highly stable wood like mahogany with a less stable one like pine may result in joint deformation or failure over time as they respond differently to environmental changes. Selection of wood species with comparable stability properties is essential for long-term joint integrity.
- Adhesive Compatibility
The chosen adhesive must be chemically compatible with the wood species being joined. Certain wood species contain extractives or oils that can inhibit the curing process of some adhesives, leading to a weak or incomplete bond. For instance, oily woods like teak require specialized adhesives formulated to overcome these interference issues. Careful consideration of the wood’s chemical properties and the adhesive’s specifications is necessary.
- Dissimilar Material Joining (Wood and Metal)
When integrating metal fasteners (screws, bolts) into woodworking joints, potential for galvanic corrosion must be addressed. If dissimilar metals are used in a damp or humid environment, electrochemical reactions can occur, leading to the corrosion of one metal and weakening the joint. Using corrosion-resistant fasteners or isolating dissimilar metals with a barrier material is crucial for preventing this deterioration.
- Finishing Product Compatibility
The selected finishing products (stains, sealants, topcoats) must be compatible with both the wood species and the adhesive used in the three-way joint. Some finishes may contain solvents that can degrade the adhesive bond or cause discoloration of the wood. Testing the finish on a sample joint prior to full application is recommended to ensure compatibility and prevent unforeseen adverse effects.
In summary, material compatibility is an indispensable aspect of designing and constructing reliable three-way woodworking joints. Failing to account for the potential interactions between wood species, adhesives, fasteners, and finishing products can undermine the joint’s structural integrity and aesthetic appeal, ultimately impacting the longevity and performance of the finished woodworking piece. Thorough assessment and testing are advisable to mitigate risks associated with material incompatibility.
4. Assembly Sequence
In three-way joint woodworking, the assembly sequence is not merely a procedural step; it is an integral component of the joint’s ultimate strength and structural integrity. The order in which components are brought together directly impacts the distribution of stress, the effectiveness of adhesive bonds, and the overall stability of the finished assembly. An improperly planned assembly sequence can introduce undue stress, hinder proper alignment, or compromise the mechanical advantage inherent in the joint design.
- Order of Component Engagement
The sequence in which individual wooden pieces are engaged profoundly affects joint integrity. As an example, consider a table leg intersecting both an apron and a stretcher. Securing the leg to the apron before attaching the stretcher may facilitate precise alignment of the tabletop surface. Reversing this sequence could lead to cumulative misalignments, resulting in an unstable or visually flawed final product. The implications of component engagement order extend to more complex joinery methods, where the accessibility of clamping surfaces is contingent on the assembly path.
- Adhesive Application Timing
The timing of adhesive application within an assembly sequence directly influences bond strength. Applying adhesive too early may result in premature drying or contamination, reducing its effectiveness. Conversely, delaying adhesive application can hinder proper coverage and prevent complete surface contact. For instance, in a mortise and tenon joint, adhesive must be applied immediately before insertion to ensure a strong and gap-free bond. The viscosity and setting time of the chosen adhesive must be considered in conjunction with the anticipated assembly time.
- Clamping Accessibility and Pressure Distribution
The assembly sequence dictates the accessibility of clamping surfaces and influences the distribution of clamping pressure. A well-planned sequence ensures that adequate clamping force can be applied to all critical areas of the joint, promoting optimal adhesion and preventing distortion. Securing one section of the joint before another may create obstructions, hindering the application of clamps or leading to uneven pressure distribution. In scenarios involving complex three-way intersections, specialized clamping jigs may be required to effectively distribute pressure.
- Tolerance Stack-up Management
Even with precise machining, minor variations in component dimensions (tolerances) are inevitable. The assembly sequence provides a mechanism for managing the cumulative effect of these tolerances. By strategically assembling components in a specific order, it is possible to minimize the propagation of errors and ensure that the final assembly meets dimensional requirements. Allowing tolerance stack-up to occur without strategic mitigation creates visible gaps or misalignment and impacts the stability of the structure.
In conclusion, the assembly sequence is an indispensable aspect of three-way joint woodworking, directly influencing the structural integrity, aesthetic quality, and overall stability of the finished product. A carefully considered assembly plan, taking into account component engagement order, adhesive application timing, clamping accessibility, and tolerance management, is essential for achieving robust and reliable connections. Neglecting this aspect can negate the benefits of precise joinery and high-quality materials, resulting in a compromised final outcome.
5. Adhesive Selection
The selection of an appropriate adhesive is paramount to the success of three-way joint woodworking. The adhesive acts as a critical intermediary, transmitting forces between the three intersecting wooden members. Inadequate adhesive selection directly compromises the joint’s strength, durability, and long-term stability. The cause-and-effect relationship is clear: improper adhesive choice leads to weakened joints and potential structural failure. Considering that a three-way joint often handles complex stress distributions, the adhesive must withstand shear, tensile, and compressive forces simultaneously. For example, in the construction of a chair where legs intersect the seat and stretchers, a high-strength adhesive like epoxy or polyurethane would be appropriate due to its gap-filling capabilities and resistance to stress. In contrast, using a weaker adhesive, such as polyvinyl acetate (PVA) glue on this joint, could result in the chair becoming unstable under moderate use. The practical significance of this understanding becomes clear when considering the safety and longevity of furniture or structural woodworking projects.
Further considerations in adhesive selection involve the specific properties of the wood being joined. Oily woods, such as teak or rosewood, require adhesives formulated to bond to their oily surfaces, often necessitating surface preparation techniques like wiping with a solvent. For joints intended for outdoor use, water-resistant adhesives are essential to prevent moisture-induced degradation, selecting a type I or type II PVA. The working time of the adhesive is also a significant factor. Complex three-way joints may require more assembly time, thus requiring an adhesive with a longer open time to prevent premature setting. A common application of this principle can be seen in timber framing, where epoxy resins or structural adhesives provide the necessary strength and weather resistance to withstand large stresses. All of these considerations emphasize the functional need for a proper understanding of the materials used in conjunction with the needs of the project at hand.
In conclusion, appropriate adhesive selection is non-negotiable in three-way joint woodworking. Its impact is multifaceted, affecting strength, durability, and resistance to environmental factors. Challenges in this area include balancing adhesive strength with wood characteristics and the intended use of the finished project. Ultimately, a comprehensive understanding of adhesive properties, coupled with a careful assessment of joint requirements, is essential for achieving high-quality, structurally sound woodworking outcomes. Ignoring the nuances of adhesive selection creates high likelihood of reduced lifespan of all woodworking projects.
6. Clamping Strategy
The strategic application of clamping force during adhesive curing is a critical factor in achieving strong and durable three-way woodworking joints. A carefully considered clamping strategy ensures proper alignment, tight surface contact for optimal adhesion, and prevention of joint distortion during the curing process. Inadequate clamping can lead to weakened joints and premature failure, highlighting the significance of this aspect of woodworking.
- Force Vector Optimization
Effective clamping involves applying force vectors that counteract the natural tendency of the joined components to separate or shift during adhesive curing. Consider the intersection of a table leg, apron, and stretcher; clamps must apply pressure both inward to secure the leg to the apron and horizontally to maintain the stretcher’s position. Misdirected force vectors can induce stress within the joint, compromising its long-term stability. Optimizing force vectors requires strategic clamp placement and the potential use of cauls to distribute pressure evenly.
- Clamping Pressure Magnitude
The magnitude of clamping pressure must be sufficient to ensure intimate contact between the mating surfaces without crushing or deforming the wood fibers. Excessive clamping pressure can starve the joint of adhesive, creating a weaker bond, while insufficient pressure can result in gaps and incomplete adhesion. The ideal clamping pressure depends on the wood species, adhesive type, and joint geometry. Careful monitoring and adjustment of clamping pressure are essential for achieving optimal results. Spring clamps may offer low pressure which is fine for small parts, whilst bar clamps offer high pressures which work great in large furniture builds.
- Clamp Placement and Accessibility
Strategic clamp placement is necessary to effectively apply pressure to all critical areas of the three-way joint. Accessibility challenges often arise due to the complex geometry of such intersections. Specialized clamping jigs or custom-designed cauls may be required to reach recessed areas or distribute pressure evenly across irregular surfaces. Pre-planning the clamping strategy during the design phase can mitigate these challenges and ensure accessibility for all necessary clamps.
- Clamping Duration and Adhesive Cure Time
The duration of clamping must align with the adhesive’s recommended cure time. Premature removal of clamps can disrupt the bond formation process, leading to a weakened joint. Conversely, excessively long clamping times may not offer additional benefit and can potentially induce stress within the wood. Monitoring the adhesive’s cure time and adhering to manufacturer’s recommendations is crucial for achieving a strong and durable three-way joint. Remember temperatures effect the setting of adhesives.
These facets underscore the critical connection between clamping strategy and three-way joint woodworking. The strategic application of force vectors, appropriate pressure magnitudes, thoughtful clamp placement, and adherence to proper clamping durations are essential for maximizing the joint’s strength and longevity. A well-executed clamping strategy, informed by a thorough understanding of these principles, is a hallmark of high-quality woodworking and ensures the creation of robust and aesthetically pleasing structures.
Frequently Asked Questions About Three-Way Joint Woodworking
This section addresses common inquiries regarding the design, execution, and performance of woodworking joints involving three intersecting pieces of wood. The information presented aims to provide clarity and guidance for achieving robust and aesthetically pleasing connections.
Question 1: What joint types are best suited for three-way connections subjected to high stress?
Mortise and tenon joints, dovetail joints, and reinforced lap joints are generally preferred for high-stress applications. These joint types provide significant mechanical interlocking and increased surface area for adhesive bonding, enhancing load-bearing capacity and resistance to racking forces.
Question 2: How does wood species selection impact the strength and longevity of three-way joints?
Wood species with comparable density and dimensional stability should be selected to minimize stress caused by differential expansion and contraction. Combining disparate wood types can lead to joint failure due to unequal responses to changes in humidity and temperature.
Question 3: What are the key considerations for adhesive selection in three-way woodworking joints?
Adhesive selection must account for the wood species, joint geometry, and intended application. Water-resistant adhesives are essential for outdoor use, while high-strength adhesives are necessary for load-bearing joints. Oily wood species require specialized adhesives formulated for optimal bonding.
Question 4: How can clamping pressure be optimized to ensure a strong and durable three-way joint?
Clamping pressure must be sufficient to ensure intimate contact between mating surfaces without crushing the wood fibers. Even distribution of pressure is critical, and specialized clamping jigs or cauls may be required to achieve optimal results. Over-clamping can starve the joint of adhesive, weakening the bond.
Question 5: What role does the assembly sequence play in the structural integrity of three-way joints?
The order in which components are assembled influences stress distribution and alignment accuracy. Strategic assembly sequences can minimize tolerance stack-up and ensure that clamping forces are applied effectively. Improper assembly sequences can induce undue stress and compromise joint stability.
Question 6: How can potential alignment issues be mitigated when constructing three-way woodworking joints?
Precise measurement, accurate cutting, and meticulous dry fitting are essential for mitigating alignment issues. Employing jigs and fixtures to ensure consistent alignment during assembly can significantly improve accuracy. Addressing even minor misalignments during the dry-fitting stage prevents compounded errors in the final assembly.
These responses offer a starting point for understanding the complexities of woodworking involving three intersecting pieces of wood. A thorough comprehension of these principles is crucial for achieving robust, aesthetically pleasing, and long-lasting woodworking results.
The subsequent section will explore specific joinery techniques suitable for various three-way connection scenarios, providing practical guidance for implementing these principles in woodworking projects.
Conclusion
This exploration of 3 way joint woodworking has illuminated the critical aspects of design, material selection, execution, and assembly. From the paramount importance of strength distribution to the nuanced selection of adhesives and the strategic implementation of clamping forces, each element directly contributes to the integrity and longevity of these complex connections. Understanding joint geometry, material compatibility, and the influence of assembly sequence further underscores the necessity of a comprehensive approach.
Mastery of these principles allows for the creation of robust, aesthetically pleasing, and enduring woodworking projects. The successful implementation of 3 way joint woodworking stands as a testament to the craftsman’s skill and knowledge, yielding structures capable of withstanding the test of time. Further study and practical application of these techniques are essential for advancing the art and science of woodworking.


