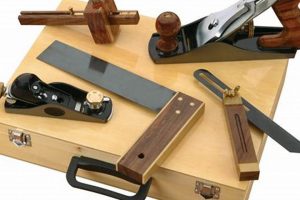
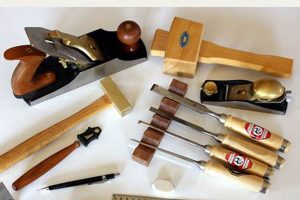
Tools designed for shaping and smoothing wood surfaces using muscle power. These consist of a body, typically metal or wood, with a blade inserted at a specific angle to shave thin layers of material. Examples include smoothing planes, used for achieving a fine finish; jack planes, serving as general-purpose instruments; and block planes, designed for end-grain work and detail applications.
Their enduring significance arises from their ability to produce exceptionally smooth and controlled surfaces unattainable with power tools. They afford a high degree of precision and tactile feedback, enabling craftspeople to achieve nuanced results. Historically, these implements represent a cornerstone of woodworking, used across cultures and centuries to construct furniture, buildings, and countless other objects.
The following sections will delve into various types, appropriate usage techniques, maintenance procedures, and factors to consider when selecting one for specific woodworking tasks. Attention will be given to both antique and contemporary designs, and their suitability for diverse skill levels and project requirements.
Essential Usage and Maintenance Guidance
The following guidelines are crucial for achieving optimal performance and extending the lifespan of these woodworking implements.
Tip 1: Blade Sharpness: A keen cutting edge is paramount. Regularly hone the blade using sharpening stones of progressively finer grit. A dull blade necessitates increased force, leading to uneven cuts and potential damage to the tool.
Tip 2: Proper Blade Projection: Adjust the blade depth precisely. Too much projection results in aggressive cutting and potential tear-out; insufficient projection produces minimal material removal. Incremental adjustments are recommended.
Tip 3: Consistent Plane Body Pressure: Maintain even downward pressure throughout the stroke. Varying pressure can induce dips and inconsistencies in the planed surface. Practice smooth, controlled movements.
Tip 4: Wood Grain Awareness: Plane with the grain whenever possible. Planing against the grain often results in tear-out, especially with figured woods. Observe the grain direction carefully prior to each pass.
Tip 5: Sole Cleanliness: Ensure the sole is free of debris. Dirt and wood shavings can impede smooth gliding and mar the work surface. Periodic cleaning with a brush or cloth is advisable.
Tip 6: Rust Prevention: Protect metal components from rust. Apply a thin coat of oil or wax to the blade and sole after each use, particularly in humid environments. Proper storage is also critical.
Tip 7: Regular Adjustment: Routinely check and adjust the lateral alignment of the blade. Misalignment will produce uneven cuts and necessitate corrective action. Minor adjustments often yield significant improvements.
Adherence to these recommendations will enhance the effectiveness, longevity, and overall satisfaction derived from these valued woodworking tools.
The subsequent sections will provide in-depth analysis of selecting appropriate types, mastering advanced techniques, and troubleshooting common challenges.
1. Surface Preparation
Effective use hinges on meticulous surface preparation. The quality of the starting surface directly impacts the effort required and the achievable results. Inadequate preparation can lead to increased difficulty, reduced precision, and compromised final finish.
- Removal of Imperfections
Prior to utilizing planes, removal of significant imperfections such as saw marks, dents, and planer snipe is crucial. These imperfections, if left unaddressed, necessitate excessive material removal with the plane, increasing workload and potentially introducing inaccuracies. Initial flattening can be achieved with coarser tools before transitioning to planes for refinement.
- Addressing Twist and Cup
Wood that exhibits twist or cup requires particular attention. These distortions must be substantially reduced before planing to a final, flat surface. Failure to do so results in uneven material removal and prolonged effort, as the plane follows the contours of the distorted board. Techniques such as jointing can be employed to mitigate these issues before planing.
- Moisture Content Management
The moisture content of the wood influences its stability and susceptibility to warping. Planing wood with excessively high moisture content can lead to dimensional changes after drying, negating the effort expended. Conversely, excessively dry wood may be brittle and prone to tear-out. Allowing wood to acclimate to the environment before planing is essential for achieving lasting results.
- Initial Flattening Strategies
Effective surface preparation often involves utilizing a combination of techniques to establish a reference surface. Scrub planes can be employed for rapid material removal on rough stock, followed by jointing planes for establishing a flat surface along the length of the board. This multi-step approach minimizes the amount of material that must be removed with finer smoothing planes, optimizing efficiency and precision.
In essence, surface preparation represents a critical preliminary phase. Thorough attention to detail during this stage directly translates to improved planing efficiency, enhanced precision, and a superior final finish. A well-prepared surface minimizes the challenges associated with planing and maximizes the potential of the tool.
2. Blade Sharpness
Blade sharpness is unequivocally fundamental to the effective operation of any woodworking hand plane. It dictates the quality of cut, the effort required, and the overall success of the task. A dull blade compromises the entire process, regardless of the plane’s design or the user’s skill.
- Clean Cutting Action
A keen edge severs wood fibers cleanly, producing a smooth, polished surface. This minimizes the likelihood of tear-out, especially in figured or interlocked grain. Conversely, a dull blade crushes and tears the fibers, resulting in a rough, uneven surface that requires further refinement.
- Reduced Effort and Fatigue
A sharp blade requires significantly less force to propel the plane. This reduces physical exertion, allowing for greater control and precision, particularly during prolonged planing sessions. Dull blades necessitate increased pressure, leading to fatigue and potential errors.
- Improved Control and Accuracy
Sharpness directly influences the user’s ability to control the depth and direction of the cut. A keen blade responds predictably to subtle adjustments, enabling precise shaping and fine-tuning of the workpiece. A dull blade is less responsive, making it difficult to achieve desired results.
- Minimized Tear-out Potential
The sharpness of the blade plays a crucial role in preventing tear-out, the undesirable lifting of wood fibers ahead of the cutting edge. A razor-sharp blade slices through the fibers cleanly, while a dull blade wedges them apart, increasing the risk of tear-out, especially when planing against the grain.
In summary, blade sharpness is not merely a desirable attribute; it is an indispensable prerequisite for efficient and effective use. Maintaining a keen edge is a continuous process that requires diligent sharpening and honing. The investment in time and effort yields significant dividends in terms of cut quality, user comfort, and overall project success.
3. Consistent Pressure
Maintaining consistent downward force on a woodworking hand plane is fundamental for achieving uniform cuts and a smooth, even surface. Variations in pressure introduce irregularities, compromising the precision and quality of the finished piece. This facet explores the nuances of consistent pressure application.
- Uniform Depth of Cut
Consistent pressure ensures the blade engages the wood at a constant depth throughout the stroke. Uneven pressure results in a fluctuating depth of cut, leading to an undulating surface that requires additional correction. For example, increasing pressure mid-stroke will cause the plane to dig in, creating a noticeable depression.
- Reduced Chatter and Vibration
Maintaining steady pressure dampens vibrations that can occur during planing. Inconsistent pressure exacerbates these vibrations, leading to chatter marks on the surface. This is particularly noticeable with harder woods or when using planes with less robust construction.
- Enhanced Control and Stability
Consistent pressure contributes to improved control over the plane’s trajectory. It prevents the tool from wandering or tilting, enabling the user to maintain a straight and true path. Erratic pressure makes it difficult to guide the plane accurately, potentially resulting in skewed cuts.
- Minimized Tear-out Risk
While blade sharpness and grain direction are primary factors, consistent pressure plays a role in reducing tear-out. Abrupt changes in pressure can stress the wood fibers, increasing the likelihood of splintering or tearing. Applying steady, even pressure minimizes this risk, especially in areas prone to tear-out.
These interconnected aspects underscore the significance of consistent pressure. Achieving and maintaining steady force requires practice and awareness, becoming an integral skill in woodworking. By mastering consistent pressure, the craftsman enhances the performance of the plane, improves the quality of the surface, and minimizes potential errors, resulting in superior woodworking outcomes.
4. Grain Direction
Grain direction constitutes a critical factor in the effective utilization of woodworking hand planes. The orientation of wood fibers directly influences the ease and quality of the cut achieved. Planing with the grainmoving the tool in the same direction as the natural alignment of the wood fibersgenerally produces a smooth, clean surface. Conversely, planing against the grain, termed “climbing cut” or “back planing,” often results in tear-out, where the wood fibers are lifted and fractured ahead of the cutting edge. This phenomenon is particularly pronounced in woods with interlocked or figured grain patterns. For instance, attempting to smooth a piece of curly maple against the grain without meticulous technique will almost invariably lead to a ragged, uneven surface.
The selection of an appropriate hand plane is also influenced by grain direction considerations. Lower-angle planes, characterized by a bevel-up blade configuration with a steeper bed angle, are often favored for working with woods that are prone to tear-out. This design reduces the effective cutting angle, minimizing the tendency for the blade to lift the grain. Skilled woodworkers also employ techniques such as skewing the planeangling it relative to the direction of travelto shear the wood fibers more effectively, mitigating tear-out even when working against the grain. Furthermore, controlling depth of cut by adjusting the blade protrusion precisely contributes to managing potential tear-out. Light, overlapping passes are preferable when confronting challenging grain orientations.
Understanding the relationship between grain direction and planing technique is therefore essential for achieving optimal results. Proper assessment of the grain pattern, selection of a suitable plane, and meticulous application of planing techniques significantly reduce the risk of tear-out and contribute to a superior surface finish. Failing to account for grain direction leads to inefficient work, compromised aesthetics, and unnecessary frustration. The ability to read and respond to grain direction is thus a hallmark of skilled woodworking.
5. Sole Cleanliness
The cleanliness of the sole is a crucial determinant in the operational efficiency and precision of woodworking hand planes. The sole, being the surface that glides along the wood, establishes the plane’s contact with the material and dictates the accuracy of the cut. Debris, such as wood shavings, dust, or dried finish, accumulating on the sole disrupts its smooth passage across the wood’s surface, leading to inconsistent cutting depth and potential marring of the workpiece. For example, a small wood chip lodged beneath the sole can act as a pivot point, causing the plane to rock and creating an uneven surface. This necessitates additional corrective planing, increasing labor and potentially compromising the desired dimensions.
Maintaining a clean sole also minimizes friction, which contributes directly to the ease of use. Reduced friction translates to less effort required to propel the plane, enhancing control and mitigating fatigue, particularly during extended planing sessions. A clean, well-waxed sole allows the plane to glide effortlessly, promoting a smoother and more consistent cutting action. Conversely, a dirty or gummed-up sole increases resistance, making the plane more difficult to control and potentially leading to jerky, uneven movements. Furthermore, the presence of abrasive particles on the sole can scratch the workpiece, requiring additional sanding or refinishing. For example, planing walnut, known for its dark color and susceptibility to showing scratches, requires an impeccably clean sole to avoid visible imperfections.
In summary, sole cleanliness is not merely an aesthetic consideration but a functional imperative in woodworking hand plane usage. A clean sole ensures smooth, consistent cuts, reduces friction, and minimizes the risk of marring the workpiece. Regular cleaning and waxing of the sole are essential maintenance practices that contribute to optimal plane performance and superior woodworking outcomes. Neglecting sole cleanliness introduces inaccuracies, increases effort, and potentially compromises the quality of the finished product, thereby undermining the effectiveness of the tool itself.
6. Adjustment Precision
Adjustment precision represents a cornerstone of effective woodworking hand plane utilization. The ability to fine-tune various parameters dictates the quality of cut, the efficiency of material removal, and the overall success of the woodworking endeavor. Inadequate adjustment capabilities, or a lack of precision in those adjustments, can render even the highest-quality plane ineffective.
- Blade Projection Refinement
Blade projection dictates the depth of cut. Precise adjustment enables the craftsman to control the amount of material removed with each pass. Too much projection results in aggressive cutting and potential tear-out; insufficient projection produces minimal material removal and increased effort. Minute adjustments, on the order of thousandths of an inch, are often necessary to achieve optimal results. An example involves gradually increasing the blade projection when flattening a board, ensuring even material removal without excessive digging.
- Lateral Blade Alignment Correction
Lateral alignment ensures the blade’s cutting edge is parallel to the sole. Misalignment causes the plane to cut unevenly, resulting in a tapered or skewed surface. Precision adjustment mechanisms allow for minute corrections to lateral alignment, ensuring a uniform cut across the width of the workpiece. Adjusting lateral alignment is particularly crucial when working with wide boards, where even slight discrepancies become readily apparent.
- Mouth Opening Control
The mouth opening, the gap between the blade and the front of the sole, influences the plane’s performance. A smaller mouth minimizes tear-out, particularly on figured woods, while a larger mouth facilitates rapid material removal on coarser surfaces. Fine-tuning the mouth opening allows for optimization based on wood species and task. For example, closing the mouth when smoothing cherry minimizes tear-out, while opening it wider allows for more aggressive stock removal on pine.
- Chipbreaker (Cap Iron) Positioning
The positioning of the chipbreaker, or cap iron, relative to the cutting edge, impacts the plane’s ability to prevent tear-out. Precise adjustment of the chipbreaker’s distance from the cutting edge influences the angle at which the shavings are curled and broken, minimizing tear-out. This adjustment is particularly important when working with woods that are prone to tear-out, such as curly maple or bird’s-eye maple.
These facets illustrate the interconnected nature of adjustment precision and plane performance. The ability to accurately control these parameters allows the craftsman to optimize the plane for specific tasks and wood species. The inherent precision afforded by well-designed adjustment mechanisms translates to improved efficiency, enhanced surface quality, and a greater degree of control over the woodworking process. Without adequate adjustment precision, the full potential of these implements remains unrealized.
Frequently Asked Questions
The following addresses common inquiries regarding the selection, use, and maintenance of these woodworking tools, providing concise and authoritative information.
Question 1: What constitutes the primary advantage over power tools for certain woodworking tasks?
The primary advantage lies in the tactile feedback and control afforded by these instruments. They allow for nuanced adjustments and the ability to achieve exceptionally smooth surfaces unattainable with power tools, particularly on figured woods. The manual operation also prevents tear-out in sensitive grain patterns.
Question 2: What are the key differences between a smoothing plane, a jack plane, and a jointer plane?
The smoothing plane is designed for achieving a fine finish. The jack plane is a general-purpose instrument for rough stock removal and initial flattening. The jointer plane, characterized by its longer length, is used to create perfectly flat and straight edges on boards, essential for joining.
Question 3: How frequently should the blade be sharpened to maintain optimal performance?
The frequency of sharpening depends on the type of wood being worked and the amount of use. As a general guideline, the blade should be sharpened whenever a noticeable increase in resistance is felt or the surface finish degrades. Regular honing between sharpenings prolongs blade sharpness.
Question 4: What is the purpose of the chipbreaker (cap iron) and how should it be adjusted?
The chipbreaker’s primary purpose is to curl and break shavings ahead of the cutting edge, reducing tear-out. It should be positioned close to the cutting edge, typically within 1/32″ to 1/16″, depending on the wood species and the desired finish. Finer settings are used for challenging woods.
Question 5: What factors should be considered when selecting for use on end grain?
For end-grain work, consider employing a low-angle block plane. These are designed with a bevel-up blade configuration and a low cutting angle, which effectively shears the end grain fibers, minimizing splitting and tear-out.
Question 6: What methods can be employed to prevent rust formation on plane surfaces?
Rust prevention requires meticulous care. Metal surfaces should be cleaned and dried after each use. A thin coat of oil or wax should be applied to protect the blade and sole, especially in humid environments. Proper storage in a dry location is also critical.
In summation, these implements offer unique advantages in terms of control, precision, and surface quality. Proper selection, maintenance, and sharpening are vital for maximizing tool performance. Adherence to these guidelines will ensure consistent and satisfying results.
The subsequent sections will delve into advanced techniques, troubleshooting common challenges, and selecting appropriate accessories.
Conclusion
This exploration has traversed essential aspects of woodworking hand planes, from surface preparation and blade maintenance to nuanced adjustments and grain direction considerations. The significance of sharpness, consistent pressure, and sole cleanliness has been underscored, illustrating their collective impact on achieving optimal results. The detailed discussion of various types, techniques, and troubleshooting methods aims to provide a comprehensive understanding of their functionality and capabilities.
Mastery of these implements demands diligent practice and a commitment to refining technique. Whether employed for intricate joinery, surface refinement, or stock preparation, woodworking hand planes represent a legacy of craftsmanship. Continued exploration and dedication will unlock their full potential, contributing to enduring woodworking excellence. The pursuit of knowledge in this area ensures the continued relevance and appreciation of these tools in both traditional and contemporary woodworking practices.


