This technique, often referred to as a butterfly inlay or Dutchman’s patch, involves embedding a shaped piece of wood into a recess cut across a crack or split in another piece of wood. The insert resembles a particular piece of clothing, lending itself to the descriptive name. The primary function is to prevent further propagation of the defect by mechanically locking the surrounding wood fibers together.
Beyond its structural role in stabilizing timber, this method offers a visually appealing solution to repairing and preserving wood. Its historical application spans centuries, seen in antique furniture and architectural elements, demonstrating its enduring effectiveness. Employing this approach saves valuable material that might otherwise be discarded due to damage, contributing to sustainability and conserving resources.
Understanding the principles of creating this type of reinforcement, selecting appropriate wood species, and mastering the necessary cutting and fitting techniques are crucial for successful application. The following sections will delve into the step-by-step process, discuss variations in design and application, and provide practical tips for achieving professional results.
Tips for Effective Implementation
The following advice serves to enhance the quality and longevity of projects utilizing this joint reinforcement method. Careful consideration of these points will contribute to both structural integrity and aesthetic appeal.
Tip 1: Material Selection. Choose wood species with compatible expansion and contraction rates to avoid stress cracks. In general, using the same species for both the primary piece and the insert is recommended.
Tip 2: Grain Orientation. Align the grain direction of the insert perpendicular to the direction of the crack or split. This configuration maximizes the joints resistance to further separation.
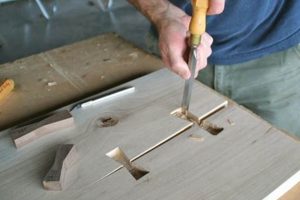
Tip 3: Precise Mortise Creation. The mortise, the recess into which the insert fits, must be accurately cut to ensure a snug fit without undue stress. A sharp chisel and careful paring are essential.
Tip 4: Template Utilization. Employing a template during the mortise routing process ensures uniformity and repeatability, particularly when creating multiple joints.
Tip 5: Adhesive Application. Apply a high-quality wood glue to all mating surfaces to create a strong, lasting bond. Ensure adequate clamp pressure during the curing process.
Tip 6: Careful Shaping. The outline of the insert should be slightly proud of the surface to allow for flush trimming. Avoid over-sanding, which can create a dished appearance.
Tip 7: Consider Joint Placement. Strategically position the reinforcement to maximize its structural benefit while maintaining aesthetic balance within the overall design.
Tip 8: Finish Application. Ensure the finish is evenly applied across both wood pieces, paying specific attention to edges. This protects the piece from environment factors.
Adhering to these suggestions will result in a stronger, more visually pleasing repair or embellishment, prolonging the lifespan of the woodworking project. The proper application of these techniques enhances the structural integrity, appearance, and long-term performance of the piece.
The concluding section will address common issues encountered during the joint’s creation and offer solutions to ensure a successful outcome.
1. Stabilization
Stabilization is a core function served by the process that involves embedding a shaped piece of wood, resembling a butterfly or bow tie, across a fissure in timber. This method addresses inherent weaknesses in the wood, mitigating further crack propagation and preserving material integrity.
- Mechanical Interlock
The primary stabilization mechanism relies on the physical bridging of the crack. The insert acts as a clamp, preventing the wood from separating further along the existing fissure. The geometry of the insert, typically wider at the ends than in the middle, distributes stress and resists pullout forces. This technique is frequently employed in furniture repair to prevent table tops or chair seats from splitting completely.
- Stress Distribution
Instead of concentrating stress at the tip of the crack, the insert disperses it across a wider area. This redistribution reduces the likelihood of new cracks forming adjacent to the original defect. The wider, flared ends of the insert are crucial for distributing the stress, ensuring it doesnt concentrate at the edges of the repair. This is especially important in large slabs of wood used for countertops or bar tops.
- Material Reinforcement
The insert itself adds structural integrity to the weakened area. The type of wood used for the insert plays a role here; a harder wood can provide greater resistance to the forces that caused the crack in the first place. Additionally, the adhesive used in conjunction with the insert creates a strong bond, further reinforcing the area. Consider using hardwood inserts within a softwood slab to add significant strength
- Preventative Measure
Beyond repair, this joining method can be used proactively in wood pieces prone to cracking, such as those with significant knots or irregular grain patterns. By strategically placing the inserts, potential stress points can be reinforced before cracks even develop. This is especially relevant in timber framing or when working with highly figured woods that are susceptible to movement.
In summary, stabilization achieved through this type of wood joinery is a multifaceted process encompassing mechanical interlocking, stress distribution, material reinforcement, and preventative application. The successful implementation of this joint relies on understanding the underlying principles of wood behavior and applying appropriate techniques to counteract potential failures, thereby prolonging the lifespan and structural integrity of the wood piece.
2. Aesthetic Integration
The intersection of structural necessity and visual appeal defines aesthetic integration within this woodworking technique. Beyond its functional role in stabilizing timber, the deliberate incorporation of visually pleasing elements transforms the repair into a design feature.
- Wood Species Contrast
The selection of wood species that contrast in color and grain pattern introduces a deliberate visual element. Dark hardwoods inserted into lighter softwoods, or vice versa, create striking visual interest. This practice elevates the joint from a mere repair to an intentional design choice, adding character and visual complexity to the wood piece. A walnut insert in a maple tabletop serves as an example.
- Shape and Proportion Deliberation
Varying the shape and proportions of the insert allows for customization and artistic expression. While the classic “bow tie” or “butterfly” shape is common, variations in the width, length, and curvature of the wings offer opportunities to tailor the design to the specific project. A more elongated design might be chosen to accentuate the flow of the wood grain, while a shorter, wider shape could provide a bolder visual statement.
- Strategic Placement Design
The strategic placement of these elements impacts overall visual balance. Symmetrical placement can lend a sense of formality and order, while asymmetrical placement creates a more dynamic and organic feel. Careful consideration of the surrounding wood grain and existing features informs the placement, ensuring that the insert complements rather than detracts from the overall aesthetic. Using multiple smaller inserts to follow a natural curve in the wood as opposed to one large insert.
- Surface Texture Consistency
Maintaining consistency in surface texture between the insert and the surrounding wood ensures visual harmony. Careful sanding and finishing are essential to achieve a seamless transition and prevent the insert from appearing raised or uneven. The choice of finish, whether matte or gloss, also plays a role in unifying the appearance and highlighting the natural beauty of the wood. A consistent texture is crucial for any appealing look.
In summary, aesthetic integration in woodworking with this joint involves a deliberate fusion of structural repair with artistic design. By carefully considering wood species, shape, placement, and surface texture, it transforms a potential flaw into a unique and visually appealing feature, enriching the overall aesthetic of the finished piece.
3. Grain Orientation
Grain orientation exerts a significant influence on the structural performance of joints. In this method, the direction of the wood grain within the reinforcing insert relative to the crack and the surrounding wood significantly impacts the joint’s capacity to resist further separation. Aligning the grain of the insert perpendicular to the crack offers maximal resistance to tensile forces pulling the crack open. This configuration effectively ties together the wood fibers on either side, preventing them from moving independently. Failure to observe proper alignment can compromise the joint’s integrity, rendering it less effective in preventing crack propagation. Consider a slab of wood with a prominent crack running along its length; an insert with its grain oriented parallel to the crack would offer minimal resistance, while a perpendicular alignment would act as a strong bridge.
Practical application of this principle requires careful attention during insert fabrication and installation. Prior to cutting the insert, the wood’s grain direction must be clearly identified. The mortise, which houses the insert, should then be carefully shaped to accommodate the insert with the correct grain orientation. Adhesive application must also account for grain direction to ensure optimal bonding. For instance, applying glue against the grain may result in weaker adhesion due to reduced surface area contact. Furthermore, variations in grain density and angle within the surrounding wood can necessitate adjustments to the insert’s shape or placement to maintain effective stabilization. In situations where the crack runs at an angle to the primary grain, the insert’s orientation should be adjusted to maintain the perpendicular relationship with the crack itself, rather than rigidly adhering to the main grain direction.
In conclusion, grain orientation is a critical parameter in constructing a functional and durable joints. Understanding its impact on stress distribution and bonding is essential for achieving long-term stability. Neglecting this aspect may lead to premature joint failure, negating the benefits of this reinforcement technique. This consideration highlights the necessity for careful planning and execution throughout the fabrication process, ensuring that structural integrity is maintained alongside aesthetic considerations. The interplay between grain orientation, insert geometry, and adhesive properties determines the overall effectiveness of the joint in preventing crack propagation and preserving the structural integrity of the wood piece.
4. Template Precision
Template precision is intrinsically linked to the successful execution of the technique. The use of templates in creating the mortise and the insert is paramount for achieving consistent dimensions, accurate shapes, and a precise fit. Inadequate precision in the template directly translates to inaccuracies in the mortise and insert, resulting in a joint that may be structurally unsound and aesthetically unappealing. For instance, if the template for the mortise is undersized, forcing the insert can induce stress in the surrounding wood, potentially leading to new cracks. Conversely, an oversized mortise results in a loose fit, compromising the joint’s ability to stabilize the existing crack. Accurate templates, therefore, serve as a foundation for creating a structurally sound and visually pleasing joint.
The practical significance of template precision extends beyond mere accuracy. Consistent templates enable the efficient replication of the joint across multiple projects or within a single large piece. This consistency is particularly valuable when repairing or reinforcing multiple cracks, ensuring a uniform aesthetic and predictable structural performance. Consider a large tabletop with several cracks requiring reinforcement; the use of a precise template ensures that all inserts are identical in shape and size, creating a cohesive visual effect. This repeatability also saves considerable time and reduces the likelihood of errors, streamlining the woodworking process.
In summary, template precision is a crucial determinant of the quality and effectiveness of woodworking featuring this technique. It dictates the accuracy of the mortise and insert, impacting structural integrity and aesthetic appeal. The capacity to replicate consistent joints efficiently, provided by precise templates, amplifies the practicality of this technique in various woodworking applications. Overcoming challenges in template creation, such as material selection and accurate pattern transfer, are essential for realizing the full potential of this reinforcement method.
5. Adhesive Strength
Adhesive strength is a critical factor in ensuring the long-term stability and structural integrity of a joint. The bond created by the adhesive between the insert and the mortise plays a vital role in distributing stress and preventing crack propagation. Without adequate adhesive strength, the mechanical interlock provided by the shaped insert is significantly weakened.
- Load Distribution Enhancement
The adhesive layer augments load distribution across the joint. Rather than concentrating stress solely on the mechanical connection, the adhesive spreads the load over a larger surface area, reducing the risk of localized failure. For example, in a large slab with a significant crack, a strong adhesive bond ensures that forces are evenly distributed between the insert and the surrounding wood, preventing stress concentrations at the edges of the insert.
- Gap Filling Capability
Adhesives can fill minor gaps and irregularities between the insert and the mortise, further enhancing surface contact and bond strength. This is particularly important when working with imperfectly fitted joints or wood with uneven surfaces. The adhesive conforms to the contours of the joint, creating a more complete and robust bond, even in the presence of slight imperfections.
- Resistance to Environmental Factors
A strong adhesive bond provides resistance to environmental factors that can compromise the joint over time. Moisture, temperature fluctuations, and cyclical loading can all weaken a poorly bonded joint. A high-quality adhesive, appropriate for woodworking applications, maintains its strength and integrity under varying conditions, protecting the joint from deterioration and ensuring long-term stability.
- Prevention of Moisture Intrusion
The adhesive acts as a barrier against moisture intrusion into the joint. Moisture can lead to wood swelling, cracking, and fungal decay, all of which can weaken the joint and compromise its structural integrity. A well-sealed adhesive bond prevents moisture from penetrating the joint, protecting the wood from these damaging effects.
The interplay between adhesive strength and the mechanical interlock provided by the insert is essential for creating a durable and effective repair. The adhesive’s ability to distribute stress, fill gaps, resist environmental factors, and prevent moisture intrusion contribute significantly to the long-term stability and structural integrity of the woodworking piece. By selecting an appropriate adhesive and ensuring proper application, the joint can withstand the test of time and maintain its functionality and aesthetic appeal. The proper integration of this method provides a superior, lasting repair.
6. Flush Finishing
Flush finishing, in the context of woodworking employing this method, refers to the process of seamlessly integrating the reinforcing insert with the surrounding wood surface. The goal is to achieve a smooth, continuous plane, eliminating any discernible ridge or depression at the joint. This meticulous attention to surface detail is critical not only for aesthetic reasons but also for the long-term durability and functionality of the repaired or reinforced piece.
- Surface Preparation
Proper surface preparation is paramount to achieving a truly flush finish. This involves carefully sanding the insert and the surrounding wood to create a uniform texture and remove any imperfections. The sanding process typically begins with coarser grits to level the surface and progresses to finer grits to refine the finish and minimize scratches. Techniques such as block sanding and the use of sanding pads are employed to ensure consistent pressure and prevent uneven removal of material.
- Adhesive Selection Impact
The adhesive selection significantly influences the ease and quality of flush finishing. Adhesives that expand or contract excessively during the curing process can create uneven surfaces, making it difficult to achieve a seamless finish. Similarly, adhesives that are prone to bleeding or staining the surrounding wood can compromise the aesthetic appeal of the finished piece. Therefore, the careful selection of a stable, non-staining adhesive is crucial for simplifying the finishing process.
- Trimming and Shaping Techniques
The techniques used to trim and shape the insert prior to sanding play a key role in achieving a flush finish. The insert is typically left slightly proud of the surrounding surface to allow for precise leveling during the sanding process. Methods such as planing, chiseling, and careful use of a router can be employed to remove the bulk of the excess material, minimizing the amount of sanding required and reducing the risk of over-sanding the surrounding wood.
- Finish Application Consistency
The consistency of finish application is essential for blending the insert seamlessly with the surrounding wood. Variations in finish thickness or application technique can result in noticeable differences in color and sheen, detracting from the overall aesthetic. Multiple thin coats of finish, applied evenly and allowed to dry thoroughly between coats, are typically used to achieve a uniform and durable finish. Techniques such as spraying, brushing, and wiping are employed, depending on the type of finish and the desired effect.
In summary, flush finishing within this method involves a holistic approach that considers surface preparation, adhesive selection, trimming techniques, and finish application. This ensures that the repair or reinforcement not only strengthens the wood but also enhances its aesthetic appeal by creating a seamless integration of the insert with the surrounding wood surface. A meticulous attention to detail throughout the finishing process is essential for achieving a professional-quality result.
Frequently Asked Questions About Bow Tie Joint Woodworking
The following questions address common inquiries and misconceptions regarding this specific timber joining and reinforcement technique. These responses aim to provide clarity and enhance understanding.
Question 1: Is this technique purely decorative, or does it serve a structural purpose?
This method serves both decorative and structural purposes. While the visual appeal is undeniable, the primary function involves preventing further crack propagation in timber. The shaped insert mechanically locks the wood fibers together.
Question 2: What types of wood are best suited for creating the insert?
Ideally, the insert should be crafted from wood with similar expansion and contraction properties as the surrounding material. Hardwoods are often chosen for their strength, but compatibility is paramount to prevent future stress fractures.
Question 3: Can this method be used on all types of wood?
This technique is applicable to various wood types; however, careful consideration must be given to grain orientation and wood density. Softer woods may require larger inserts for adequate reinforcement.
Question 4: What tools are essential for creating an insert?
Essential tools include chisels, a marking knife, a router (optional, but recommended for precision), a saw, and clamping devices. A template is highly recommended for consistent mortise creation.
Question 5: Is adhesive necessary for a secure joint?
Adhesive is indeed necessary. A high-quality wood glue strengthens the joint and helps distribute stress evenly across the insert and the surrounding wood. Glue selection should match project and timber types.
Question 6: How is a flush finish achieved?
A flush finish requires careful sanding and shaping after the insert is glued in place. Start with coarser grits to level the surface, then progress to finer grits to achieve a smooth, seamless transition. Over-sanding must be avoided.
In summary, this technique provides both structural reinforcement and aesthetic enhancement to woodworking projects. Success hinges on material compatibility, precise execution, and a thorough understanding of woodworking principles.
The following section will provide additional tips and tricks.
In Conclusion
The preceding discussion has elucidated the multifaceted nature of bow tie joint woodworking. From its dual function of structural stabilization and aesthetic integration to the critical parameters of grain orientation, template precision, adhesive strength, and flush finishing, each element contributes to the overall success of this time-honored technique. Mastery of these aspects ensures that the resulting joint not only arrests crack propagation but also enhances the visual appeal of the finished piece.
The enduring relevance of bow tie joint woodworking lies in its capacity to salvage valuable material, conserve resources, and imbue projects with a touch of craftsmanship that transcends mere functionality. Its continued application in furniture making, architectural restoration, and artistic woodworking underscores its lasting significance as a method for preserving both the integrity and beauty of wood.


