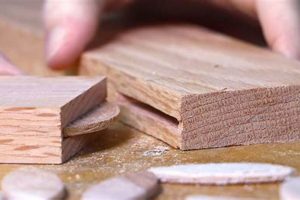
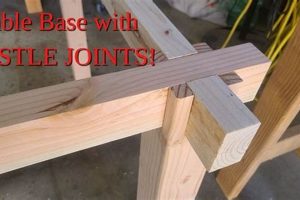
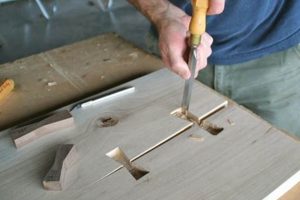
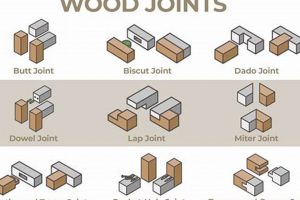
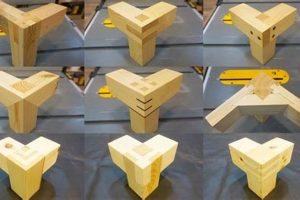
This particular woodworking technique creates a strong and visually appealing connection between two pieces of wood. One piece features a mortise-like opening, the “bridle,” that receives the tenon of the other piece. The tenon is essentially a tongue that fits snugly within the bridle, maximizing the gluing surface and mechanical strength of the union. For instance, this joint is commonly employed in constructing sturdy table legs or robust frame structures where enduring stability is paramount.
Its robust nature makes it ideal for applications demanding significant load-bearing capacity. The extended glue surface contributes to exceptional durability, resisting racking and torsion. Historically, its use can be traced back centuries, reflecting its enduring value in crafting reliable and long-lasting wooden structures. Its effectiveness has solidified its status as a respected and widely utilized technique across various woodworking disciplines.
The subsequent sections will delve into the specific variations of this joint, explore detailed instructions for its accurate execution, and offer practical advice on selecting the appropriate application based on project requirements and aesthetic considerations. This will include information on hand-tool and machine-based approaches to creating the joint, as well as tips for ensuring a precise and aesthetically pleasing outcome.
Essential Tips for Robust Woodworking Joinery
Achieving a strong and visually appealing connection relies on careful planning and precise execution. These guidelines enhance the integrity and aesthetic quality of the finished piece.
Tip 1: Prioritize Accurate Measurement: Precise measurement of both the tenon and the bridle is paramount. Even minor discrepancies can compromise the joint’s strength and appearance. Utilize precision measuring tools and double-check all dimensions before commencing cutting.
Tip 2: Employ Sharp Cutting Tools: Whether utilizing hand tools or machinery, sharpness is crucial. Dull tools can lead to tear-out, imprecise cuts, and increased physical exertion. Regularly sharpen blades and chisels to maintain optimal performance.
Tip 3: Practice on Scrap Material: Before committing to the final project pieces, practice the joint on scrap material. This allows for refinement of technique and identification of potential issues without risking damage to valuable materials.
Tip 4: Ensure a Snug, but Not Forceful, Fit: The tenon should fit snugly within the bridle, requiring minimal force for assembly. An excessively tight fit can stress the joint and potentially lead to cracking or splitting. Adjust the tenon or bridle as needed to achieve the desired fit.
Tip 5: Clamp Securely During Gluing: When gluing the joint, use clamps to apply even pressure across the entire surface area. This ensures maximum contact between the tenon and bridle, resulting in a stronger and more durable bond. Protect the surrounding wood with cauls to prevent clamp marks.
Tip 6: Consider the Grain Direction: Aligning the grain direction of the tenon and bridle enhances the joint’s resistance to warping and movement. Pay close attention to grain orientation during the layout and cutting phases.
Tip 7: Select Appropriate Wood Species: The choice of wood species impacts the joint’s overall strength and stability. Hardwoods generally offer superior performance compared to softwoods. Consider the project’s intended use and environmental conditions when selecting the appropriate wood.
Adhering to these principles will contribute significantly to the creation of structurally sound and aesthetically pleasing joinery, ensuring the longevity and integrity of woodworking projects.
The following sections will explore specific applications and advanced techniques, building upon these foundational principles.
1. Joint Strength
The mechanical robustness inherent in a woodworking bridle joint is a primary consideration in its selection and application. The overall strength of the resulting structure relies heavily on the integrity of this connection.
- Surface Area & Glue Adhesion
The substantial glue surface afforded by the design dramatically increases the bonded area between the tenon and the bridle. This extended surface allows for a more uniform distribution of stress and a stronger adhesive bond. Examples include applications in heavy-duty framing, where resistance to racking is essential.
- Mechanical Interlock
The interlocking nature of the tenon and bridle provides significant mechanical resistance to shear forces. The shoulders of the tenon, pressing against the inside faces of the bridle, prevent movement and stabilize the connection. This is particularly beneficial in furniture construction where joints are subjected to lateral loads.
- Wood Fiber Orientation
The orientation of wood fibers in both the tenon and the bridle contributes significantly to the joint’s overall resistance to splitting or fracturing. Proper alignment of the grain enhances its capacity to withstand stress. For example, selecting straight-grained timber and carefully aligning it during construction reduces the risk of failure under load.
- Resistance to Torsion
Due to the snug fit and extensive surface contact, this connection offers inherent resistance to torsional forces. This feature is crucial in structures where twisting or rotational stresses are present. An application would be a table leg connected to the table’s apron, where the leg must resist forces applied to the tabletop.
By maximizing glue surface, incorporating a mechanical interlock, and attending to wood fiber orientation, a significantly reinforced union is created. This, coupled with the inherent resistance to torsion, results in a structurally sound element. The selection of this joint is frequently dictated by project requirements where enduring strength and stability are paramount.
2. Tenon Accuracy
Tenon accuracy is paramount to the structural integrity and aesthetic quality of the result. As the projecting element designed to fit precisely within the mortise-like bridle, any deviation from the intended dimensions directly impacts the joint’s performance. An oversized tenon risks splitting the bridle during assembly, while an undersized tenon compromises the glue surface and reduces the joint’s resistance to racking. Consider the construction of a chair leg. If the tenon is not square or of uniform thickness, the resulting joint will be weak and prone to failure, potentially leading to instability and structural collapse.
Precise execution necessitates meticulous measurement and cutting techniques. Traditional hand-tool methods require sharp chisels and a keen eye to ensure accurate shaping. Similarly, when using power tools, jigs and fences are essential for repeatable and precise cuts. Furthermore, consideration of wood movement is necessary. A tenon that fits perfectly during dry assembly may become loose or excessively tight due to changes in humidity. Seasoned wood and careful consideration of grain orientation can mitigate these effects. Careful attention to dimensions and proper execution of the tenon creates a solid and stable union.
In summary, tenon accuracy is not merely a matter of cosmetic appeal; it is a critical determinant of the joint’s structural performance and longevity. Imperfections in the tenon propagate into weaknesses throughout the entire assembly, ultimately diminishing the overall quality and reliability of the final product. Therefore, meticulous attention to detail during the tenon creation process is an indispensable aspect of sound woodworking practice.
3. Bridle Width
The bridle width, a critical dimension within this joint, directly influences its strength and stability. The width of the opening, or “bridle,” must correspond precisely with the thickness of the tenon designed to fit within it. If the bridle is too narrow, the tenon will not seat properly, potentially causing splitting or stress on the wood fibers during assembly. Conversely, an excessively wide bridle results in a loose fit, diminishing the glue surface contact and compromising the joint’s resistance to racking and torsion. In framing, for example, an improperly sized bridle significantly weakens the corner, jeopardizing the structural integrity of the entire frame. Therefore, accurate determination and execution of the bridle width are non-negotiable for optimal joint performance.
The relationship between bridle width and tenon thickness dictates the overall effectiveness of the joint. Consider the construction of a sturdy table. If the bridle on the table leg is too wide for the tenon, the leg will wobble, rendering the table unstable and unsuitable for its intended purpose. In this scenario, the improper bridle width directly impacts the functionality and usability of the finished product. Furthermore, an inaccurate bridle width can also lead to aesthetic inconsistencies, as the visible joint line may appear uneven or unprofessional. This detail highlights the importance of precision and attention to detail during the layout and cutting phases.
In summary, bridle width is an indispensable factor affecting the mechanical properties and visual appeal of the connection. Precise execution, achieved through accurate measurement, careful cutting, and a thorough understanding of wood behavior, is essential for achieving a robust and aesthetically pleasing outcome. Challenges in determining the appropriate bridle width can be mitigated through the use of precise measuring tools, careful planning, and practice on scrap material. These practices ensure that the bridle width aligns perfectly with the tenon thickness, resulting in a stable and durable connection that contributes to the overall success of any woodworking project.
4. Material Selection
Material selection exerts a profound influence on the performance characteristics of a woodworking bridle joint. The inherent properties of the chosen wood species, such as its density, grain structure, and moisture content, directly impact the joint’s strength, stability, and longevity. For instance, hardwoods like oak or maple, known for their high density and tight grain, provide superior resistance to shear and tensile forces, making them suitable for applications demanding exceptional structural integrity. Conversely, softwoods like pine or cedar, while easier to work with, may lack the necessary strength for heavily loaded joints. The selection of an inappropriate material can lead to premature joint failure, resulting in structural instability and compromised product lifespan. In cabinet making, selecting the wrong material could affect how the structural integrity of the door frame might compromise its overall appearance over time.
The compatibility of selected materials is also important. Consideration must be given to the differing expansion and contraction rates of dissimilar woods. Mismatched materials, particularly when subjected to fluctuating humidity levels, can induce stress within the joint, potentially causing warping, cracking, or even complete separation. The glue choice must be appropriate to the wood type selected for optimal bond. For instance, oily woods often require specific adhesives designed to penetrate the natural oils and form a secure bond. Ignoring this can lead to glue failure. Examples include outdoor furniture construction, where weather-resistant woods and adhesives are crucial for long-term performance. This approach helps to mitigate the effect of harsh environmental conditions and protects structural integrity.
Material selection, therefore, is not merely a cosmetic consideration but a critical determinant of the joint’s mechanical properties and long-term durability. Understanding the characteristics of various wood species and selecting materials appropriate for the intended application is paramount for creating robust and reliable joinery. Furthermore, considering compatibility with other materials and choosing appropriate adhesives are essential steps in ensuring the longevity and performance of the finished product. This holistic approach to material selection significantly reduces the risk of joint failure and contributes to the overall quality and reliability of woodworking projects.
5. Glue Surface
The extent and quality of the glue surface are paramount in determining the overall strength and longevity of a woodworking bridle joint. Maximizing the area available for adhesive bonding directly translates to increased resistance against shear, tension, and torsional forces acting upon the joint.
- Surface Area Maximization
The design inherently provides a substantial surface area for glue application compared to simpler joint types. The mortise-like bridle embraces the tenon, creating extended contact zones along its sides and shoulders. For instance, in frame construction, this increased surface area allows for superior adhesion, reinforcing the connection and preventing racking under stress. This contributes to a longer lasting and structurally sound result.
- Adhesive Selection and Compatibility
The choice of adhesive must correspond with the wood species and the intended application. Porous woods benefit from glues with gap-filling properties, while oily woods necessitate adhesives formulated to penetrate natural oils and form a strong bond. In constructing an exterior piece, the use of water-resistant adhesive is critical. Incompatibility between the adhesive and wood species can compromise the joint’s integrity, leading to premature failure.
- Surface Preparation Techniques
Proper surface preparation is essential for achieving optimal adhesion. Smooth, clean surfaces free of dust, oil, or wax maximize the contact between the wood and the adhesive. Sanding the joint surfaces with a fine grit sandpaper can promote better glue penetration. Improper surface preparation drastically reduces the available area of contact. This may cause weakening of the bond, potentially leading to long-term compromise.
- Clamping Pressure and Distribution
Uniform clamping pressure is crucial for ensuring complete and consistent contact between the tenon and bridle during the curing process. Adequate pressure forces the adhesive into the wood pores and expels excess glue, resulting in a stronger bond. Insufficient clamping pressure may result in voids or gaps within the glue line, weakening the joint. Proper clamp selection, placement, and tightening are essential for maximizing the effectiveness of the glue surface.
Therefore, maximizing the glue surface, selecting a compatible adhesive, meticulously preparing the joining surfaces, and applying consistent clamping pressure are all critical for optimizing the strength and durability of this form of joint. These combined actions capitalize on the inherent advantages and result in a connection of high structural integrity.
6. Wood Grain Alignment
Wood grain alignment within a woodworking bridle joint is a critical determinant of its structural integrity and resistance to stress. The orientation of wood fibers significantly influences the joint’s ability to withstand tensile, compressive, and shear forces. When the grain direction is properly aligned between the tenon and bridle, the joint exhibits enhanced strength and dimensional stability. Conversely, misalignment introduces inherent weaknesses, predisposing the joint to failure under load or during seasonal changes in humidity. A practical example is observed in chair leg construction. If the tenon’s grain runs perpendicular to the bridle’s, the joint becomes highly susceptible to splitting, particularly along the grain lines of the weaker piece. Understanding this relationship is fundamental for creating durable and reliable woodworking structures.
Proper alignment mitigates the risks associated with wood movement. As wood expands and contracts in response to moisture fluctuations, consistent grain direction allows for uniform movement across the joint. This prevents the build-up of stress that can lead to cracking or separation. Consider a large frame constructed using this joint. If the grain is misaligned, seasonal expansion and contraction can cause the joint to loosen over time, compromising the frame’s stability. Employing techniques such as quarter-sawn lumber, where the grain runs perpendicular to the face of the board, can improve alignment and minimize wood movement-related issues. This proactive approach ensures the joint remains structurally sound throughout its service life. For example, use of quarter-sawn lumber in bridle joints ensures even load distribution and minimal risk of cracking over time.
In summary, wood grain alignment is an indispensable consideration in the creation of robust and long-lasting bridle joints. Precise alignment ensures optimal distribution of forces, minimizes the risk of wood movement-related failures, and contributes significantly to the overall structural integrity of the assembly. Challenges in achieving perfect alignment can be addressed through careful material selection, precise cutting techniques, and a thorough understanding of wood behavior. Ultimately, prioritizing grain alignment is essential for realizing the full potential of this woodworking technique and creating pieces that withstand the test of time. Understanding the importance of wood grain alignment is not just theoretical; it’s a practical necessity for quality woodworking, preventing potential failures and ensuring the longevity of finished products.
7. Assembly Technique
The successful creation of a robust woodworking bridle joint hinges significantly on the assembly technique employed. The precision with which the tenon is introduced into the bridle, the application of adhesive, and the subsequent clamping process directly influence the joint’s structural integrity and long-term performance. An improper assembly technique can negate even the most meticulous joinery preparation. For instance, forcing an overly tight tenon into the bridle without proper alignment can induce stress fractures in the surrounding wood fibers, weakening the connection. Similarly, uneven glue distribution or inadequate clamping pressure compromises the adhesive bond, reducing the joint’s resistance to shear forces. Effective assembly, therefore, is not merely a final step, but an integral component of the overall joint creation process.
Consider a scenario involving the construction of a heavy-duty frame for a workbench. If the tenons are not carefully aligned with the bridles during assembly, the frame may exhibit racking or instability under load. The sequence of assembly is also critical. Gluing and clamping multiple joints simultaneously may introduce unintended stresses or prevent proper alignment. A more controlled approach, focusing on assembling one or two joints at a time, ensures greater accuracy and minimizes the risk of misalignment. Clamping pressure must be evenly distributed across the joint surface to ensure complete contact between the tenon and bridle. The use of cauls or clamping blocks helps to distribute pressure and prevent marring of the wood surface. These practical considerations demonstrate that the assembly phase is a crucial extension of the precision and care invested in the initial preparation of the joint components.
In summary, the assembly technique employed represents a pivotal point in the realization of a strong and durable woodworking bridle joint. Careful alignment, even glue distribution, appropriate clamping pressure, and a controlled assembly sequence are essential elements of a successful outcome. Neglecting these factors, even with precisely cut components, can undermine the joint’s structural integrity and longevity. Addressing potential challenges through careful planning and practiced technique ensures that the assembly process enhances, rather than diminishes, the quality and performance of the finished joint. The understanding of assembly as a key component of this process is essential for any woodworking seeking to achieve stable and reliable connections in their projects.
Frequently Asked Questions
The subsequent questions address common inquiries regarding this joint, providing detailed explanations and practical considerations for its successful implementation.
Question 1: What distinguishes this particular technique from a mortise and tenon?
The primary difference lies in the configuration of the joint components. Whereas a mortise and tenon features a mortise entirely enclosed within one piece, this joint showcases the mortise opening on three sides, thus forming the “bridle.”
Question 2: In what applications does this joint excel, and in which does it fall short?
This joint excels in situations requiring high resistance to racking and torsional forces, such as table legs and frame construction. However, its exposed nature may not be suitable for applications where a flush or concealed joint is desired.
Question 3: What wood species are most suitable for creating a strong and reliable joint?
Hardwoods such as oak, maple, and walnut generally provide superior strength and stability due to their higher density and tighter grain structure. Softwoods can be used, but require careful consideration of load-bearing requirements.
Question 4: What level of precision is required when cutting the tenon and bridle for optimal performance?
A high degree of precision is essential. Minor discrepancies can compromise the joint’s strength and aesthetic appearance. It is recommended to employ precision measuring tools and to double-check all dimensions before commencing cutting.
Question 5: What type of adhesive is recommended for bonding this joint, and what factors influence the adhesive selection?
The adhesive selection should correspond to the wood species and intended application. For porous woods, a glue with gap-filling properties is beneficial. For oily woods, an adhesive formulated to penetrate natural oils is recommended. Always adhere to the manufacturer’s guidelines for application.
Question 6: What are the potential challenges in executing this joint, and how can these challenges be effectively mitigated?
Potential challenges include achieving accurate dimensions, preventing tear-out during cutting, and ensuring a snug fit. These can be mitigated through the use of sharp cutting tools, precise measuring techniques, and practice on scrap material.
The strength and reliability of the joint relies on careful execution and appropriate material selection. Mastery requires precision, patience, and a thorough understanding of woodworking principles.
The subsequent section will provide a detailed, step-by-step guide to the crafting of the join, covering both hand-tool and machine-based methods.
Conclusion
The preceding exploration has detailed critical aspects of the woodworking bridle joint, emphasizing its design intricacies, material considerations, and execution techniques. Key points have included dimensional accuracy, glue surface optimization, wood grain alignment, and meticulous assembly practices. Understanding these factors is paramount for achieving the structural integrity and aesthetic quality inherent in a well-executed joint.
Mastery of the woodworking bridle joint represents a significant step in advancing woodworking proficiency. Further study and hands-on practice are encouraged to fully realize the potential of this robust and versatile connection. The ongoing refinement of skills will ultimately contribute to the creation of enduring and impactful woodworking projects.


