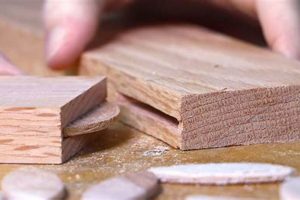
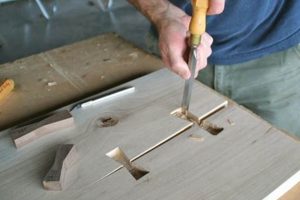
This technique, also referred to as a butterfly joint or Dutchman’s patch, represents a method of joining or reinforcing two pieces of wood. It involves creating a mortise, shaped typically like a keystone or butterfly, across the seam between the boards, and then inlaying a corresponding piece of wood to lock them together. This embedded insert provides both structural support and a visually distinct element to the finished piece.
The described method is frequently employed to prevent further cracking in wood slabs, adding considerable strength to the connection point. Furthermore, it presents an opportunity to introduce contrasting wood species, enhancing the aesthetic appeal of the project. Historically, its application can be observed in antique furniture and timber framing, demonstrating its long-standing utility in woodworking practices. Its advantages are twofold: stabilizing compromised timber and contributing to the overall design.
The following sections will delve into the specifics of executing this technique, including considerations for wood selection, precise cutting methods, and finishing touches to ensure a durable and aesthetically pleasing result. Topics to be explored are layout and cutting techniques, gluing and clamping procedures, and sanding and finishing considerations.
Essential Considerations
This section provides crucial advice for achieving optimal results. Adherence to these guidelines will enhance both the structural integrity and aesthetic quality of the finished piece.
Tip 1: Grain Orientation: Align the grain of the insert with the grain of the surrounding wood. This minimizes the effects of wood movement and reduces the likelihood of future cracking or separation.
Tip 2: Precise Mortise and Tenon Fit: Ensure a tight, gap-free fit between the mortise and the inlay. This is essential for maximizing the joint’s strength and preventing the need for excessive filler.
Tip 3: Wood Selection: Choose a species for the insert that is compatible in hardness and density with the surrounding wood. Avoid using excessively hard woods in softer substrates, as this can create stress points.
Tip 4: Careful Layout: Accurately transfer the inlay pattern to the wood. A well-defined outline is critical for achieving a symmetrical and visually appealing result.
Tip 5: Glue Application: Apply glue evenly to all surfaces of both the mortise and the inlay. Avoid excessive glue squeeze-out, which can complicate the finishing process.
Tip 6: Clamping Pressure: Use moderate clamping pressure during glue-up. Over-clamping can starve the joint of glue and weaken the bond.
Tip 7: Allow Adequate Drying Time: Allow the glue to cure completely before sanding or finishing the joint. Premature sanding can disrupt the bond and compromise the joint’s strength.
These considerations are paramount to ensuring a strong and visually appealing result. By paying close attention to material compatibility, precise execution, and proper adhesion, the long-term integrity of the project is assured.
The subsequent sections will examine best practices for sanding and finishing the completed assembly, culminating in a comprehensive guide to achieving professional-quality outcomes.
1. Strength
The incorporation of the specified joint directly influences the structural integrity of wood assemblies. The joint serves as a reinforcing element, resisting tensile forces that would otherwise propagate cracks or cause complete separation. The expanded surface area provided by the inlay distributes stress more effectively than a simple butt joint, minimizing the concentration of force at any single point. This enhanced load-bearing capacity is especially critical in situations where the wood is subject to significant stress or environmental fluctuations.
Consider, for instance, a large wooden tabletop prone to splitting along its grain. The judicious placement of several of these joints across the affected area mechanically ties the wood fibers together, inhibiting crack propagation. The strength of the resulting repair depends not only on the inherent properties of the wood species used for both the primary material and the inlay, but also on the accuracy of the joint’s execution and the quality of the adhesive. A poorly fitted inlay, or the use of incompatible materials, will negate the intended strengthening effect, potentially exacerbating the structural weakness.
In summation, the technique is employed as a strengthening agent, mitigating the risk of structural failure in wooden components. Its effectiveness is directly proportional to the precision of its execution and the compatibility of the materials involved. The practical significance lies in its capacity to extend the lifespan of wooden objects and structures, preserving their functionality and aesthetic value. A lack of understanding of these relationships can lead to compromised results and potential structural instability.
2. Aesthetics
The incorporation of a “bowtie joint” extends beyond mere structural reinforcement; it introduces a deliberate aesthetic element into the woodworking project. The contrasting wood species selected for the inlay create a focal point, drawing the eye and adding visual interest. The shape of the inlay itself, traditionally resembling a butterfly or keystone, contributes to the overall design, transforming a necessary repair or reinforcement into an intentional artistic feature. The precision with which the inlay is executed directly impacts the final appearance, influencing the perception of craftsmanship and attention to detail. For example, in high-end furniture making, the careful selection of exotic wood for the inlays can elevate the perceived value and sophistication of the piece. This deliberate artistic integration can serve to balance the more practical functions of the joint, enhancing the character of the woodworking.
Consider the restoration of antique furniture. The use of the joint allows for the preservation of original materials while simultaneously addressing structural weaknesses. Skilled artisans often meticulously match the species of the inlay to that of the original piece, ensuring a harmonious blend that maintains the historical integrity of the object. Alternatively, a contrasting wood can be strategically employed to subtly highlight the repair, acknowledging the passage of time and the object’s history. The placement of these joints is equally important. Their strategic positioning can create a balanced composition, guiding the viewer’s eye and emphasizing key design elements within the overall form. The aesthetic consideration extends beyond material selection and placement to the finishing process. Care must be taken to ensure a smooth transition between the inlay and the surrounding wood, avoiding any abrupt changes in texture or finish that could detract from the visual appeal.
In summary, the technique integrates structural necessity with artistic expression. The selection of materials, the shape and placement of the inlay, and the precision of the execution all contribute to the aesthetic impact of the joint. While its primary function remains structural reinforcement, its inherent visual potential cannot be ignored. A mindful approach to its integration ensures that the outcome enhances the overall beauty and character of the woodworking project. Overlooking the aesthetic implications, or executing the joint without due regard for its visual impact, may result in a structurally sound but aesthetically unappealing outcome. This emphasizes the necessity of integrating both structural and design considerations throughout the process.
3. Prevention
The application of this technique extends beyond remedial action; it serves as a proactive measure to mitigate potential structural weaknesses in wood. Addressing inherent vulnerabilities early in the construction process can significantly extend the lifespan and maintain the integrity of wood projects.
- Mitigating End Grain Splitting
Wood is particularly susceptible to splitting along its end grain, especially in areas subjected to stress or environmental fluctuations. Inserting a reinforcing element across the end grain preemptively binds the fibers together, reducing the likelihood of cracks initiating and propagating. This is particularly beneficial in the construction of furniture legs, frame components, and other elements prone to mechanical stress.
- Controlling Checks in Large Slabs
Large wood slabs, such as those used for tabletops or countertops, are inherently prone to developing checks (small splits) as they dry and acclimate to their environment. Strategically placed reinforcing elements across the potential check lines act as mechanical restraints, minimizing the extent and severity of these cracks. This preventive measure is critical for maintaining the structural integrity and aesthetic value of these large-format pieces.
- Reinforcing Weak Grain Orientation
In certain wood species or cuts, the grain orientation may be less than ideal, creating inherent weak points. Implementing the technique at these vulnerable junctures provides supplementary reinforcement, compensating for the suboptimal grain structure. This approach is particularly valuable when working with figured wood or pieces with complex grain patterns.
- Limiting Expansion and Contraction Stress
Wood naturally expands and contracts with changes in humidity. These dimensional shifts can create stress points, particularly at joints and seams. Reinforcing these areas preemptively distributes these stresses more evenly, reducing the risk of joint failure or material deformation. This preventative measure is essential in environments with significant humidity fluctuations.
These preventative applications demonstrate the versatility of the technique. By strategically addressing potential weaknesses before they manifest, this woodworking approach serves as a safeguard against future structural issues, ensuring the longevity and stability of wood projects across various applications. Neglecting these proactive measures can lead to premature failure and costly repairs, underscoring the importance of preventative reinforcement in woodworking practices.
4. Stabilization
The process of stabilization, in the context of woodworking, refers to maintaining the dimensional integrity and structural soundness of timber over time. A critical component of achieving this stability often involves strategic reinforcement techniques. The described joint serves as a primary method for achieving this desired stability, preventing further degradation of wood elements.
- Arresting Crack Propagation
Cracks in wood, whether pre-existing or nascent, represent points of structural weakness. Installing the described joint across these fissures mechanically binds the wood fibers, arresting further propagation. This process redirects stress, preventing the crack from extending under load or environmental stress. Examples include using the joint on large slab tables or mantels that are prone to cracking. The stabilization achieved prevents catastrophic failure, prolonging the lifespan of the wood piece.
- Minimizing Warping and Twisting
Wood is susceptible to warping and twisting due to uneven moisture content and internal stresses. These deformations can compromise structural integrity and aesthetic appeal. The installation of a reinforcing element resists these forces, maintaining the planar stability of the wood. This is particularly relevant in wide boards or panels used in furniture construction. The stabilization prevents unsightly distortions, ensuring the longevity and functionality of the finished piece.
- Reinforcing Weak Joint Interfaces
Where traditional joinery techniques prove inadequate, supplementary reinforcement provides additional stability. Existing joints exhibiting signs of weakness benefit from strategically placed inlays, providing a secondary mechanical interlock. This application is prevalent in antique furniture restoration where original joinery may have deteriorated. The stabilization ensures the continued serviceability of the joint and prevents structural collapse.
- Distributing Stress Concentrations
Localized stress concentrations can lead to premature failure in wood components. The joint acts as a stress distributor, spreading the load over a larger area. This is particularly crucial in areas subject to high impact or sustained weight. Examples include table legs or structural supports. The stabilization minimizes the risk of localized failure, enhancing the overall resilience of the wood structure.
These facets underscore the importance of the technique in achieving wood stabilization. From preventing crack propagation to distributing stress concentrations, the process offers a multifaceted approach to ensuring the long-term structural integrity of wood components. The strategic implementation of these joints directly translates to enhanced durability, reduced maintenance, and extended service life, highlighting their significance in both new construction and restoration endeavors.
5. Durability
Durability, in the context of woodworking, signifies the ability of a structure or component to withstand wear, pressure, or damage over an extended period. The strategic implementation of the described joint plays a pivotal role in enhancing the longevity and resilience of wood assemblies.
- Enhanced Resistance to Mechanical Stress
The introduction of the inlay distributes stress concentrations across a larger surface area. This reduces the likelihood of localized failure under load. For example, a table subjected to regular weight and movement benefits from this reinforcement, mitigating stress around joint areas. Increased resistance translates to a prolonged service life and reduced susceptibility to damage under normal operating conditions.
- Mitigation of Environmental Degradation
Wood is inherently susceptible to moisture-induced expansion and contraction, leading to warping, cracking, and joint failure. The method reduces the impact of these dimensional changes by mechanically restraining movement. An application on outdoor furniture or architectural elements exposed to weather fluctuations would demonstrate the joint’s resistance to environmental stress. This resistance preserves structural integrity and aesthetic quality over time.
- Preservation of Structural Integrity in Aging Timber
Existing cracks and checks in aged wood represent inherent points of weakness. The described joint arrests the propagation of these defects, preventing further degradation and maintaining structural soundness. The integration of these joints in antique furniture restoration exemplifies this capability, prolonging the functional life of valuable pieces. This preventative measure preserves historical objects and reduces the need for extensive repairs.
- Improved Joint Stability and Longevity
Traditional woodworking joints can weaken over time due to stress, wood movement, and adhesive degradation. Incorporating the technique adds a mechanical interlock that reinforces the joint, preventing separation and maintaining structural integrity. This reinforcement is particularly valuable in high-stress joints, such as those found in chair construction. Improved joint stability ensures lasting performance and reduces the risk of structural failure.
In conclusion, the incorporation of the joint enhances the durability of woodworking projects by mitigating mechanical stress, resisting environmental degradation, preserving aging timber, and improving joint stability. These combined effects significantly extend the lifespan and maintain the structural integrity of wood assemblies across diverse applications, solidifying its role as a valuable technique for achieving lasting results.
6. Precision
Precision is paramount in the execution of a “bowtie joint” and directly influences both the structural integrity and aesthetic outcome of the woodworking project. Accurate measurements, careful cutting, and meticulous fitting are indispensable for achieving optimal results. Deviations from precise execution can compromise the joint’s strength and detract from its visual appeal.
- Accurate Layout and Marking
The initial layout and marking of the mortise and the inlay are critical for achieving a symmetrical and well-proportioned joint. Precise measurements, utilizing accurate measuring tools, are essential for transferring the pattern accurately to the wood. Errors in layout will propagate throughout the process, resulting in a poorly fitted and aesthetically displeasing joint. The use of templates or marking gauges is recommended to ensure consistency and accuracy.
- Precise Cutting of the Mortise
The mortise, or recess, must be cut with extreme accuracy to ensure a tight, gap-free fit with the inlay. The dimensions and angles of the mortise must precisely match those of the inlay for optimal structural support. A variety of tools, including chisels, routers, and specialized mortising machines, can be employed, but regardless of the tool selection, meticulous attention to detail is essential. Over-sized or irregular mortises compromise the joint’s strength, while under-sized mortises prevent proper seating of the inlay.
- Precise Shaping of the Inlay
The inlay, or butterfly, must be shaped with the same degree of precision as the mortise. The dimensions and angles must precisely correspond to those of the mortise to ensure a snug and seamless fit. Accurate shaping, utilizing saws, chisels, files, and sanding tools, is crucial for achieving a visually appealing and structurally sound joint. Care must be taken to avoid chipping or splintering the wood, which can compromise the joint’s aesthetics and functionality.
- Meticulous Fitting and Adjustment
Even with precise layout, cutting, and shaping, minor adjustments are often necessary to achieve a perfect fit between the mortise and the inlay. The process requires patience and meticulous attention to detail. Incremental adjustments, using hand tools and fine abrasives, are preferred over aggressive material removal. A tight, gap-free fit is essential for maximizing the joint’s strength and preventing the need for excessive filler. Improper fitting can lead to structural weakness and visual imperfections.
The relationship between precision and the successful implementation of this technique is undeniable. Each stage, from layout to final fitting, demands meticulous attention to detail and adherence to accurate measurements. A failure to prioritize precision at any point in the process will inevitably result in a compromised joint, affecting both its structural integrity and aesthetic value. This reinforces the necessity for skilled craftsmanship and a commitment to accuracy in woodworking practices.
Frequently Asked Questions
This section addresses common inquiries regarding the application, benefits, and limitations of the joint in woodworking projects. The answers provided are intended to offer clarity and guidance based on established woodworking principles.
Question 1: In what scenarios is the technique most appropriately employed?
This method is typically applied in situations requiring both structural reinforcement and aesthetic enhancement. These situations include stabilizing cracks in wood slabs, reinforcing weak joints, and adding decorative elements to furniture and architectural components.
Question 2: What wood species are best suited for the inlay?
The selection of wood species for the inlay should consider compatibility with the surrounding wood. Hardness, density, and grain orientation should be similar to prevent stress concentrations. Contrasting wood species can be used for aesthetic purposes, but material properties must remain compatible.
Question 3: What tools are required for creating the joint?
Essential tools include measuring instruments (rulers, calipers), marking tools (knives, marking gauges), cutting tools (chisels, saws, routers), and clamping devices. Specialized mortising machines can enhance precision, but are not strictly required.
Question 4: How can potential issues with wood movement be mitigated?
Aligning the grain of the inlay with the surrounding wood minimizes differential expansion and contraction. Proper acclimatization of the wood before construction and the application of appropriate finishes can further reduce the impact of wood movement.
Question 5: What adhesive is recommended for securing the inlay?
A high-quality wood glue, such as polyvinyl acetate (PVA) or epoxy, is recommended. The adhesive should be compatible with the wood species and capable of creating a strong, durable bond. Proper clamping pressure is essential for achieving optimal adhesion.
Question 6: What finishing techniques are appropriate for the joint?
Finishing techniques should blend the inlay seamlessly with the surrounding wood. Sanding, staining, and topcoating should be performed with care to avoid uneven color or texture. The chosen finish should protect the wood from moisture and environmental damage.
In summary, the joint offers a versatile solution for addressing structural weaknesses and enhancing the aesthetic appeal of woodworking projects. Careful planning, precise execution, and appropriate material selection are crucial for achieving optimal results.
The subsequent section will explore advanced applications and considerations for specialized projects.
Conclusion
The preceding exploration has detailed the multifaceted nature of “bowtie joint woodworking.” It has clarified the method’s role in augmenting structural integrity, enhancing aesthetic value, preventing material failure, stabilizing compromised wood, ensuring durability, and demanding precision. The information presented highlights the technique’s versatility, finding utility in preventative measures as well as restorative applications.
Effective implementation requires a comprehensive understanding of material properties, tool proficiency, and meticulous execution. Further investigation into advanced joinery techniques and innovative applications remains crucial for woodworking professionals and enthusiasts alike. The continued refinement of this approach promises to yield even greater structural and aesthetic advancements in the craft.


