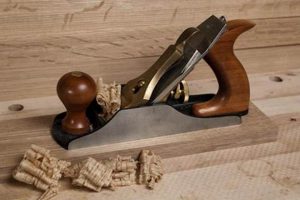
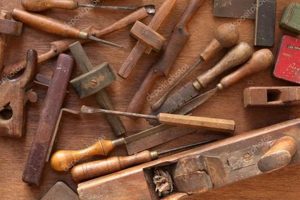
These tools, fundamental in shaping wood, are designed to produce smooth surfaces, consistent thicknesses, and precisely fitted joints. Consisting of a blade, a body (or stock), and a method for adjusting the blade’s depth, they allow for controlled shaving of wood. A common example is using one to flatten a tabletop or create a seamless edge for joining boards.
Their significance lies in the control and precision they offer. They allow the craftsman to feel the wood and make minute adjustments, resulting in a superior finish compared to some power tools. Historically, these were the primary means of preparing lumber, and their use promotes a deeper understanding of wood grain and material properties. This promotes efficiency and the potential for less waste material.
The following sections will delve into the different types available, how to properly select the appropriate type for a given task, the techniques for effective use, and the maintenance required to keep them in optimal condition, which will ensure a successful project outcome.
Essential Techniques
Mastering these tools requires patience and practice. However, adhering to fundamental principles significantly enhances efficiency and quality of work.
Tip 1: Blade Sharpness is Paramount: A dull blade tears wood fibers, leading to a rough surface. Consistent sharpening and honing are crucial for achieving clean cuts.
Tip 2: Grain Direction Awareness: Planing against the grain causes tear-out. Always observe the grain direction and plane with it to achieve a smooth surface.
Tip 3: Proper Depth of Cut: Avoid excessive depth of cut, especially with harder woods. Gradual, shallow passes yield better results and minimize the risk of chatter.
Tip 4: Consistent Overlap: Overlap each pass by approximately half the blade width to ensure consistent material removal and avoid ridges.
Tip 5: Body Posture and Control: Maintain a stable stance and use body weight to drive the tool forward, ensuring a smooth and consistent stroke.
Tip 6: Lubrication is Key: Applying wax to the sole reduces friction. This allows for smoother operation, reducing strain and improving control.
Tip 7: Practice on Scrap Material: Before working on a final project, practice techniques on scrap wood of similar type to refine control and avoid errors.
By prioritizing blade sharpness, understanding grain direction, and employing controlled techniques, woodworking outcomes are improved and ensure efficiency.
The following section provides maintenance advice to ensure your tool retains its performance for many years.
1. Blade sharpness
Blade sharpness is paramount for the proper functioning and effectiveness of any tool designed for shaping wood. Its condition directly impacts the quality of the cut, the effort required to operate the tool, and the overall finish achieved. A keen edge is fundamental for achieving precision and efficiency. The design of the tools relies on this aspect for satisfactory performance.
- Clean Cutting Action
A sharp blade severs wood fibers cleanly, minimizing tear-out and producing a smooth surface. A dull blade, conversely, tends to crush or tear the wood, resulting in a ragged and unsatisfactory finish. This difference is visually apparent and directly affects the aesthetic quality of the workpiece.
- Reduced Effort and Fatigue
When properly sharpened, it glides through the wood with minimal resistance. This reduces the physical exertion required, allowing for longer periods of use without fatigue. A dull blade requires significantly more force, increasing the risk of errors and leading to operator fatigue.
- Enhanced Control and Precision
A sharp edge provides greater control over the depth and direction of the cut. This allows for precise shaping and dimensioning of the wood, enabling the creation of intricate details and accurate joinery. Lack of sharpness reduces control, increasing the likelihood of mistakes.
- Improved Tool Longevity
While counterintuitive, maintaining a sharp edge actually contributes to the longevity of the blade. A dull blade requires more force, placing undue stress on the tool and increasing the risk of damage. Regular sharpening, conversely, preserves the blade’s integrity and extends its lifespan.
Therefore, prioritizing edge maintenance is not merely a matter of convenience, but a fundamental aspect of responsible tool use and quality woodworking. Its impact is pervasive, affecting everything from the physical effort required to the final quality of the project. Neglecting this vital aspect compromises the tool’s potential and ultimately diminishes the quality of the finished product.
2. Sole flatness
Sole flatness is a critical attribute of any tool used for accurately shaping wood. Its condition directly influences the uniformity of the surface created and the overall effectiveness of the tool.
- Consistent Contact with the Wood
A flat sole ensures that the blade engages the wood evenly across its width. Without flatness, the blade may only contact certain areas, leading to an uneven surface. This is particularly important when flattening wide boards or creating consistent thicknesses.
- Accurate Reference Surface
The sole serves as the reference surface against which the blade cuts. Deviations from flatness introduce errors into the cut, making it difficult to achieve precise dimensions or smooth surfaces. For example, a concave sole will result in edges being planed more than the center.
- Reduced Chatter and Vibration
An uneven sole can contribute to chatter and vibration during use, making it difficult to control the tool and achieve a clean cut. A flat sole provides a stable platform, minimizing these issues and allowing for smoother, more controlled operation.
- Optimal Performance of Other Components
Sole flatness directly affects the performance of other tool components, such as the blade and depth adjustment mechanism. A flat sole ensures that the blade is properly supported and that adjustments are accurately translated into changes in cutting depth. An unflat sole may cause the blade to flex unevenly, impacting cutting performance.
Therefore, ensuring the sole is flat and true is essential for achieving optimal performance. Regular maintenance and correction of any deviations from flatness are critical for achieving the desired results and maintaining the tool’s accuracy over time. Neglecting sole flatness compromises the tool’s potential and increases the difficulty of achieving high-quality woodworking results.
3. Grain direction
In woodworking, understanding grain direction is paramount when employing manual tools. The interaction between the blade and the wood fibers dictates the quality of the cut and the ease of operation. Recognizing and adapting to the grain is essential for achieving smooth surfaces and avoiding tear-out.
- Avoiding Tear-Out
Planing against the grain causes the blade to lift wood fibers, resulting in a rough, splintered surface known as tear-out. This is particularly problematic with woods that have interlocked or highly figured grain. Identifying the grain direction and planing with it, rather than against it, significantly reduces the likelihood of this occurring.
- Achieving a Smooth Surface
When planing with the grain, the blade severs the wood fibers cleanly, resulting in a smooth and polished surface. This is essential for preparing wood for finishing, as it minimizes the need for sanding and ensures optimal adhesion of stains or coatings. A smooth surface also enhances the aesthetic appeal of the finished piece.
- Determining the Optimal Planing Direction
The direction is not always obvious, especially with boards that have complex grain patterns. Careful observation of the wood’s surface, including the orientation of pores and growth rings, is necessary. Sometimes, testing the direction by taking a small, cautious cut can reveal the grain direction without damaging the workpiece.
- Adjusting Technique Based on Grain
Even when planing with the general grain direction, variations within the wood may require adjustments. Slightly skewing the tool, reducing the depth of cut, or using a specialized tool with a higher cutting angle can help to mitigate tear-out in areas where the grain is particularly challenging. Adaptive technique is essential for optimal performance.
The ability to read and respond to wood grain is a fundamental skill for any woodworker using manual tools. It not only enhances the quality of the finished product but also promotes a deeper understanding of the material and its properties. A thorough understanding of grain direction is key to achieving exceptional results and minimizing waste.
4. Proper adjustment
Adjustment of manual tools is a prerequisite for their effective use. These tools are mechanisms reliant on precise settings to achieve desired outcomes in shaping and finishing wood. Improper adjustments render even the highest quality tool ineffective or, worse, capable of producing undesirable results.
- Blade Projection and Depth of Cut
The extent to which the blade projects beyond the sole dictates the amount of material removed with each pass. Too little projection results in minimal cutting action, while excessive projection increases the risk of chatter, tear-out, and difficult operation. Adjustment mechanisms, typically screws or levers, allow for fine-tuning of blade projection to match the wood type and desired finish. Experienced users adjust the depth based on the wood hardness and grain direction. For instance, a softer wood like pine requires less projection compared to a hardwood like maple.
- Mouth Opening and Chip Breaker Setting
The mouth opening, or the gap between the blade and the front of the sole, influences the tool’s ability to manage shavings. A narrow mouth reduces tear-out but can clog easily with thicker shavings. A wider mouth handles thicker shavings but increases the risk of tear-out. Similarly, the chip breaker, positioned closely behind the blade, curls shavings and prevents them from splitting the wood ahead of the cut. Its proximity to the blade is critical: too close, and it clogs; too far, and it loses its effectiveness. Optimal settings are crucial for different wood types and planing directions.
- Lateral Blade Alignment
Ensuring the blade is perfectly aligned with the sole is fundamental for achieving a consistent cutting width. Misalignment results in uneven material removal, with one side of the blade cutting more aggressively than the other. Lateral adjustment mechanisms, often screws located on the sides of the tool, allow for precise correction of blade alignment. This ensures that the cut is square and uniform across the entire width of the board.
- Frog Position and Stability
The frog, the angled bed that supports the blade, affects both cutting angle and overall stability. Adjusting the frog position alters the aggressiveness of the cut. A higher angle is suitable for difficult or figured woods, while a lower angle is better for softer woods. Furthermore, a securely mounted and stable frog is essential for preventing blade chatter and maintaining consistent cutting depth. Any looseness or movement in the frog compromises the tool’s accuracy and efficiency.
These adjustments are interrelated and influence each other’s effectiveness. Mastering these adjustments requires experience and a keen understanding of woodworking principles. Proper adjustment enhances the tool’s performance and unlocks its potential for achieving exceptional woodworking results.
5. Consistent technique
Effective use of these tools hinges upon developing and maintaining technique. The consistent application of fundamental principles ensures predictable results, minimizes errors, and promotes efficient material removal. Without a standardized approach, outcomes become erratic and project quality suffers.
- Stance and Body Positioning
A stable stance, with weight distributed evenly, provides a solid foundation for controlled movement. Proper body alignment allows for the use of larger muscle groups, reducing fatigue and promoting consistent pressure along the length of the cut. An unbalanced stance leads to jerky movements and inconsistent planing depth. For example, leaning too far forward can cause the tool to dig in at the beginning of each stroke, while leaning back can cause it to lift at the end.
- Stroke Length and Rhythm
Maintaining a consistent stroke length and rhythm ensures even material removal. A full stroke, utilizing the entire length of the blade, maximizes efficiency. A consistent rhythm allows for a smoother, more controlled cutting action. Abrupt changes in speed or pressure can result in uneven surfaces or chatter. For instance, pausing mid-stroke can create a visible dip in the wood.
- Grip and Pressure Application
A firm, yet relaxed grip allows for precise control of the tool. Applying consistent downward pressure, primarily over the toe (front) of the tool at the start of the stroke and shifting pressure towards the heel (rear) as the stroke progresses, ensures uniform cutting depth. Excessive pressure leads to difficulty controlling the tool, while insufficient pressure results in a shallow, ineffective cut. Imagine trying to plane a hard wood with a light grip the tool will likely skip and chatter.
- Overlap and Shaving Thickness
Overlapping each pass by approximately half the width of the blade ensures consistent material removal and eliminates ridges. Maintaining a consistent shaving thickness requires precise adjustment of the blade and consistent application of pressure. Varying the overlap or shaving thickness results in an uneven surface. For example, failing to overlap adjacent passes creates visible steps in the planed surface, requiring additional effort to correct.
By adhering to these principles, woodworkers can harness the full potential of these tools, achieving precise dimensions, smooth surfaces, and aesthetically pleasing results. Consistent technique transforms these tools from simple instruments into extensions of the craftsman’s skill, allowing for the creation of heirloom-quality work.
Frequently Asked Questions
The following addresses common inquiries regarding the selection, application, and maintenance of tools essential for shaping wood.
Question 1: What distinguishes different types, and when is each appropriate?
Various designs exist, each optimized for specific tasks. Smoothing are used for achieving a fine finish, while jack are versatile for general stock preparation. Block are suited for end-grain work, and jointers are designed for creating perfectly flat edges for joinery. Selecting the right type depends on the task at hand, the type of wood being worked, and the desired outcome.
Question 2: How does one properly sharpen the blade?
Sharpening requires a series of abrasive surfaces, typically beginning with a coarse stone to establish a primary bevel, followed by progressively finer stones to refine the edge. Honing, using a strop, further polishes the edge. Maintaining a consistent angle during each step is crucial for achieving a keen edge.
Question 3: What are the key indicators of a well-tuned tool?
A well-tuned tool exhibits a flat sole, a sharp and properly aligned blade, and smooth operation. The depth of cut should be easily adjustable, and the tool should not chatter or vibrate excessively during use.
Question 4: How does wood grain direction affect the planing process?
Planing against the grain causes tear-out, resulting in a rough surface. Always plane with the grain to sever the wood fibers cleanly and achieve a smooth finish. Identifying grain direction requires careful observation of the wood’s surface.
Question 5: What is the purpose of the chip breaker, and how should it be adjusted?
The chip breaker curls shavings ahead of the blade, preventing them from splitting the wood and causing tear-out. The chip breaker should be positioned close to the blade, typically within 1/32 inch, to maximize its effectiveness. Improper adjustment can lead to clogging or reduced performance.
Question 6: How can one prevent rust and maintain these tools for long-term use?
Regular cleaning and lubrication are essential for preventing rust. After use, wipe down the tool with a clean cloth and apply a light coat of oil or wax. Store the tool in a dry environment to minimize the risk of corrosion.
Proficient utilization of these tools requires careful attention to sharpening, tuning, grain direction, and technique. Consistent practice is essential for mastering these skills.
The subsequent section will address advanced techniques and specialized applications.
Conclusion
This exposition has underscored the fundamental role that hand planes for woodworking play in shaping and refining wood. Through exploring their various types, proper techniques, maintenance, and adjustments, the core principles governing their efficient and precise application have been illuminated. Essential aspects like blade sharpness, sole flatness, grain direction considerations, and the significance of consistent technique have been detailed to provide a thorough understanding.
The mastery of hand planes for woodworking demands dedication and an understanding of wood properties. Continued exploration and practice of these techniques will undoubtedly lead to improved craftsmanship and a deeper appreciation for the art of woodworking. These are instruments that reward diligence with both functionality and aesthetic achievement in woodworking projects.


