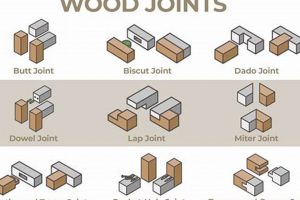
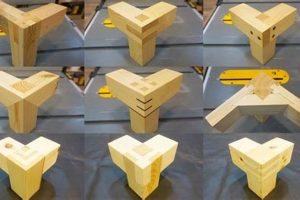
A continuous grain effect, achieved by meticulously crafting the edges of two adjoining wood pieces, creates the illusion of a seamless flow. This technique, predominantly applied to the corners of furniture such as tables and desks, visually extends the wood grain from one surface to the next, as if the material is cascading over an edge. For instance, a desktop crafted with this method might exhibit uninterrupted wood grain flowing from the horizontal surface down to the vertical leg.
The aesthetic appeal derived from a fluid grain transition elevates the perceived quality of the finished piece. This seamless effect demands precision and careful execution, resulting in a high-end look. Historically, similar techniques, though perhaps employing different methods, have been utilized to enhance the visual harmony of woodworking projects. The contemporary application provides a refined solution for achieving continuous wood grain.
The remainder of this article will address the processes involved in producing the continuous grain illusion, material selection considerations, suitable adhesives, clamping strategies, and finishing techniques crucial for a successful outcome. The discussion will also include potential challenges and recommended best practices to mitigate common issues.
Considerations for Executing a Continuous Grain Effect
Achieving a visually seamless transition requires meticulous planning and execution. The following guidelines provide a foundation for successful implementation of this advanced woodworking technique.
Tip 1: Grain Selection: Careful matching of wood grain between adjoining pieces is paramount. Prior to any cutting, examine the material to identify sections where the grain patterns align. Proper alignment before cutting ensures a cohesive appearance in the final product.
Tip 2: Miter Accuracy: Precision in miter cuts is non-negotiable. Employ a high-quality saw, calibrated for accuracy, to achieve precisely angled surfaces. Inaccurate miters compromise the visual flow and introduce unsightly gaps.
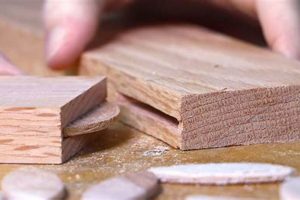
Tip 3: Reinforcement Strategy: While adhesives provide initial bonding, mechanical reinforcement is advisable. Options include splines, dowels, or biscuits, strategically placed to enhance joint strength. Reinforcement minimizes the risk of separation under stress.
Tip 4: Dry Fit Verification: Before applying any adhesive, conduct a thorough dry fit. This allows for identification and correction of any discrepancies in alignment or fit. Adjustments made during the dry fit stage prevent potential complications during the gluing process.
Tip 5: Clamping Pressure: Even and consistent clamping pressure is essential for a strong bond. Utilize an adequate number of clamps, strategically positioned to distribute force uniformly across the joint. Insufficient or uneven clamping can result in weak points and visible gaps.
Tip 6: Adhesive Selection: Choose an adhesive formulated for woodworking applications. Consider factors such as open time, cure time, and strength. Epoxy resins offer superior strength and gap-filling capabilities, while traditional wood glues may be suitable for tighter-fitting joints.
Tip 7: Surface Preparation: Ensure that surfaces to be joined are clean, dry, and free from contaminants. Lightly sanding the joining surfaces with fine-grit sandpaper can improve adhesive bond strength. Proper preparation maximizes the effectiveness of the adhesive.
These considerations aim to optimize the structural integrity and visual appeal of the joint. Precise execution of each step is critical for achieving a high-quality result.
The subsequent section will delve into advanced techniques for achieving the desired aesthetic and functional outcomes.
1. Grain Matching
Grain matching is a foundational element in achieving a visually seamless cascade effect in woodworking. The success of the continuous grain illusion is directly proportional to the precision and care applied to grain selection and alignment.
- Sequential Board Selection
The most effective method involves selecting adjacent boards from the same parent stock. This ensures a high degree of similarity in grain pattern, color, and figure. Employing boards cut sequentially minimizes visual discontinuities across the joint, contributing to a cohesive aesthetic. Consider a slab of walnut sawn into four boards: using boards 1 and 2 will yield better grain matching than using 1 and 4.
- Orientation Awareness
Understanding wood grain direction is crucial. The annual growth rings must align congruently across the joint to maintain the illusion of continuity. Reversing grain direction creates a jarring visual break that detracts from the intended effect. This is particularly important when dealing with figured wood, like curly maple, where reversing the grain changes the way light reflects off the surface, resulting in differing color and texture.
- Figured Wood Considerations
When working with highly figured woods, such as burl or quilted maple, achieving perfect grain matching is often impractical. In such cases, the goal shifts to creating a balanced and harmonious transition, even if exact replication is unattainable. Emphasis should be placed on matching the dominant characteristics of the figure to create visual coherence, rather than absolute symmetry.
- Mitigation Strategies for Imperfect Matches
In situations where perfect grain matching is not feasible, techniques such as dye or stain blending can be employed to minimize visual discrepancies. Careful application of colorants can help to unify disparate grain patterns and reduce the prominence of the joint line. However, this requires a skilled hand and a thorough understanding of color theory and wood finishing techniques.
The degree to which these facets are addressed directly impacts the perceived quality and aesthetic value of the finished piece. Strategic grain matching elevates the joint from a mere structural connection to an integral design element, enhancing the overall visual appeal of the completed project. Attention to these details significantly contributes to the artistry of “waterfall joint woodworking”.
2. Miter Accuracy
Miter accuracy serves as a cornerstone in the successful execution of continuous grain joints. The angular cut, typically 45 degrees for a 90-degree corner, directly dictates the seamlessness of the transition. Any deviation from the intended angle introduces a visible discontinuity in the grain pattern, undermining the fundamental aesthetic principle of the “waterfall joint woodworking” technique. A discrepancy of even a single degree can manifest as a noticeable gap or misalignment, thereby negating the illusion of a continuous flow. For example, a table leg intended to present an unbroken grain from the tabletop downwards will appear fragmented if the miter angles are not precisely matched.
The accuracy of miter cuts relies on multiple factors, including the precision of the cutting tool, the stability of the workpiece during the cut, and the skill of the craftsman. A high-quality miter saw, meticulously calibrated, is essential for achieving consistent and accurate angles. Furthermore, proper clamping and support mechanisms must be employed to prevent movement or vibration during the cutting process. Consider the construction of a waterfall edge on a cabinet; even a slight wobble in the miter saw during the cut can cause a rounding of the mitered edge, hindering perfect closure. The practical significance is that without precise miter cuts, the effort invested in grain matching and reinforcement becomes futile.
In summary, miter accuracy is not merely a procedural step but a prerequisite for achieving the desired visual effect in the continuous grain technique. The challenges associated with achieving precise angles highlight the necessity for meticulous tool calibration and the application of proper woodworking practices. The integration of accurate miter cuts ultimately determines the success of this joint, linking directly to the pursuit of seamless aesthetics in woodworking.
3. Joint Reinforcement
Joint reinforcement serves as a critical component of structural integrity within “waterfall joint woodworking”. The inherent nature of mitered corners, essential for achieving the continuous grain effect, creates a mechanically weaker joint compared to traditional butt or rabbet joints. The acute angle of the miter reduces the gluing surface area, resulting in a bond that is more susceptible to failure under stress. Consequently, relying solely on adhesive is generally insufficient for long-term stability, particularly in load-bearing applications. Consider, for example, a waterfall desk where the leg joins the desktop. Without reinforcement, the weight applied to the desktop can easily stress the mitered joint, leading to separation and eventual failure.
Several methods exist to augment the strength of mitered joints in continuous grain designs. Options include the use of splines, biscuits, dowels, or even metal fasteners. Splines, thin strips of wood inserted into grooves cut into both mitered surfaces, significantly increase the gluing surface area and provide substantial mechanical interlocking. Similarly, biscuits and dowels offer localized reinforcement, resisting shear forces that can compromise the adhesive bond. In heavy-duty applications, metal fasteners, such as screws or brackets, can provide additional support, albeit potentially at the expense of aesthetic purity. A cabinet with waterfall construction may employ splines or biscuits within the miter joint to enhance structural integrity while preserving the external appearance of continuous grain.
In conclusion, while the continuous grain joint provides a visually appealing aesthetic, its inherent weakness necessitates robust reinforcement strategies. Selection of the appropriate reinforcement method depends on factors such as the intended application, load-bearing requirements, and desired aesthetic outcome. Integrating reinforcement measures ensures the longevity and structural stability of the finished piece, safeguarding the visual appeal of “waterfall joint woodworking” from being compromised by joint failure. Achieving a balance between visual harmony and structural soundness is the hallmark of masterful woodworking.
4. Clamping Pressure
Effective clamping pressure serves as a critical determinant in the successful execution of continuous grain joints. Inadequate or uneven clamping directly compromises the integrity and aesthetic appeal of “waterfall joint woodworking”. The purpose of clamping is to ensure intimate contact between the two mitered surfaces while the adhesive cures. Insufficient pressure results in gaps within the joint line, negating the seamless visual transition central to this technique. Conversely, excessive clamping pressure can starve the joint of adhesive, leading to a weak bond and potential failure over time. For instance, constructing a waterfall edge on a countertop requires carefully calibrated clamping force to avoid squeezing out all the glue from the miter joint, which weakens it. The resultant joint then becomes prone to separation, especially under stress or environmental changes.
The distribution of clamping pressure also plays a significant role. The application of force must be uniform across the entire mitered surface to prevent localized areas of weakness. Uneven clamping concentrates stress in certain areas, potentially leading to distortions or bond failures. Strategies for achieving even distribution include employing cauls, which are rigid boards placed between the clamps and the workpiece, to spread the clamping force. Consider assembling a waterfall leg on a table: applying clamps only at the top and bottom of the miter will create a pivot point in the middle, resulting in weak glue adhesion along that section. Proper caul usage and strategic clamp placement are essential for ensuring consistent compression across the entire joint surface, contributing to a stronger and more visually appealing result.
In conclusion, clamping pressure represents a critical variable within the parameters of “waterfall joint woodworking”. Its proper application directly impacts both the structural integrity and aesthetic quality of the finished product. Successful outcomes depend on achieving a balance between sufficient force to ensure intimate contact and avoiding excessive pressure that compromises adhesive integrity. The use of cauls and careful clamp placement helps ensure even distribution, minimizing the risk of joint failure. The practical understanding and skillful application of clamping pressure are indispensable skills for achieving professional-level results in continuous grain joint construction, where achieving both visual seamlessness and structural robustness are paramount.
5. Adhesive Selection
The selection of an appropriate adhesive is paramount to the success and longevity of a “waterfall joint woodworking” project. Due to the nature of mitered joints and the emphasis on achieving a seamless visual transition, adhesive choice directly impacts both the structural integrity and aesthetic quality of the final piece. Incorrect adhesive selection can lead to joint failure, visible glue lines, or inconsistencies in the finished surface.
- Viscosity and Open Time
The viscosity of the adhesive, or its resistance to flow, affects its ability to penetrate the wood fibers and create a strong bond. A thicker adhesive may be preferable for gap-filling, but can also be more challenging to apply evenly. Open time, the period during which the adhesive remains workable, dictates the time available for alignment and clamping. A longer open time can be advantageous for complex assemblies, while a shorter open time may be necessary for faster production. In “waterfall joint woodworking,” where precise alignment is crucial, an adhesive with a moderate open time that allows for adjustments without premature setting is often ideal. For example, assembling a large waterfall table requires enough open time to position and clamp all components accurately.
- Bond Strength and Durability
The ultimate strength of the adhesive bond is a critical factor, particularly given the potential stress concentrated at mitered corners. Adhesives with higher bond strength, such as epoxy resins or polyurethane glues, are often favored for load-bearing applications or projects subject to significant stress. Durability, encompassing resistance to moisture, temperature fluctuations, and other environmental factors, also influences adhesive selection. Exterior projects, or those exposed to humidity, necessitate adhesives formulated for such conditions. In “waterfall joint woodworking,” a strong and durable bond is essential to prevent joint separation, especially when the piece is intended for heavy use or exposure to fluctuating environmental conditions.
- Color and Transparency
The color and transparency of the cured adhesive can impact the visual appearance of the joint line. In “waterfall joint woodworking,” where the goal is to create a seamless transition, adhesives that dry clear or blend well with the wood species are often preferred. Opaque or dark-colored adhesives can create visible glue lines, detracting from the intended aesthetic. Some adhesives can also be tinted with wood dust to better match the surrounding material. Consider a waterfall joint in a light-colored wood like maple. A dark adhesive would create a stark and unsightly glue line, compromising the desired seamless look.
- Clamping Requirements
Different adhesives necessitate varying clamping pressures and durations to achieve optimal bond strength. Some adhesives, such as cyanoacrylate (super glue), require minimal clamping, while others, like polyvinyl acetate (PVA) wood glue, benefit from substantial clamping pressure. Exceeding the recommended clamping pressure can starve the joint of adhesive, while insufficient pressure results in a weaker bond. The clamping requirements of the adhesive should be considered in conjunction with the overall assembly process and the available clamping resources. For a “waterfall joint woodworking” project, choosing an adhesive with manageable clamping requirements ensures a strong and visually appealing joint.
The interplay of viscosity, bond strength, color, and clamping requirements dictates the suitability of an adhesive for “waterfall joint woodworking”. Careful consideration of these factors is essential to achieve a strong, durable, and visually seamless joint that complements the overall aesthetic of the finished piece. A thorough understanding of adhesive properties, coupled with meticulous application techniques, will yield the best results. Proper adhesive selection, therefore, represents a pivotal step in achieving successful and long-lasting “waterfall joint woodworking”.
Frequently Asked Questions
The following section addresses common inquiries regarding the principles, techniques, and challenges associated with continuous grain joints.
Question 1: What defines a successful application of “waterfall joint woodworking”?
A successful application is characterized by a seamless visual transition of the wood grain across the joint, combined with a structurally sound bond capable of withstanding anticipated stresses. The absence of visible glue lines or gaps, coupled with a joint that does not exhibit weakness under load, signifies a well-executed continuous grain detail.
Question 2: Is specialized equipment required for creating this joint?
While not strictly necessary, precision-oriented tools significantly enhance the quality and efficiency of the process. A high-quality miter saw, calibrated for accurate angle cuts, is highly recommended. Furthermore, clamping systems capable of applying even pressure across the joint surface are beneficial for achieving optimal adhesive bonding.
Question 3: What wood species are best suited for “waterfall joint woodworking”?
Wood species with pronounced grain patterns, such as walnut, cherry, or figured maple, are particularly well-suited for showcasing the continuous grain effect. However, any wood species can be employed, provided that careful attention is paid to grain matching and alignment during the cutting and assembly process.
Question 4: What are the most common causes of failure in continuous grain joints?
Common causes include inaccurate miter cuts, insufficient adhesive application, inadequate clamping pressure, and a lack of joint reinforcement. These factors can lead to weak bonds, visible gaps, and eventual joint separation under stress.
Question 5: How is joint reinforcement best incorporated into “waterfall joint woodworking”?
Reinforcement methods, such as splines, dowels, or biscuits, should be integrated strategically to maximize structural integrity without compromising the visual aesthetic. Placement of these reinforcement elements should be planned to resist anticipated stress vectors, while remaining concealed within the joint.
Question 6: How can visible glue lines be minimized in continuous grain joints?
Minimizing glue lines involves selecting an adhesive that dries clear or closely matches the color of the wood. Additionally, careful adhesive application, avoiding excessive squeeze-out, and meticulous cleanup of any residual adhesive prior to curing can further reduce the visibility of the joint line.
Successful execution of a continuous grain joint demands precision, attention to detail, and a thorough understanding of woodworking principles. Addressing these frequently asked questions helps mitigate potential challenges and enhances the likelihood of achieving a visually appealing and structurally sound result.
The subsequent section will delve into advanced techniques and troubleshooting tips for refining your continuous grain woodworking skills.
Conclusion
This exploration has detailed the nuances of achieving a continuous grain effect in woodworking. Key aspects reviewed encompass grain matching, miter accuracy, joint reinforcement strategies, clamping pressure control, and appropriate adhesive selection. The integration of these elements is crucial for achieving both visual appeal and structural integrity in this technique.
Mastering the principles of “waterfall joint woodworking” requires diligence and precision. Continued refinement of technique and a commitment to quality materials will yield superior results. The pursuit of seamless aesthetics in woodworking demands a dedication to craftsmanship, where careful execution transforms a mere joint into a statement of artistry.


