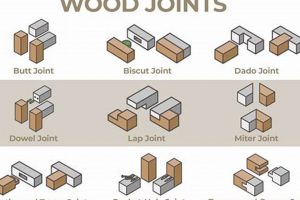
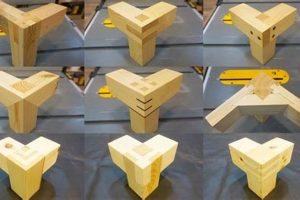
A joint created when two pieces of wood are joined at a 90-degree angle, with each piece being cut at a 45-degree angle, forming a corner. This technique provides a clean, aesthetically pleasing appearance where the end grain is concealed. Picture a picture frame or a corner of a box; often these are constructed using this type of connection.
The use of this angled connection offers enhanced structural integrity compared to butt joints because of the increased surface area for gluing. It also allows for a seamless visual transition, making it suitable for applications where appearance is paramount. Historically, the creation of this particular connection showcases a woodworker’s skill, requiring precision in both cutting and assembly.
The subsequent sections will delve into the various methods for producing this connection, the tools required, and techniques for achieving accurate and strong results. We will also explore common challenges encountered during its creation and provide solutions for overcoming these obstacles.
Tips for Creating a Precise Mitered Corner
Achieving accurate and strong mitered corners requires careful planning and execution. The following tips will improve the quality and durability of this connection.
Tip 1: Precise Angle Measurement: Ensure that each piece is cut at precisely 45 degrees. Utilize a high-quality protractor or a digital angle finder to verify the accuracy of the miter saw or hand tools.
Tip 2: Sharp Cutting Tools: Employ sharp saw blades or chisels to minimize tear-out and ensure clean, crisp edges. Dull tools can lead to inaccurate cuts and weakened joints.
Tip 3: Test Cuts on Scrap Wood: Before cutting the final pieces, make test cuts on scrap wood of the same thickness. This allows for fine-tuning the angle and ensuring a perfect fit.
Tip 4: Secure Workpiece Clamping: Securely clamp the workpiece to prevent movement during the cutting process. Movement can result in inaccurate cuts and potential injury.
Tip 5: Dry Fit Before Gluing: Assemble the pieces without glue to check for gaps or misalignments. Adjustments can be made more easily before adhesive is applied.
Tip 6: Consistent Glue Application: Apply an even and adequate amount of glue to both surfaces of the joint. Insufficient glue will weaken the bond, while excessive glue can create a messy cleanup.
Tip 7: Proper Clamping Pressure: Use clamps to apply even pressure to the joint while the glue dries. Avoid over-tightening, which can distort the wood or squeeze out too much glue.
Tip 8: Reinforcement Techniques: Consider reinforcing the joint with splines, biscuits, or dowels for increased strength, especially in load-bearing applications.
By following these guidelines, a strong and visually appealing mitered corner can be consistently achieved. Attention to detail and precision are paramount for success.
The subsequent section will discuss common issues encountered during the creation of mitered corners and provide practical solutions for resolving them.
1. Accuracy
In the context of a woodworking 45 degree joint, accuracy is not merely a desirable attribute but a fundamental requirement for success. Deviations from the precise 45-degree angle on either piece of the joint directly translate into visible gaps, misalignments, and a weakened structural bond. The effect is a reduction in both the aesthetic appeal and the functional integrity of the finished item. For example, in the construction of a picture frame, even a slight inaccuracy in the mitered corners results in a frame that is not square, compromising the overall presentation. Similarly, in a box or cabinet, inaccuracies can lead to uneven seams and a failure to properly contain the contents.
The importance of accuracy extends beyond visual imperfections. A poorly executed mitered corner provides a reduced surface area for adhesive bonding. This diminished bonding surface compromises the strength of the joint, making it more susceptible to failure under stress or impact. Consider the case of a table with mitered corners; if the angles are not accurate, the table legs may not be securely attached, leading to instability and potential collapse. The selection of appropriate measuring tools, the calibration of cutting equipment, and the implementation of precise cutting techniques are all essential components in achieving the required level of accuracy.
Ultimately, the pursuit of accuracy in the creation of a woodworking 45 degree joint represents a commitment to quality and craftsmanship. While challenges such as material variations and tool limitations may arise, a focus on precise measurement, careful execution, and diligent inspection will yield a joint that is both aesthetically pleasing and structurally sound. This foundational understanding of accuracy’s pivotal role sets the stage for exploring other critical aspects of this woodworking technique, such as joint reinforcement and adhesive selection.
2. Strength
The strength of a woodworking 45 degree joint is paramount to its utility and longevity. While the joint offers aesthetic advantages, its inherent structural characteristics necessitate careful consideration of factors influencing its durability.
- Surface Area for Adhesion
The primary determinant of the connection’s strength lies in the surface area available for adhesive bonding. Compared to a butt joint, the angled cuts inherently increase the bonding area. However, this advantage is only realized with precise cuts that minimize gaps and ensure full contact between the surfaces. Even slight imperfections can drastically reduce the effective bonding area, compromising the joint’s resistance to tensile and shear forces.
- Wood Grain Orientation
The orientation of the wood grain plays a crucial role. In a 45-degree joint, the grain direction is angled, which can create weakness, especially if the joint is subjected to bending forces. Reinforcement techniques, such as splines or biscuits, are often employed to counteract this weakness by providing additional support perpendicular to the grain, thereby increasing the joint’s overall strength and resistance to stress.
- Adhesive Selection
The type of adhesive used is a critical factor. Different adhesives possess varying strengths and suitability for specific wood species and environmental conditions. Polyurethane and epoxy adhesives are generally preferred for their superior bonding strength and water resistance, particularly in joints exposed to moisture or stress. Careful selection and application, ensuring complete coverage and proper clamping pressure, are essential for maximizing the adhesive’s effectiveness.
- Mechanical Reinforcement
Mechanical reinforcement methods, such as the use of nails, screws, or dowels, can significantly augment the joint’s strength. These elements provide additional support and prevent the joint from separating under stress. The placement and type of fasteners must be carefully considered to avoid splitting the wood or compromising the aesthetic appeal of the finished piece. The effectiveness of mechanical reinforcement is contingent upon proper installation techniques and the use of appropriate materials.
In summation, the strength of the joint is a multifaceted property dependent on the interplay between surface preparation, wood grain characteristics, adhesive selection, and reinforcement strategies. Optimizing these factors is essential for constructing durable and reliable woodworking projects that utilize this type of connection.
3. Aesthetics
The woodworking 45 degree joint, beyond its structural function, possesses significant aesthetic value. The clean, mitered corner created by this technique offers a visually appealing alternative to exposed end grain, contributing to a refined and professional appearance. The concealment of end grain is often desirable in woodworking projects where visual harmony and a seamless transition between surfaces are prioritized.
The aesthetic impact of a well-executed 45-degree joint is evident in various applications. Picture frames, for instance, rely heavily on this type of connection to create a visually cohesive border around artwork. The precision of the joint directly affects the perceived quality of the frame. Similarly, in cabinet making, mitered corners on drawer fronts or door frames contribute to a sense of elegance and sophistication. In furniture construction, the smooth, continuous lines achieved with this method can elevate the overall design and enhance the piece’s visual appeal. Successful use of this joint communicates attention to detail and elevates perceived value.
In conclusion, the aesthetic component of a 45-degree woodworking joint is integral to its value, influencing both the visual harmony and perceived quality of finished pieces. While mastering the technique presents certain challenges, such as achieving precise angles and ensuring structural integrity, the resulting enhancement of visual appeal justifies the effort. Understanding and appreciating the aesthetic impact of this connection is essential for woodworkers seeking to create refined and visually appealing products.
4. Tools
The creation of a precise woodworking 45 degree joint is inherently reliant on the appropriate selection and utilization of tools. The accuracy, efficiency, and ultimately, the success of this woodworking technique are directly influenced by the quality and suitability of the implements employed. A comprehensive understanding of the tools available and their specific applications is therefore crucial.
- Miter Saw
The miter saw is a power tool specifically designed for making accurate crosscuts and miter cuts. It offers a high degree of precision and efficiency, especially when cutting multiple pieces at the same angle. A sliding compound miter saw provides additional versatility, allowing for bevel cuts and wider boards to be processed. Its accuracy is dependent on proper calibration and a sharp blade. In the context of a woodworking 45 degree joint, a miter saw streamlines the process and increases consistency, particularly in repetitive tasks such as frame making.
- Hand Saw and Miter Box
A hand saw and miter box offer a more traditional approach to creating angled cuts. The miter box provides a guide for the saw, ensuring the cut is made at the desired angle. While requiring more manual effort and skill than a power saw, this method allows for greater control and is suitable for smaller projects or intricate cuts. This combination provides a portable and versatile solution, particularly useful when working on-site or in situations where power tools are not readily available. Its success depends on the sharpness of the saw and the stability of the miter box.
- Chisels
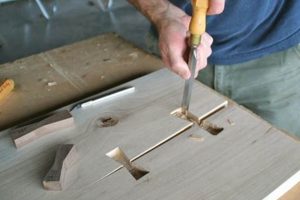
Chisels are essential for fine-tuning the fit of the joint. Even with precise cutting techniques, minor imperfections may occur. Chisels enable the woodworker to remove small amounts of material to achieve a perfect alignment. They are also useful for cleaning up the edges of the cut and ensuring a smooth, seamless transition between the two pieces of wood. The sharpness and quality of the chisel are critical for precise work. A honing guide assists in maintaining the correct bevel angle, crucial for effective and controlled material removal.
- Measuring and Marking Tools
Accurate measuring and marking tools, such as a precision square, a protractor, and a marking gauge, are fundamental for ensuring that the initial cuts are made at the correct angles. A high-quality protractor allows for precise angle measurements, while a marking gauge ensures consistent lines for cutting. A combination square verifies the squareness of the joint after assembly. These tools provide a baseline for accuracy and are indispensable for achieving a well-fitted woodworking 45 degree joint. They prevent errors and minimize the need for corrective measures.
In conclusion, the realization of a structurally sound and visually appealing woodworking 45 degree joint is inextricably linked to the proper selection, maintenance, and skillful application of various tools. From initial angle measurement and cutting to final fit adjustments, each tool plays a specific and vital role in the process. The effective integration of these tools and techniques enables the woodworker to create joinery that is both functional and aesthetically pleasing.
5. Technique
The successful execution of a woodworking 45 degree joint is fundamentally dependent on the application of sound technique. Technique, in this context, encompasses the specific methods, procedures, and skills employed throughout the entire process, from initial measurement and cutting to final assembly and finishing. A deficiency in any aspect of technique directly contributes to inaccuracies, weakened joints, and a compromised aesthetic outcome. Consider, for example, the impact of an inconsistent sawing motion. If the saw is not held at a constant angle or pressure is unevenly applied, the resulting cut will deviate from the precise 45-degree requirement. This deviation, in turn, produces gaps within the assembled joint, undermining its structural integrity and visual appeal.
A critical element of technique involves precise measurement and marking. The use of high-quality measuring tools is essential, but equally important is the ability to accurately transfer those measurements to the workpiece. A fine-tipped marking knife, for instance, creates a more defined and precise line than a pencil, minimizing the potential for errors during the cutting process. Furthermore, clamping techniques significantly influence the outcome. Inadequate clamping pressure can lead to joint slippage during glue-up, resulting in misalignment. Conversely, excessive clamping pressure can squeeze out too much adhesive, weakening the bond. Proper clamping technique entails the application of even pressure across the entire joint surface, ensuring optimal glue distribution and alignment. As an example, using cauls, which are pieces of wood placed between the clamps and the workpiece, distributes pressure more evenly, preventing indentations or distortions.
In conclusion, while tools and materials play a significant role, the mastery of specific techniques is the cornerstone of a high-quality woodworking 45 degree joint. Accurate measurement, precise cutting, and controlled assembly are essential for both structural soundness and aesthetic appeal. By meticulously refining these techniques, woodworkers can consistently achieve superior results, transforming raw materials into precisely crafted and visually pleasing components. The emphasis on technique acknowledges that tools are merely extensions of the woodworker’s skill and that the quality of the finished product ultimately reflects the precision and expertise employed throughout the process.
6. Adhesive
Adhesive plays a critical role in the structural integrity of a woodworking 45 degree joint. Given the inherent geometry of this type of connection, where two pieces of wood meet at an angle to form a corner, the adhesive is often the sole element holding the joint together. Unlike joints with mechanical fasteners, which may provide some level of retention independently, the mitered joint depends almost exclusively on the adhesive bond to resist separation and maintain structural stability. For example, consider a picture frame constructed with mitered corners. If the adhesive fails, the frame will separate at the corners, compromising its functionality and aesthetic appeal. In this scenario, the adhesive acts as the primary load-bearing component, distributing stress across the entire joint surface.
The selection of an appropriate adhesive is therefore paramount. Factors to consider include the type of wood being joined, the intended use of the finished piece, and environmental conditions. Polyvinyl acetate (PVA) glues, commonly referred to as wood glues, are frequently used for interior applications due to their ease of use and relatively strong bond. However, for exterior applications or situations where moisture resistance is critical, polyurethane adhesives or epoxy resins offer superior performance. Surface preparation also significantly affects adhesive performance. Clean, smooth surfaces allow for optimal contact and adhesion. The application of adhesive should be uniform and sufficient to ensure complete coverage of the mating surfaces. Clamping pressure is then applied to compress the joint, forcing the adhesive into the wood pores and maximizing the bonding surface area. Insufficient clamping or uneven pressure can result in weak spots and premature failure.
In summary, adhesive is an indispensable element of a robust woodworking 45 degree joint. Its proper selection, application, and the implementation of appropriate clamping techniques are fundamental to achieving a durable and aesthetically pleasing result. The bond that results from the wood-to-wood contact provides an enduring result. Understanding the significance of adhesive in this context is crucial for woodworkers aiming to produce high-quality, long-lasting projects.
7. Reinforcement
Reinforcement, when applied to a woodworking 45 degree joint, directly addresses inherent structural weaknesses stemming from the angled nature of the connection. The mitered joint, while visually appealing, relies primarily on adhesive for its strength, rendering it susceptible to failure under stress or impact. Reinforcement techniques augment the adhesive bond, providing additional support and distributing force more evenly across the joint, thereby increasing its overall durability. Failure to implement adequate reinforcement can result in joint separation, particularly in applications subject to load-bearing or frequent use. For instance, a mitered corner on a heavily used table leg, lacking reinforcement, is prone to weakening and eventual detachment.
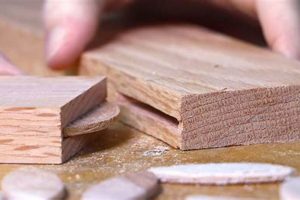
Common reinforcement methods include the use of splines, biscuits, and dowels. Splines involve inserting a thin piece of wood into a groove cut across the joint, effectively increasing the surface area for adhesion and providing mechanical interlocking. Biscuits, small oval-shaped pieces of compressed wood, serve a similar purpose, expanding upon contact with adhesive to create a tight, strong bond. Dowels, cylindrical wooden pegs inserted into pre-drilled holes, offer a robust form of reinforcement, particularly effective in resisting shear forces. The choice of reinforcement technique depends on the specific application, the size of the joint, and the desired aesthetic outcome. Each technique offers a unique combination of strength enhancement and visual integration, allowing for tailored solutions that address both structural and design considerations.
In summary, reinforcement is a critical component in maximizing the longevity and reliability of a woodworking 45 degree joint. By supplementing the adhesive bond with mechanical elements, reinforcement mitigates the inherent weaknesses of the mitered connection, ensuring its capacity to withstand stress and maintain structural integrity over time. The selection of appropriate reinforcement techniques, carefully tailored to the specific requirements of each project, is essential for achieving lasting and visually appealing results. The understanding of reinforcement principles directly translates into the production of higher quality, more durable woodworking projects.
Frequently Asked Questions About Woodworking 45 Degree Joints
This section addresses common inquiries and clarifies misconceptions surrounding the creation and application of woodworking 45 degree joints, providing concise and authoritative answers.
Question 1: What is the primary advantage of utilizing a woodworking 45 degree joint compared to a butt joint?
The primary advantage resides in the increased surface area available for adhesive bonding. This expanded area contributes to a significantly stronger and more durable connection, particularly when subjected to tensile or shear forces.
Question 2: How critical is precision in the execution of a woodworking 45 degree joint?
Precision is paramount. Any deviation from the precise 45-degree angle will result in visible gaps, misalignment, and a weakened joint. Accurate cuts are essential for both structural integrity and aesthetic appeal.
Question 3: What types of adhesives are most suitable for creating a woodworking 45 degree joint?
Polyurethane and epoxy adhesives are generally preferred due to their superior bonding strength and water resistance. However, polyvinyl acetate (PVA) glues are acceptable for interior applications where moisture exposure is minimal.
Question 4: Is reinforcement always necessary when constructing a woodworking 45 degree joint?
While not always strictly necessary, reinforcement is highly recommended, especially in load-bearing applications or situations where the joint is likely to experience stress. Splines, biscuits, or dowels significantly enhance the joint’s strength and longevity.
Question 5: What tools are essential for creating accurate woodworking 45 degree joints?
A miter saw, hand saw with miter box, chisels, precision square, protractor, and marking gauge are essential. The specific tools utilized will depend on the size and complexity of the project, but accuracy in measurement and cutting is crucial.
Question 6: How does wood grain orientation impact the strength of a woodworking 45 degree joint?
The angled grain orientation can inherently weaken the joint’s resistance to bending forces. Reinforcement techniques, such as splines placed perpendicular to the grain, are employed to counteract this weakness and enhance overall strength.
In conclusion, woodworking 45 degree joints demand careful attention to detail, precise execution, and the strategic application of adhesives and reinforcement techniques. A thorough understanding of these principles is crucial for achieving both structural integrity and aesthetic appeal.
The subsequent section will delve into common troubleshooting scenarios and provide solutions for resolving typical challenges encountered during the creation of a woodworking 45 degree joint.
Conclusion
The preceding sections have explored the multifaceted aspects of the woodworking 45 degree joint, emphasizing the interplay between precision, strength, aesthetics, and technique. Accuracy in angle cutting, appropriate adhesive selection, and strategic reinforcement were identified as critical factors influencing the success of this connection. The selection and proper utilization of tools, alongside a thorough understanding of wood grain orientation, further contribute to the creation of durable and visually appealing mitered corners.
The woodworking 45 degree joint, when executed with diligence and expertise, represents a pinnacle of craftsmanship. Its successful implementation elevates the quality and longevity of woodworking projects, underscoring the significance of mastering this essential joinery technique. Continuous refinement of skills and a commitment to precision remain paramount for woodworkers seeking to achieve consistently superior results in their craft.


