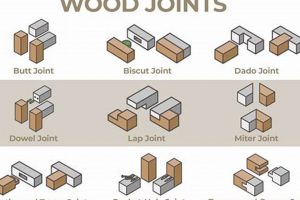
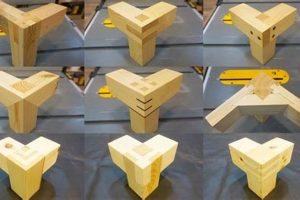
A technique employed in carpentry and furniture making, this method involves joining two pieces of material at an angle to create a corner. Typically, both pieces are cut at equal angles, resulting in a corner that is twice the cut angle. A common example is creating a 90-degree corner, where each piece is cut at a 45-degree angle.
This approach provides aesthetically pleasing and structurally sound corners. It conceals the end grain of the material, offering a clean and professional appearance. Historically, this method has been used to construct frames, boxes, and other joinery where precision and visual appeal are paramount. Its strength comes from the glue surface area, especially when reinforced with fasteners.
The subsequent sections will delve into the tools and techniques required for achieving accurate and durable results, along with considerations for different types of wood and joint reinforcement strategies.
Essential Guidance for Precise Angled Joinery
Achieving precise and robust angled corners in woodworking requires careful attention to detail. The following tips offer critical guidance for minimizing errors and maximizing the longevity of these joints.
Tip 1: Accurate Measurement is Paramount: Prior to any cutting, meticulous measurement of the materials is crucial. Discrepancies, however small, will compound at the corner, leading to gaps and weakened structures. Utilize precision measuring tools and double-check all dimensions.
Tip 2: Sharp Blades are Non-Negotiable: A dull blade will tear the wood fibers rather than cleanly severing them. This results in splintering along the cut line, making perfect alignment difficult. Ensure blades are regularly sharpened or replaced to maintain optimal performance.
Tip 3: Employ a Miter Saw with a Fine-Tooth Blade: While hand tools can be used, a power miter saw offers superior accuracy and repeatability. A fine-tooth blade minimizes tear-out, contributing to a cleaner, more precise cut.
Tip 4: Utilize a Miter Gauge or Angle Finder: Achieving the correct angle is critical for a seamless joint. A miter gauge attached to a table saw or an angle finder can assist in setting the precise angle needed for each piece.
Tip 5: Dry-Fit Before Gluing: Always dry-fit the pieces together before applying any adhesive. This allows for identifying and correcting any minor discrepancies in the cut angles. Make adjustments as necessary before proceeding.
Tip 6: Apply Glue Evenly and Clamping is Essential: A thin, even layer of wood glue should be applied to both surfaces. Use clamps to apply even pressure across the joint while the glue dries. Ensure the pieces are properly aligned during clamping.
Tip 7: Reinforce the Joint for Added Strength: While glue provides a strong bond, reinforcing the joint with mechanical fasteners like brad nails, dowels, or splines will further enhance its durability. Consider the aesthetic impact of the reinforcement method.
Following these guidelines will greatly increase the probability of creating strong, visually appealing angled joints in various woodworking projects.
The subsequent section will cover common problems encountered in creating such corners, and strategies to remedy them.
1. Accuracy
In woodworking, achieving precise angled joints is fundamentally reliant on accuracy. Any deviation from the intended angle, however minuscule, is magnified at the joint, leading to visible gaps, structural instability, and a diminished aesthetic quality. For instance, when constructing a picture frame, even a half-degree error on each cut will result in a noticeable misalignment at the corners, creating an unprofessional and structurally unsound finished product. Accuracy, therefore, functions as the cornerstone upon which successful angled joinery is built. It directly impacts the fit, strength, and overall appearance of the completed piece.
The pursuit of accuracy necessitates the use of calibrated measuring tools, properly tuned machinery, and a meticulous approach to the cutting process. A digital angle finder, for example, provides a more precise angle measurement compared to traditional protractors. Likewise, a miter saw with a precise fence and a sharp blade minimizes tear-out and ensures clean, consistent cuts. In practical applications, this means carefully checking the calibration of the saw before each use and employing techniques such as test cuts on scrap material to verify the angle before committing to the final piece.
Ultimately, understanding the critical relationship between accuracy and angled joints underscores the importance of precision in every stage of the woodworking process. While minor imperfections may be acceptable in some joinery methods, angled joints demand a high degree of precision for optimal results. Achieving this precision presents a challenge, requiring a commitment to detail and the proper use of tools, yet it yields significant improvements in the final product’s quality and durability.
2. Blade Sharpness
The quality of a miter joint is inextricably linked to the sharpness of the blade employed in its creation. A dull blade does not sever wood fibers cleanly; instead, it tears and crushes them, resulting in splintering and ragged edges along the cut line. This imprecise cutting action directly compromises the accuracy of the miter angle, as the damaged wood fibers prevent a flush, seamless fit between the joining pieces. Consequently, gaps and imperfections become readily apparent, undermining both the structural integrity and the aesthetic appeal of the finished product. A practical example is the construction of picture frames, where even minor imperfections at the angled corners are highly visible and detract significantly from the overall presentation.
The impact of blade sharpness extends beyond mere aesthetics. A clean, sharp cut minimizes friction and heat buildup during the sawing process. Excessive friction generated by a dull blade can scorch the wood, alter its dimensions slightly due to heat expansion, and even damage the cutting tool itself. Furthermore, the force required to push the wood through a dull blade increases the risk of operator error, such as blade deflection or workpiece slippage, leading to inaccuracies and potential safety hazards. In contrast, a sharp blade glides through the wood with minimal resistance, producing a smooth, precise cut that requires less effort and reduces the likelihood of errors. This efficiency is particularly critical when creating multiple miter joints for larger projects, such as cabinetry or furniture, where consistency and accuracy are paramount.
In conclusion, blade sharpness is not merely a desirable attribute but a fundamental prerequisite for achieving high-quality miter joints. The use of a sharp blade minimizes tear-out, ensures accurate angles, reduces the risk of errors and injury, and ultimately contributes to a structurally sound and visually appealing final product. Maintaining blade sharpness through regular sharpening or replacement is, therefore, an essential practice for any woodworker seeking to produce professional-grade mitered corners.
3. Joint Reinforcement
Miter joints, by their very nature, present a challenge in terms of structural integrity. The angled glue surfaces, while aesthetically pleasing, offer a limited long-grain-to-long-grain bonding area, which is crucial for optimal strength in woodworking joints. Consequently, relying solely on adhesive is often insufficient, particularly in applications subject to stress or weight. Joint reinforcement becomes a critical component to counteract this inherent weakness. Without proper reinforcement, mitered corners are prone to failure, exhibiting gaps, cracks, or complete separation over time or under load. An example is seen in picture frames, where repeated handling can weaken unreinforced joints, leading to the frame’s eventual collapse. The importance of reinforcement lies in its ability to augment the bond created by the adhesive, increasing the joint’s resistance to tensile and shear forces.
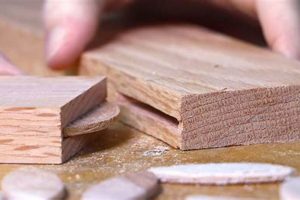
Several methods exist to bolster the strength of miter joints. Mechanical fasteners, such as brad nails or screws driven at opposing angles, provide immediate holding power and resist shear forces. However, they may compromise the aesthetic appeal if not carefully concealed. Dowels, strategically placed across the joint, offer increased gluing surface and enhanced resistance to racking forces, while remaining largely invisible. Splines, thin strips of wood inserted into slots cut into both mitered faces, provide significant reinforcement by creating a larger gluing surface area and interlocking the two pieces. Another technique involves the use of keys, which are decorative and functional wedges inserted into the corner after assembly. The choice of reinforcement method depends on factors such as the wood species, joint size, anticipated load, and desired aesthetic.
In summary, joint reinforcement is indispensable for ensuring the longevity and structural soundness of woodworking miter joints. While the inherent aesthetic advantages of this type of joint are undeniable, its relative weakness necessitates the incorporation of reinforcement techniques to mitigate the risk of failure. Understanding the principles of force distribution and selecting appropriate reinforcement strategies is paramount for achieving durable and visually pleasing results. The challenges associated with reinforcing mitered corners are balanced by the satisfaction of creating robust and elegant joinery that withstands the test of time.
4. Angle Precision
In the context of woodworking, angle precision is paramount to the success of miter joints. The accuracy with which the component pieces are cut directly determines the integrity and aesthetic outcome of the finished corner. Any deviation from the intended angle, even a fraction of a degree, results in noticeable gaps, misalignments, and a weakened joint. This is particularly evident in applications such as picture frames or door frames, where even slight imperfections are highly visible and compromise the overall appearance. The relationship is causal: imprecise angles directly cause flawed and structurally unsound miter joints.
Achieving angle precision necessitates the use of calibrated tools and careful technique. A digital protractor, for instance, provides a more accurate angle measurement than a traditional speed square. The use of a high-quality miter saw with a finely adjustable fence is crucial for ensuring that each cut is made at the intended angle. Furthermore, meticulous attention must be paid to the blade’s alignment and the workpiece’s positioning. Practical applications demonstrating the importance of angle precision include the construction of complex geometric patterns, such as parquet flooring, where even minor angular errors accumulate and distort the overall design. Similarly, in the fabrication of custom furniture, precisely angled miters are essential for creating seamless transitions and maintaining the structural integrity of the piece.
In conclusion, angle precision is an indispensable element in the creation of high-quality miter joints. The challenges associated with achieving such precision highlight the need for specialized tools, refined techniques, and a deep understanding of geometric principles. Mastery of this aspect of woodworking yields substantial benefits in terms of both the aesthetic appeal and the structural performance of the finished product. By recognizing and addressing the critical role of angle precision, woodworkers can elevate the quality of their craft and create lasting, visually stunning pieces.
5. Glue Application
Effective glue application is critical for the structural integrity of woodworking miter joints. Given the end-grain nature of the joint, proper glue distribution and selection directly influence its longevity and resistance to stress.
- Surface Preparation and Glue Adhesion
Clean surfaces are essential for optimal glue adhesion. Dust, oil, or other contaminants impede the bonding process. Sanding the surfaces to create a slightly rough texture increases the available surface area for the glue to grip. A real-world example is observed in furniture construction, where neglecting surface preparation results in premature joint failure. The implication is that proper surface preparation is not merely a preliminary step, but an integral component of successful glue application.
- Even Glue Distribution
Achieving uniform glue coverage across the entire mitered surface is crucial. Insufficient glue results in weak spots, while excessive glue can lead to starved joints if it is squeezed out during clamping. The appropriate amount ensures a continuous bond line. Cabinet making provides a relevant example: inconsistent glue application can lead to warping or separation over time. Therefore, strategic application techniques are required to prevent such failures.
- Glue Selection and Compatibility
Different wood species require different types of glue for optimal bonding. Polyvinyl acetate (PVA) glues are commonly used for general woodworking, but polyurethane glues may be preferred for oily woods or when moisture resistance is needed. A common mistake is using standard PVA on oily exotic hardwoods, resulting in weak joints. The implications are significant: selecting the correct adhesive based on wood properties directly impacts joint strength and durability.
- Clamping Pressure and Open Time
Adequate clamping pressure is necessary to ensure intimate contact between the glued surfaces while the adhesive cures. Insufficient pressure allows gaps to form, while excessive pressure can squeeze out too much glue. Furthermore, adhering to the glue’s open time is critical. Exceeding the open time reduces the glue’s ability to wet the wood fibers. An example is found in frame construction, where inadequate clamping leads to misaligned corners and weak joints. Consequently, precise control over clamping and adherence to specified curing times are essential for strong miter joints.
These elements of glue application, when properly executed, enhance the strength and durability of woodworking miter joints. Understanding and implementing best practices in surface preparation, glue distribution, adhesive selection, and clamping techniques directly contribute to the creation of structurally sound and visually appealing mitered corners.
6. Clamping Pressure
Clamping pressure is a critical determinant of the strength and longevity of woodworking miter joints. Proper application of force during the adhesive curing process ensures intimate contact between the joining surfaces, maximizing the bond strength and minimizing the risk of joint failure. Inadequate or excessive clamping pressure can both lead to compromised joints, emphasizing the need for a balanced approach.
- Optimal Contact and Glue Line Thickness
The primary function of clamping pressure is to bring the two mitered surfaces into intimate contact, squeezing out excess glue and creating a thin, uniform glue line. This thin glue line is significantly stronger than a thick, irregular one, as it minimizes the potential for voids or air pockets that can weaken the bond. An example is the construction of picture frames; insufficient pressure can lead to noticeable gaps at the corners, compromising both the aesthetic and structural integrity of the frame. The consistent and even distribution of pressure across the joint ensures a uniform glue line and maximizes the surface area available for bonding.
- Preventing Joint Movement During Curing
Clamping pressure serves to stabilize the miter joint while the adhesive cures, preventing any movement or shifting that could disrupt the bonding process. Even slight movements can compromise the alignment of the joint and weaken the glue bond, resulting in gaps or misalignments. In cabinet making, for example, maintaining consistent clamping pressure is crucial to prevent warping or twisting of the mitered corners during glue curing. Stabilization of the components ensures the joint remains aligned and secure throughout the curing period.
- Force Distribution and Clamp Placement
The effectiveness of clamping pressure is directly related to the distribution of force across the joint. Clamps should be strategically placed to apply even pressure to all areas of the miter, avoiding localized stress points that could damage the wood or compromise the joint. When assembling a mitered box, for instance, clamps should be positioned at regular intervals around the perimeter to ensure uniform pressure distribution. Proper clamp placement not only ensures even pressure but also prevents distortion or misalignment of the mitered pieces.
- Impact of Over-Clamping
While adequate clamping pressure is essential, excessive force can be detrimental. Over-clamping can squeeze out too much adhesive, resulting in a starved joint with insufficient glue to form a strong bond. Additionally, excessive pressure can deform the wood fibers, particularly in softer wood species, leading to a weakened joint and potential structural failure. During furniture construction, applying excessive clamping pressure to delicate mitered components can lead to splitting or crushing of the wood. Monitoring and controlling clamping pressure is crucial to avoid these adverse effects.
In conclusion, clamping pressure plays a pivotal role in the creation of strong and durable woodworking miter joints. By ensuring optimal contact, preventing movement during curing, distributing force evenly, and avoiding over-clamping, woodworkers can maximize the adhesive bond and create mitered corners that are both aesthetically pleasing and structurally sound. The careful application of clamping pressure, therefore, is an essential element of quality craftsmanship in miter joint construction.
7. Wood Selection
The choice of wood species significantly influences the strength, stability, and aesthetic outcome of woodworking miter joints. The inherent properties of different wood types interact with the joint’s geometry, affecting its long-term performance and visual appeal. Therefore, careful consideration of wood selection is crucial for achieving durable and aesthetically pleasing mitered corners.
- Hardness and Density
Wood hardness and density directly impact the miter joint’s resistance to impact and wear. Hardwoods, such as oak and maple, offer greater strength and durability compared to softwoods like pine or fir. In applications requiring robustness, such as furniture frames or door casings, hardwoods are generally preferred. The denser structure of hardwoods also facilitates a cleaner cut, minimizing splintering and promoting tighter joint lines, thus producing superior miter joints. Softwoods, conversely, may be more susceptible to damage and require additional reinforcement to ensure longevity.
- Grain Pattern and Direction
The grain pattern and direction of the wood play a crucial role in the aesthetic integration of miter joints. Aligning the grain patterns across the joint creates a seamless transition, enhancing the visual appeal and masking the joint line. Conversely, mismatched grain patterns can detract from the overall aesthetic and highlight the joint’s presence. In projects where visual continuity is paramount, such as high-end cabinetry or decorative trim, careful attention to grain matching is essential. Consistent grain direction also contributes to dimensional stability, minimizing the risk of warping or cupping over time.
- Dimensional Stability
Wood’s dimensional stability, or its resistance to changes in size and shape due to moisture fluctuations, is a critical factor in miter joint performance. Wood species with low dimensional stability are more prone to swelling, shrinking, or warping, which can compromise the integrity of the miter joint and lead to gaps or misalignments. Species like mahogany and walnut exhibit greater dimensional stability compared to others like pine and aspen. In environments with fluctuating humidity levels, selecting dimensionally stable wood species is crucial for maintaining the long-term integrity and appearance of mitered corners.
- Glue Adhesion Properties
Different wood species exhibit varying degrees of glue adhesion, which directly impacts the bond strength of miter joints. Some woods, particularly oily or resinous species, may impede glue penetration and weaken the joint. Surface preparation techniques, such as sanding or solvent cleaning, can improve glue adhesion in these cases. Selecting a glue type specifically formulated for the chosen wood species also enhances bond strength. For instance, using a polyurethane adhesive on oily hardwoods can promote better adhesion compared to standard PVA glues. Understanding the adhesive properties of different wood species is essential for achieving reliable and durable miter joints.
These facets of wood selection underscore its fundamental role in achieving successful woodworking miter joints. Careful consideration of wood properties, including hardness, grain, stability, and glue adhesion, enables the creation of mitered corners that are not only visually appealing but also structurally sound and resistant to the effects of time and environmental changes. The implications of these factors, especially in high-stress applications such as heavy furniture pieces, can be significant, thereby further reinforcing that the quality of the corner starts with the selection of the right materials.
Frequently Asked Questions About Woodworking Miter Joints
This section addresses common queries regarding the techniques, challenges, and best practices associated with creating miter joints in woodworking.
Question 1: What is the optimal angle for cutting miter joints?
The standard angle for creating a 90-degree corner using a miter joint is 45 degrees for each piece. However, this angle may vary depending on the desired final angle of the corner. Precise measurement and accurate cutting are critical regardless of the intended angle.
Question 2: What tools are essential for creating accurate miter joints?
A miter saw, either powered or manual, is generally considered essential for achieving accurate cuts. A precise measuring device, such as a digital angle finder, and a reliable clamping system are also highly beneficial. The use of sharp blades is paramount, irrespective of the tool chosen.
Question 3: How can gaps in miter joints be minimized?
Accurate measurement and precise cutting are the primary factors in minimizing gaps. Ensuring the blade is sharp and that the saw is properly calibrated are also important. Filling minor gaps with wood filler or epoxy can provide a cosmetic solution, but addressing the root cause of the inaccuracy is the preferred approach.
Question 4: What methods can be used to reinforce miter joints?
Miter joints can be reinforced using various methods, including mechanical fasteners such as brad nails or screws, splines, dowels, or keys. The selection of a reinforcement method depends on the size of the joint, the species of wood, and the anticipated stress on the joint.
Question 5: What type of glue is best suited for miter joints?
Polyvinyl acetate (PVA) glue is commonly used for miter joints in woodworking. However, for oily woods or applications requiring water resistance, polyurethane glue may be more appropriate. Proper surface preparation is essential for any adhesive to achieve a strong bond.
Question 6: What are the common causes of miter joint failure?
Common causes of miter joint failure include inaccurate cutting angles, insufficient glue application, inadequate clamping pressure, and the use of unsuitable wood species or reinforcement methods. Exposure to moisture or excessive stress can also contribute to premature failure.
In summary, achieving durable and aesthetically pleasing miter joints requires attention to detail in every step of the process, from accurate measurement and cutting to proper glue application and reinforcement.
The following section will delve into advanced techniques for creating intricate and decorative mitered corners.
Woodworking Miter Joints
This exploration has underscored that achieving proficiency in creating woodworking miter joints requires a multifaceted approach. Accuracy in measurement and cutting, blade sharpness, appropriate wood selection, precise glue application, adequate clamping pressure, and strategic reinforcement are all critical elements. Failure to attend to any of these factors can result in joints that are structurally unsound and aesthetically deficient.
The successful execution of woodworking miter joints is not merely a technical skill, but a commitment to precision and quality craftsmanship. Further research and continued practice are encouraged, as a mastery of these techniques provides a foundation for creating enduring and visually appealing woodworking projects. The principles outlined herein are not limited to novice woodworkers; experienced craftspeople will find a reaffirmation of essential practices, emphasizing the necessity of unwavering adherence to fundamental techniques for achieving superior results.


